MANUAL HARD DRIVE PRO EXTERNAL HARD DRIVE / 3.5 " / USB 2.0 / ESATA Win & Mac Rev.
Freecom Hard Drive Pro Dear user! GB Thank you for choosing the Freecom Hard Drive Pro external hard drive. For optimal use and performance we advise you to read this manual carefully before using this product. Freecom Technologies • Germany www.freecom.com Contents of the box Please check the contents of the box.
Table of Contents User manual GB General Information............................................................................................................. page 4 Precautionary measures..................................................................................................... page 5 Freecom Hard Drive Pro external hard drive............................................................... page 6 Chapter 1: Installation of the Freecom Software (PC)......................................
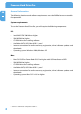
Freecom Hard Drive Pro General Information GB The following hardware and software requirements must be fulfilled to ensure troublefree operation. System requirements To use the Freecom Hard Drive Pro, you will require the following components: PC: • Intel/AMD CPU 700 MHz or higher • 256 MB RAM or higher • CD-ROM drive for installing software • Available eSATA, USB 2.0 or USB 1.
General Information Precautionary measures GB To ensure that your Freecom Hard Drive Pro functions properly, please take note of the following precautions. If these are not followed, you may void your warranty and damage the Freecom Hard Drive Pro. • Safely remove the Freecom Hard Drive Pro via your operating system (the "unplug or eject hardware" option in the Windows taskbar) before disconnecting the USB cable or power cable and before switching off the device. Failing to do so may result in data loss.
Freecom Hard Drive Pro Freecom Hard Drive Pro external hard drive GB For your convenience, the Freecom Hard Drive Pro has been partitioned (1 partition) and pre-formatted (FAT32 file system). The FAT32 format ensures maximum interchangeability of the Freecom Hard Drive Pro between different computers. Should you choose to format the Freecom Hard Drive Pro in another file system (e.g.
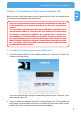
Installation of the Freecom software Chapter 1: Installation of the Freecom software (PC) GB Before you can use the Sync button on your Freecom Hard Drive Pro, you need to install the Freecom Personal Media Suite software first. 1 Note: To use the functions of the Freecom Personal Media Suite described in this handbook, your Freecom Hard Drive Pro has to be connected to your PC. The sync button will only work with certain eSATA host controllers when connected over eSATA.
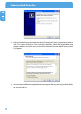
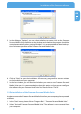
Freecom Hard Drive Pro GB 1 3. Please read the license agreement carefully. To accept the license agreement, confirm with "Yes". Note: Clicking on "No" ends the installation. Select the target folder and program folder in the start menu in which the Freecom Personal Media Suite symbol is to appear. 4. You can select a different target folder for the program files by selecting another folder on your hard drive.
Installation of the Freecom software GB 1 5. In the dialogue "Options" you can select whether to create a link to the Freecom Personal Media Suite Software on the desktop and whether the program should be started automatically when starting Windows. It is recommended to select both options for better operation of the Freecom Personal Media Suite. 6. Click on "Next" to start the installation. All necessary program files are now written on the hard drive of your computer. 7.
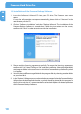
Freecom Hard Drive Pro 1.3 Installation of the Freecom Backup Software GB 1. Insert the Software & Manual CD into your CD drive. The Freecom start menu opens. 1 In case the software does not open automatically, please click on "Start.exe" in the root directory of the CD. 2. Click on "Software Installation" and then "Backup Software". The installation of the Freecom Backup Software is started then. Follow the instructions on the screen, confirm with "Next" in order to continue with the installation. 3.
Installation of the Freecom software GB 1 6. Click on "Next" to start the installation. All necessary program files are now written to the hard disk of your computer. 7. In the last window, you are asked if you want to start Freecom Backup Software now. If you want to create a backup of your data right away, click on "Finish". If you want to start the software later, then remove the check mark at "Start Freecom Backup Software" and then click on "Finish". 1.
Freecom Hard Drive Pro Chapter 2: Hardware Installation GB Before connecting the cables make sure the Freecom Hard Drive Pro is switched off (See Chapter 2.2). 2 1. Connect the interface cable (USB or eSATA) to the Freecom Hard Drive Pro. 2. Connect the cable of the power supply to the Freecom Hard Drive Pro and the power supply itself to the socket. 3. Connect the interface cable to the interface port of your computer. 4.
Hardware Installation For optimal performance, the Freecom Hard drive pro should be connected to an eSATA port. GB 2 2.1 Sync Button The front panel of the Freecom Hard Drive Pro contains the Sync button. Sync Button Power Button 2.2 Power Button To turn on the Freecom Hard Drive Pro, push the power button located on the front panel of the device.
Freecom Hard Drive Pro Chapter 3: Driver installation GB Under Windows 2000 / XP and Mac OS X a separate Freecom driver is not required. The drivers will be installed automatically by the operating system after plugging in the Freecom Hard Drive Pro into the USB/eSATA port of the computer. 3 Chapter 4: Daily use of the Freecom Hard Drive Pro The combination of having an eSATA and USB 2.
The User Interface of the Freecom Personal Media Suite Chapter 5: The User Interface of the Freecom Personal Media Suite (PC) GB 5 2 1 4 3 5 6 1 7 8 Tabs for configuration of the Freecom Personal Media Suite components - Secure & Compress - Freecom SYNC - Autorun 2 Minimizes Freecom Personal Media Suite in the taskbar 3 Input field (also shows the selected folder) 4 User menu 5 Connected Freecom Hard Drive Pro (drive letter + available memory capacity) 6 Link to www.freecom.com.
Freecom Hard Drive Pro Important: We recommend to leave the function "Start program on Windows start" activated under all circumstances in order to be able to use all the functions of the Freecom Personal Media Suite (e.g. "Autorun", "SYNC on Freecom device plug-in")! GB 5 5.2 Autorun The "Autorun" function enables you to open or start documents, files or programs automatically when your Freecom Hard Drive Pro is connected to your PC.
The User Interface of the Freecom Personal Media Suite 5.2.2 Removing files / folders from the Autorun list GB 1. Open the Freecom Personal Media Suite and select the "Autorun" tab. 2. Select the file or the folder to be removed in the Autorun list field. 5 3. Click on "Remove". The corresponding entry is removed from the list. 5.3 Secure&Compress The Secure&Compress function serves to compress and encrypt your documents. Unauthorized access to your personal data is therefore impossible. 5.3.
Freecom Hard Drive Pro 5.3.2 Opening the Secure&Compress folder GB 1. Open the Freecom Personal Media Suite and select the tab "Secure&Compress". 2. Click on "Open folder" in order to open the Secure&Compress folder. 5 3. If the Freecom Personal Media Suite is already open and has started minimised in the taskbar, you can also open the Secure&Compress folder with a right-click on the taskbar symbol of the Freecom Personal Media Suite: 4.
The User Interface of the Freecom Personal Media Suite 5.3.5 Deleting the Secure&Compress folder GB Click on "Delete folder" in order to delete the selected Secure&Compress folder. 5 ATTENTION: All files in the folder are irrevocably deleted! Before the deletion, a security request is carried out whether you really want to delete the folder: 5.3.6 Changing the password 1. Open the Freecom Personal Media Suite and select the tab "Secure&Compress". 2. Click on "Change password".
Freecom Hard Drive Pro Please note: Your changed password applies to all files and folders encrypted from the time of the change. For files and folders which were encrypted before, the password which was used for encryption remains. GB 5 Changes of the password do not apply to files and folders already encrypted! 5.4 Freecom SYNC 5.4.1 What is Freecom SYNC? The Freecom SYNC integrated in the Freecom Personal Media Suite is a program for synchronizing files. The computer serves as origin of the data.
The User Interface of the Freecom Personal Media Suite 5.4.2 Creating a new SYNC folder GB 1. Open the Freecom Personal Media Suite and select the tab "Freecom SYNC". Click on "Select folder" and select a folder on your Freecom Hard Drive Pro. 5 2. Alternatively, you can create a new SYNC folder on your Freecom Hard Drive Pro using the "Select folder" function by clicking on "Create new folder", naming the folder (e.g. "SYNC") and selecting it. 3. Click on "Complete" so that the new folder is created.
Freecom Hard Drive Pro Before the deletion, a security request is carried out whether you really want to delete the folder: GB 5 5.4.7 Synchronisation of files and folders There are three possibilities for the synchronization of your files: 1. Press the SYNC button of your Freecom Hard Drive Pro. Your data is now synchronised. 2. Synchronisation of the data when your Freecom Hard Drive Pro is connected to your computer.
The User Interface of the Freecom Personal Media Suite 3. Starting the synchronization manually GB a) Open the Freecom Personal Media Suite and click on the tab "Freecom SYNC". b) Select a SYNC folder if you have not yet done so. 5 c) Click on "Sync now!" to start the data synchronization. d) Alternatively, right-click on the system tray icon of the Freecom Personal Media Suite and select "Start synchronization" there. 5.4.
Freecom Hard Drive Pro 3. A status window appears. Please select "Update" if you wish to synchronize the file or otherwise select "Cancel". If you choose not to synchronize the file (Cancel) you will be able to synchronize this file during the next synchronization. GB 5 5.4.10 Skip files during synchronization If you want to skip just one file out of many, please click on this file with the right mouse button and select "Skip".
The User Interface of the Freecom Personal Media Suite 5.4.11 Handling deleted files GB Deleting files on either the primary computer or the SYNC folder on the Freecom Hard Drive Pro results in a red X next to the file during the next synchronization. 5 This indicates that the file has been deleted and that its counterpart will be deleted, too. Please select "Update" to proceed. If you wish to keep the file, please click with the right mouse button on the file and select "Don’t Delete".
Freecom Hard Drive Pro 3. Select "Update" and "Split From Original". GB 5 4. Select "Yes".
The User Interface of the Freecom Personal Media Suite 5.4.12 Office use GB The Freecom Hard Drive Pro is ideal for making a local backup, which stores your data independently from your network or local computer. Simply ‘send to’ your important files and directories to the SYNC folder on the Freecom Hard Drive Pro and update your backup from time to time click "Sync now". This is extremely easy and very fast, because the SYNC tool only backups changed files via the fast USB 2.0/eSATA connections.
Freecom Hard Drive Pro 5.4.13 Home use GB At the office, there is always a backup of your important business data. But how about your data at home? All the memories stored in digital photo’s made during your last holiday? Or the first pictures and movies of your children! You do not want to loose those! The Freecom Hard Drive Pro is ideal for making a safety backup, which stores your data independently from your computer.
Using the Freecom Backup Software Chapter 6: Using the Freecom Backup Software (PC) GB The "Freecom Backup Software" serves to back up personal and business data from internal file media (e.g. hard disk) onto external Freecom drives. It makes it possible to back up all data from individual hard disks, as well as data or data types individually specified by the user. This can be carried out as a full backup or in incremental backups (to save time). There are two user interfaces available: 6 1.
Freecom Hard Drive Pro 6.1.1 Selection of the files to back up GB 6 For selecting the files to be backed up, there are three different options available: 1. My documents and settings contains the "My Documents" folder, Internet Favourites, as well as the desktop of the logged-in user. 2. All documents and settings on this computer backs up the files of all users on your computer. 3. Let me choose what to back up gives you the possibility to carry out a user-specified backup.
Using the Freecom Backup Software 6.1.2 Predefined backup GB Select either My documents and Settings or All documents and settings on this computer and then click on "Next". A list of available Freecom drives is displayed then: 6 Select the drive to which you want to back up your data. You can open the advanced backup options by clicking on the Options button. 6.1.
Freecom Hard Drive Pro GB The modes Full backup (complete data backup) and Incremental backup (appending data backup) are available. 6 1. Full backup means that at every backup a new directory is created with all data to be backed up. 2. Incremental backup means that an already existing backup set is opened and only that data is backed up that has been created or modified since the last backup. An incremental backup is significantly faster than a full backup, because not all data needs to be backed up.
Using the Freecom Backup Software 6.1.5 Summary of the settings made GB A summary of the settings you made is displayed then. Click on "Back" to make changes or click on "Complete" to accept the settings and to start the backup. 6 6.1.6 Backup While the backup is in progress a window is displayed showing the status of the backup. A bar indicates the progress of the backup. Furthermore the number of backed up files and the total size of the backup is listed after the completion of the backup.
Freecom Hard Drive Pro 6.1.7 User-defined backup GB Select “Let me choose what to backup” if you would rather determine yourself which files should be backed up. 6 6.1.8 Select drives This window lists the drives from which a backup can be made. By clicking on "Add" you can select further folders. With "Remove" you can take folders/drives from the list. All the drives or folders that have a check mark are included in the backup.
Using the Freecom Backup Software GB 6 6.1.9 File types to back up In the following window you can select which types of files should be backed up. This prevents unwanted files (such as temporary files) from being backed up. A list of the most common files types is presented. Click the "Add" button to add a further file types. Click on "Next" to continue.
Freecom Hard Drive Pro 6.1.10 Add extensions GB When you click on "Add" a list of all known file types is displayed. Select the file types you need. In case the file name extension you are looking for is not on the list, then you can define it yourself. For this go to the end of the list and select "Click here to add your own extension". 6 6.1.11 Folders that should not be backed up In the following window you can exclude folders from being backed up.
Using the Freecom Backup Software 6.1.12 Summary of the settings made GB The settings you have made are now listed for review. Click on "Back" if you want to make changes or click on "Complete" to start the backup. 6 6.1.13 Backup While the backup is in progress a window is displayed showing the status of the backup. A bar indicates the progress of the backup. Furthermore the number of backed up files and the total size of the backup is listed after the completion of the backup.
Freecom Hard Drive Pro 6.2 Advanced Mode GB 6.2.1 Select source 6 In Source the source drives or folders can be specified from which a backup should be made. 6.2.2 File types to back up (extensions) File types can be selected in the Files window that should be included in the backup.
Using the Freecom Backup Software 6.2.3 Selecting the target drive GB In this window you can select the target drive for the backup. 6 6.2.4 Select backup mode In the Destination window under Options the modes Full backup (complete data backup) and Incremental backup (appending data backup) are available. 1. Full backup means that at every backup a new directory is created with all data to be backed up. 2.
Freecom Hard Drive Pro 6.2.5 Options GB Under Options in the main window the splash screen can be activated or deactivated that appears when the software is started. 6 Furthermore folders can be selected that should not be included in the backup. Click on "Backup Now" to start the backup. 6.2.6 Backup While the backup is in progress a window is displayed showing the status of the backup. A bar indicates the progress of the backup.
Partitioning your Freecom Hard Drive Pro Chapter 7: Partitioning your Freecom Hard Drive Pro GB 7.1 General information 7 Your Freecom Hard Drive Pro was partitioned and formatted to provide you with the maximum available capacity and compatibility. FAT32 was chosen as file system to assure that you will be able to read your files on any PC. It is recommended not to change the current configuration of your Freecom Hard Drive Pro. For some users another file system might fit better for their needs.
Freecom Hard Drive Pro Example for different partitions with different file systems on one Freecom Hard Drive Pro GB 7 Total size of Freecom Hard Drive Pro File system 500 GB NTFS FAT32 200 GB 300 GB Note: Writing to hard disks with NTFS formatting is only possible under Windows 2000/XP. The example above is a good solution for Windows 2000/XP users who sometimes exchange data with Windows 98SE/ME PCs. For storing data under Windows 2000/XP both partitions can be used.
Partitioning your Freecom Hard Drive Pro GB 7 5. Click with the right mouse button on the "unallocated" area and select the option "New Partition" (Windows 2000: "Create Partition Wizard"). The "New Partition Wizard" opens. Click on "Next".
Freecom Hard Drive Pro 6. Select "Primary partition" and click on "Next". GB 7 7. Now you can adjust the size of your partition. Click on "Next" if only one partition is to be created. See next chapter (Creating two or more partitions on the Freecom Hard Drive Pro under Windows XP/2000) how to create more than one partition. 8. Assign a drive letter to your hard disk. Normally you can use the default options. Click on "Next".
Partitioning your Freecom Hard Drive Pro 9. Select the formatting option. Choose either "FAT32" or "NTFS", the "Allocation Unit Size" should remain on "Default". Finally select "Perform Quick Format" and click on "Next". GB 7 10. Click on "Finish" to complete the partitioning of your Freecom Hard Drive Pro. Your Freecom Hard Drive Pro will be formatted now and is ready-to-use afterwards.
Freecom Hard Drive Pro 7.3.3 Creating two or more partitions on the Freecom Hard Drive Pro under Windows XP / 2000 GB 1. Repeat the steps from the previous chapter (Creating a partition on the Freecom Hard Drive Pro under Windows XP/2000) for creating the first partition. 7 2. Click with the right mouse button on the "My Computer" icon on your desktop. 3. Select the option "Manage". 4. Select the option "Storage" -> "Disk Management". 5.
Partitioning your Freecom Hard Drive Pro 8. Click on "Finish" to create the "Extended partition". The unallocated space now changed to "Free space".
Freecom Hard Drive Pro 9. Right-click on "Free Space" and select "New Logical Drive" (Windows 2000: "Create Logical Drive"). The "New Partition Wizard" (Windows 2000: "Create Partition Wizard") opens. Click on "Next". GB 7 10. "Logical drive" is already selected. Click on "Next". 11. Specify the partition size and click on "Next". 12. Assign a drive letter and click on "Next". 13. Select the formatting option. Choose either "FAT32" or "NTFS", the "Allocation Unit Size" should remain on "Default".
Partitioning your Freecom Hard Drive Pro 7.4 Partitioning your Freecom Hard Drive Pro under Mac OS X GB 1. Open the “Disk Utility”. This can be found in “Applications” —> “Utilities”. 2. Click on the tab “Partition”. 7 Here you can setup the partition settings and partition the drive according to your settings.
Freecom Hard Drive Pro Chapter 8: Troubleshooting GB Issue 8 Solution After I connected the Freecom Hard Drive • Pro to my computer for the first time no Freecom SYNC folder has been created automatically. • Install the Freecom Personal Media Suite software and safely remove and reconnect the Freecom Hard Drive Pro Follow the instructions on chapter 5.4.2 Creating a new SYNC folder. After installation of Freecom Personal • Media Suite, the message "No Freecom Hard Drive Pro external hard drive found.
WARRANTY (valid in Europe/Turkey only) We thank you for purchasing this Freecom product and hope you will enjoy using it. In order to avoid unnecessary inconvenience on your part, we suggest reading the quick install guide, instruction manual and any additional electronic and or printed manuals. When problems occur we have a database with Frequently Asked Questions (FAQ) on our Freecom website (www.freecom.com), please check this site before you contact the helpdesk.