USB 2.0 / USB 2.0 & FireWire version Rev.
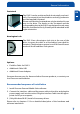
Freecom FHD-3 Dear user! GB Thank you for choosing the Freecom FHD-3 external hard drive. For optimal use and performance we advise you to read this manual carefully before using this product. Freecom Technologies Germany www.freecom.
Table of Contents User manual GB General Information ........................................................................... page 4 Precautionary measures ..................................................................... page 5 Freecom FHD-3 external hard drive ................................................... page 6 Chapter 1: Installation of the Freecom Personal Media Suite software ..............................................................................................
Freecom FHD-3 General Information GB The following hardware and software requirements must be fulfilled to ensure trouble-free operation. Hardware Requirements In order to use the Freecom FHD-3, following components are needed: Intel Pentium II 233MHz or higher 64MB RAM or higher CD-ROM drive for installing drivers and/or software USB-2 version: Available USB 2.0 or USB 1.1 port* USB-2 & FireWire version: Available USB 2.0 or USB 1.
General Information Precautionary measures GB To ensure that your Freecom FHD-3 functions properly, please take note of the following precautions. If these are not followed, you may void your warranty and damage the FHD-3. Safely remove the FHD-3 via your operating system (the "unplug or eject hardware" option in the Windows taskbar) before disconnecting the Cable or the power cable. Failing to do so may result in data loss.
Freecom FHD-3 Freecom FHD-3 external hard drive GB If you are looking for maximum performance, maximum storage capacity and maximum reliability from an external hard drive, the Freecom FHD-3 is the right choice. The hi-speed data transfer through the USB 2.0 and/or FireWire interface makes it ideally suitable for data-storage, file sharing, backup, archiving, digital video editing, audio playback and all applications that need fast file access.
General Information Footstand GB The FHD-3 can be positioned both horizontally and vertically. If you want to position the drive vertically you have to use the supplied footstand. Please note that the footstand can only be attached in one way to the drive. The hooks on the footstand and the corresponding slots in the FHD-3 are designed in such a way that the footstand will only fit easlily when attached in the right orientation.
Freecom FHD-3 Chapter 1: Installation of the Freecom Personal Media Suite software GB 1 If you want to use the SYNC button on the FHD-3, you need to install the Freecom Personal Media Suite software first. Note: To use the functions of the Freecom Personal Media Suite described in this handbook, your Freecom FHD-3 has to be connected to your PC. 1.1 Installation of the Freecom Personal Media Suite 1. Insert the FHD-3 Software & Manual CD into your CD drive.
Installation of the Freecom Personal Media Suite software GB 1 3. Please read the licencing agreement carefully. To accept the licencing agreement, confirm with "Yes". Note: Clicking on "No" ends the installation. Select the target folder and program folder in the start menu in which the Freecom Personal Media Suite symbol is to appear. 4. Default target folder is C:\Programs\Freecom Personal Media Suite.
Freecom FHD-3 GB 1 5. In the dialogue "Options" you can select whether to create a link to the Freecom Personal Media Suite Software on the desktop and whether the program should be started automatically when starting Windows. It is recommended to select both options for better operation of the Freecom Personal Media Suite. 6. Click on "Next" to start the installation. All necessary program files are now written on the hard drive of your computer. 10 7.
Installation of the Freecom Personal Media Suite software 1.2 Deinstallation of the Freecom Personal Media Suite GB In order to remove the Freecom Personal Media Suite from your computer, please proceed as follows: 1 1. In the "Start" menu, please click on "Programs" - "Freecom Personal Media Suite". 2. Select "Uninstall Freecom Personal Media Suite". The software is now removed from your computer.
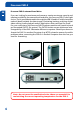
Freecom FHD-3 Chapter 2: Hardware Installation GB 1. Connect the interface cable to the Freecom FHD-3. 2 2. Connect the cable of the power supply to the FHD-3 and the power supply itself to the socket. 3. Connect the interface cable to the interface port of your computer.
Hardware Installation USB 2.0 version GB USB Port 2 AC adapter Remark (if your drive is connected to the computer via USB): Since USB 2.0 is backwards compatible with USB 1.1, the FHD-3 can be connected to all USB ports. When connected to a USB 1.1 port, however, the performance (data transfer rate) of the FHD-3 will be much lower than when the drive is connected to a USB 2.0 port. Connect the FHD-3 to the computer only on the USB or FireWire interface. USB 2.
Freecom FHD-3 Recommended after Hardware installation GB (only Windows 98:) After you connected the FHD-3, please start with the driver installation, as in chapter 3 described. 2 (Windows ME / 2000 / XP:) Under Windows ME / 2000 / XP a separate Freecom driver is not required. The drivers for Windows ME, Windows 2000 and Windows XP will be installed automatically by the operating system after plugging in the Freecom FHD-3 into the USB port of the computer.
Driver installation Chapter 3: Driver installation GB Under Windows ME / 2000 / XP a separate Freecom driver is not required. The drivers for Windows ME, Windows 2000 and Windows XP will be installed automatically by the operating system after plugging in the Freecom FHD-3 into the USB port of the computer. 3 3.1 FHD-3 USB 2.0 version Driver installation USB under Windows 98 SE Note: Your Freecom FHD-3 is fully backwards compatible with USB 1.1. The installation for USB 1.
Freecom FHD-3 4. In the next window select "Search for the best driver for your device. (Recommended)". Click on "Next". GB 3 5. Make sure that the checkbox "CD-ROM drive" is activated in the next window. Continue by clicking on "Next".
Driver Installation 6. The Hardware Wizard finds a "Freecom Freecom FHD-3". GB 3 By clicking on "Next" the necessary files will be installed. Afterwards click on "Finish" to complete the installation. Congratulations! Youve just finished to install the Freecom FHD-3 and the external hard drive is almost ready to use.
Freecom FHD-3 3.2 FHD-3 USB 2.0 & FireWire version GB Driver installation USB under Windows 98 SE 3 Connect the FHD-3 to the computer only on the USB or FireWire interface. Note: Your Freecom FHD-3 is fully backwards compatible with USB 1.1. The installation for USB 1.1 is the same as described below for USB 2.0. 1. Insert the Freecom Manual and driver CD into the CD-ROM drive. 2. Connect your Freecom FHD-3 to the USB connector of your notebook or computer. 3.
Driver Installation 4. In the next window select "Search for the best driver for your device. (Recommended)". Click on "Next". GB 3 5. Make sure that the checkbox "CD-ROM drive" is activated in the next window. Continue by clicking on "Next".
Freecom FHD-3 6. The Hardware Wizard finds a "Freecom Freecom FHD-3". GB 3 By clicking on "Next" the necessary files will be installed. Afterwards click on "Finish" to complete the installation. Congratulations! Youve just finished to install the Freecom FHD-3 and the external hard drive is almost ready to use.
Driver Installation 6. The next window shows the driver file found on the CD-ROM. Confirm with "Next". GB 7. Click on "Finish" in the next window. 8. In order for the changes to take effect, you must restart your computer. 3 Note: You can plug the drive in and unplug it at the FireWire port while the PC is running. The drive will be recognized automatically under "My Computer" when it is reconnected ("hot plug & play").
Freecom FHD-3 Chapter 4: Daily use of the FHD-3 with Freecom Personal Media Suite software GB 4 4.1 Creating a SYNC folder After the installation of the FHD-3 is finished, the Freecom SYNC folder will be created automatically when Freecom Personal Media Suite was installed before. If not, please refer to chapter 4.3 (Creating a new SYNC folder). 4.
Daily use of the FHD-3 with Freecom Personal Media Suite software Status of LEDs GB 3 LED button LED ring LED ring on: FHD-3 on LED ring flickers: Access to the FHD-3 LED button on/ SYNC button pressed/ LED ring flickers: Data transfer / Synchronisation 23
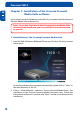
Freecom FHD-3 Chapter 5: The User Interface of the Freecom Personal Media Suite GB 5 1 2 4 3 5 6 7 8 1 Tabs for configuration of the Freecom Personal Media Suite components - Secure & Compress - Freecom SYNC - Autorun 2 Minimises Freecom Personal Media Suite in the taskbar 3 Input field (also shows the selected folder) 4 User menu 5 Connected FHD-3 (drive letter + available memory capacity) 6 Link to www.freecom.com. Click on this to access the Freecom homepage.
The User Interface of the Freecom Personal Media Suite 1. "Show splash screen": Deactivate this function to prevent the display of the start screen when starting the program. GB 2. "Start program on Windows start": Starts the Freecom Personal Media Suite in the background with every Windows start. You will know this by the icon of the Freecom Personal Media Suite in the system tray.
Freecom FHD-3 5.2.2 Removing files / folders from the Autorun list GB 1. Open the Freecom Personal Media Suite and select the "Autorun" tab. 2. Select the file or the folder to be removed in the Autorun list field. 5 3. Click on "Remove". The corresponding entry is removed from the list. 5.3 Secure&Compress The Secure&Compress function serves to compress and encrypt your documents. Unauthorised access to your personal data is therefore impossible. 5.3.1 Add / Select Folders 1.
The User Interface of the Freecom Personal Media Suite 5.3.2 Opening the Secure&Compress folder GB 1. Open the Freecom Personal Media Suite and select the tab "Secure&Compress". 5 2. Click on "Open folder" in order to open the Secure&Compress folder. 3. If the Freecom Personal Media Suite is already open and has started minimised in the taskbar, you can also open the Secure&Compress folder with a right-click on the taskbar symbol of the Freecom Personal Media Suite: 4.
Freecom FHD-3 5.3.5 Deleting the Secure&Compress folder GB Click on "Delete folder" in order to delete the selected Secure&Compress folder. 5 ATTENTION: All files in the folder are irrevocably deleted! Before the deletion, a security request is carried out whether you really want to delete the folder: 5.3.6 Changing the password 1. Open the Freecom Personal Media Suite and select the tab "Secure&Compress". 2. Click on "Change password". The following window opens: 3.
The User Interface of the Freecom Personal Media Suite Please note: Your changed password applies to all files and folders encrypted from the time of the change. For files and folders which were encrypted before, the password which was used for encryption remains. GB 5 Changes of the password do not apply to files and folders already encrypted! 5.4 Freecom SYNC 5.4.1 What is Freecom SYNC? The Freedom SYNC integrated in the Freecom Personal Media Suite is a program for synchronising files.
Freecom FHD-3 GB 5 5.4.2 Creating a new SYNC folder 1. Open the Freecom Personal Media Suite and select the tab "Freedom SYNC". Click on "Change" and select a folder on your FHD-3. 2. Alternatively, you can create a new SYNC folder on your FHD-3 using the "Change folder" function by clicking on "Create new folder", naming the folder (e.g. "SYNC") and selecting it. 3. Click on "Complete" so that the new folder is created. Then opens the Freecom SYNC folder. 5.4.3 Opening the SYNC folder 1.
The User Interface of the Freecom Personal Media Suite 5.4.5 Synchronisation of files and folders GB There are three possibilities for the synchronisation of your files: 5 1. Press the SYNC button of your FHD-3. Your data is now synchronised. 2. Synchronisation of the data when your FHD-3 is connected to your computer. For this, please proceed as follows: a) Open the Freecom Personal Media Suite and click on the tab "Freedom SYNC". b) Select a SYNC folder if you have not yet done so.
Freecom FHD-3 5.4.6 Changing the SYNC folder GB a) Open the Freecom Personal Media Suite and click on the tab "Freedom SYNC". 5 b) Click on "Change folder" to select a new folder for data synchronisation. c) Important: The selected folder may not contain any files or folders! 5.4.7 Deleting the SYNC folder a) Open the Freecom Personal Media Suite and click on the tab "Freedom SYNC". b) Click on "Delete folder" in order to delete the active SYNC folder.
The User Interface of the Freecom Personal Media Suite Synchronization of new or changed files GB This example shows how you can synchronize files which were changed or created on the FHD-3, with the original files on the primary computer. 5 1. Connect the FHD-3 with the primary computer. 2. Press the SYNC button or open the context menu on the SYNC icon in the taskbar and click on "Start synchronization". 3. A status window appears and the SYNC LED on the FHD-3 starts blinking.
Freecom FHD-3 5.5 Skip files during synchronization GB If you want to skip just one file out of many, please click on this file with the right mouse button and select "Skip". The green arrow next to the selected file changes to a blue one, indicating that this file will not be synchronized. You will be able to synchronize this file during the next synchronization. 5 5.5.
The User Interface of the Freecom Personal Media Suite If you wish to keep the file, please click with the right mouse button on the file and select "Dont Delete". The file will not be deleted and will be disregarded during the next synchronization. GB If you want to delete a file on either the primary computer or in the SYNC folder and do not want to affect its counterpart, it is necessary to "Split From Original" the files. Please follow the instructions: 5 1.
Freecom FHD-3 GB 5 5.5.2 What do I need the SYNC-button for? The FHD-3 comes with a special feature, which is unique for this kind of product: SYNC. SYNC is a combination of hard and software that allows you safe and easy access, transportation and synchronisation of all your data. And you can enjoy all this by just pressing one single button! To help you start exploring the various ways you can utilize SYNC to make your life easier, we are showing how we think you could use SYNC. 5.5.
Daily use of the FHD-3 with Freecom SYNC software This is what you have to do: GB Follow the instruction in the manual to install the FHD-3 and the SYNC-folder. Mark the files and folders you want to copy to the SYNC-folder. Click with the right mouse button on the files and folders and select 'Send to SYNC folder...' 5 Done. Now all your valuable data has been copied to the FHD-3.
Freecom FHD-3 This is what you have to do: GB Follow the instruction in the manual to install the FHD-3 and the SYNC-folder. Mark the files and folders you want to copy to the SYNC-folder. Click with the right mouse button on the files and folders, which contain the pictures or videos you want to be in a safe place and select 'Send to SYNC folder...' 5 Done. Now all your valuable data has been copied to the FHD-3.
Partitioning your FHD-3 Chapter 6: Partitioning your FHD-3 GB 6.1 General information 6 Your FHD-3 was partitioned and formatted to provide you with the maximum available capacity and compatibility. FAT32 was chosen as file system to assure that you will be able to read your files on any PC. It is recommended not to change the current configuration of your FHD-3. For some users another file system might fit better for their needs.
Freecom FHD-3 Example for different partitions with different file systems on one FHD-3 GB Total size of FHD-3 6 120 GB File system NTFS FAT32 90GB 30 GB The example above is a good solution for Windows 2000/XP users who sometimes exchange data with Windows 98SE/ME PCs. For storing the data under Windows 2000/XP both partitions can be used. As the NTFS file system is not recognized by Windows 98SE/ME data to be used on these operating systems must be stored on the FAT32 partition.
Partitioning your FHD-3 6.3.1 Deleting a partition on the FHD-3 under Windows 98SE / ME GB The following steps will explain how to delete a partition on your FHD-3. 1. Click on the "Start" button. 6 2. Select "Run". 3. Enter "fdisk" and confirm with "OK". 4. fdisk will be started. Answer the question "Do you wish to enable large disk support?" by pressing the 'Return' key. FAT32 is now activated. 5. Choose Option 5 "(Change current fixed disk drive)" by pressing '5' and 'Return'. 6.
Freecom FHD-3 6.3.2 Creating a partition on the FHD-3 under Windows 98 SE / ME GB The following steps will guide you the process of creating partitions on your FHD-3 under Windows 98SE/ME. After this procedure your Freecom FHD-3 will be ready for use and it will be allocated a drive letter. 6 1. Click on the "Start" button. 2. Select "Run". 3. Enter "fdisk" and confirm with "OK". 4. Answer the question "Do you wish to enable large disk support?" by pressing the 'Return' key. FAT32 is now activated. 5.
Partitioning your FHD-3 GB 6 Note: Partition size of large hard disks will not be displayed correctly! However partitioning results will be OK. 7. Select Option 1 "(Create DOS partition or Logical DOS drive)" by pressing '1' and confirm with 'Return'. 8. Select Option 1 "(Create primary DOS partition)" by pressing '1' and confirm with 'Return'. Wait until drive integrity is completely checked. 9.
Freecom FHD-3 12. Stop your hard disk by using the hot unplug icon in the lower right corner of your screen and remove the USB cable from your hard disk. Afterwards connect your hard disk again with your computer. The hard disk will now be recognized by Windows. GB 6 As Windows tries to access your hard disk an error message will appear. This happens, because your hard disk is not yet formatted. 6.3.3 Creating two or more partitions on the FHD-3 under Windows 98SE / ME 1.
Partitioning your FHD-3 6.3.4 Formatting partitions on the FHD-3 under Windows 98SE / ME GB 1. Double-click on the "My Computer" icon on your desktop. 2. Click with the right mouse button on the drive symbol of your FHD-3. Now a menu will appear where you can choose the option "Format". 6 3. Please perform a complete formatting of your drive. You can also assign a name to your drive here. 4. After you have completed your selection, click on "Start".
Freecom FHD-3 6.4 Partitioning your FHD-3 under Windows XP / 2000 GB 6.4.1 Deleting a partition on the FHD-3 under Windows XP / 2000 6 1. Click with the right mouse button on the "My Computer" icon on your desktop. 2. Select the option "Manage". 3. Select the option "Storage" -> "Disk Management". 4. Choose your external hard drive and right-click on the partition. 5. Select "Delete Partition" and confirm by clicking on "Yes". The partition will be deleted now. 6.4.
Partitioning your FHD-3 5. Click with the right mouse button on the "unallocated" area and select the option "New Partition" (Windows 2000: "Create Partition Wizard"). The "New Partition Wizard" opens. Click on "Next". GB 6 6. Select "Primary partition" and click on "Next". 7. Now you can adjust the size of your partition. Click on "Next" if only one partition is to be created. See next chapter (Creating two or more partitions on the FHD-3 under Windows XP/2000) how to create more than one partition.
Freecom FHD-3 GB 6 8. Assign a drive letter to your hard disk. Normally you can use the default options. Click on "Next". 9. Select the formatting option. Choose either "FAT32" or "NTFS", the "Allocation Unit Size" should remain on "Default". Finally select "Perform Quick Format" and click on "Next". 10. Click on "Finish" to complete the partitioning of your FHD-3. Your FHD-3 will be formatted now and is ready-to-use afterwards.
Partitioning your FHD-3 GB 6 6.4.3 Creating two or more partitions on the FHD-3 under Windows XP / 2000 1. Repeat the steps from the previous chapter (Creating a partition on the FHD3 under Windows XP/2000) for creating the first partition. 2. Click with the right mouse button on the "My Computer" icon on your desktop. 3. Select the option "Manage". 4. Select the option "Storage" -> "Disk Management". 5.
Freecom FHD-3 7. Now you can adjust the size of your partition. Enter the size and click on "Next". GB 6 8. Click on "Finish" to create the "Extended partition". The unallocated space now changed to "Free space".
Partitioning your FHD-3 GB 6 9. Right-click on "Free Space" and select "New Logical Drive" (Windows 2000: "Create Logical Drive"). The "New Partition Wizard" (Windows 2000: "Create Partition Wizard") opens. Click on "Next".
Freecom FHD-3 10. "Logical drive" is already selected. Click on "Next". GB 11. Specify the partition size and click on "Next". 12. Assign a drive letter and click on "Next". 6 13. Select the formatting option. Choose either "FAT32" or "NTFS", the "Allocation Unit Size" should remain on "Default". Finally select "Perform Quick Format" and click on "Next". 14. Click on "Finish" to complete partitioning. Your partition will be formatted now and is ready-to-use.
Troubleshooting Chapter 7: Troubleshooting GB Solution Issue After I connected the FHD-3 to my computer for the first time no Freecom SYNC folder has been created automatically. Install the Freecom Freecom Personal Media Suite software and safely remove and reconnect the FHD-3 After installation of Freecom Freecom Personal Media Suite, the message "No Freecom FHD-3 external hard drive found." appears. Connect the Freecom FHD-3 to your computer.
WARRANTY (valid in Europe/Turkey only): We thank you for purchasing this Freecom product and hope you will enjoy using it. In order to avoid unnecessary inconvenience on your part, we suggest reading the quick install guide, instruction manual and any additional electronic and or printed manuals. When problems occur we have a database with Frequently Asked Questions (FAQ) on our Freecom website (www.freecom.com), please check this site before you contact the helpdesk.