FREECOM FSG-3 STORAGE GATEWAY Rev.
Freecom FSG-3 Storage Gateway Congratulations GB Congratulations on your purchase of the Freecom™ Storage Gateway (FSG-3). The FSG-3 provides central network storage or Network Attached Storage (NAS) and a secure connection for multiple personal computers (PCs) to the Internet through an external modem. If you are unfamiliar with networking and routing basics, refer to Appendix B, "Networks and Routing Basics", to become more familiar with the terminology and procedures used in this manual.
Table of Contents User manual GB General Information .......................................................................................... page 4 Precautionary measures ..................................................................................... page 5 Chapter 1: Getting to know your FSG-3 .............................................................................. page 8 Chapter 2: Before you begin ....................................................................................
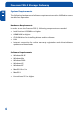
Freecom FSG-3 Storage Gateway General Information GB Contents of the box Please check the contents of the box; the following items should be included: • Freecom FSG-3 drive • Power adapter • Network cable (UTP) • Footstand • Wall mount • CD-ROM with manual, driver and application software • Quick Install Guide • Warranty card + envelope • Safety manual Technical Support For help with any technical issues, visit us on the Web at www.freecom.com or at www.openfsg.
General Information Related Publications GB There is a lot of information available on the internet that can help you achieve what you want. In this document, you may be directed to various RFC documents for further information. An RFC is a Request For Comment (RFC) published by the Internet Engineering Task Force (IETF), an open organization that defines the architecture and operation of the Internet. The RFC documents outline and define the standard protocols and procedures for the Internet.
Freecom FSG-3 Storage Gateway System Requirements GB The following hardware and software requirements must be fulfilled to ensure trouble-free operation.
Precautionary measures Precautionary measures GB To ensure that your Freecom FSG-3 functions properly, please take note of the following precautions. If these are not followed, you may void your warranty and damage the FSG-3. • Do not drop the Freecom FSG-3 or expose it to other kinds of sudden mechanical shocks as this may result in data loss and damage to the hard drive. • Do not use the Freecom FSG-3 when the ambient temperature is below 10°C or above 45°C.
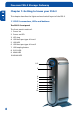
Freecom FSG-3 Storage Gateway Chapter 1: Getting to know your FSG-3 GB This chapter describes the lights and mechanical layout of the FSG-3. 1 1.1 FSG-3 connectors, LEDs and buttons The FSG-3 Front panel The front panel consists of: 1. Power on 2. Power on LED 3. LED ring 4. USB host port type A front 1 5. USB LED 6. USB host port type A front 2 7. USB unplug button 8. SATA LED 9. WAN LED 10. WLAN LED 1./2. 3. 4. 5. 6. 7. 8. 9. 10.
Getting to know your FSG-3 The FSG-3 Back panel GB The back panel consists of: 1. WLAN antenna connector 1 2. Fan inlet 3. 12 V DC power jack 4. eSATA connector 5. Hardware reset button 6. WAN port 7. LAN ports 1, 2 and 3 8. USB host port type A back 1 9. USB host port type A back 2 10. Kensington lock 1. 4. 2. 3. 5. 8. 6. 7. 9. 10. 1.
Freecom FSG-3 Storage Gateway 1.3 LED configuration GB Booting 1 Redboot: Power LED on Linux boot: Power LED blinking Linux finished booting: Power LED OFF / EL Ring ON 1.
Getting to know your FSG-3 WLAN LED (For WLAN versions) GB Steady blue: Link is active OFF: Inactive 1 1.
Freecom FSG-3 Storage Gateway Chapter 2: Before you begin GB This chapter describes how to prepare your computer network to connect to the FSG-3 and to the internet. 2 2.1 Preparing Your Computers to connect to the FSG-3 To connect to the FSG-3, each computer on your network must have TCP/IP (Transmission Control Protocol/Internet Protocol) installed and selected as its networking protocol.
Before you begin You must have an Ethernet adapter (NIC), the TCP/IP protocol and the Client for Microsoft Networks installed. You do not have to remove any other network components shown in the Network components window. GB 2 To install an Ethernet adapter (NIC): a. Click the Add button. b. Select Adapter, and then click Add. c. Select the manufacturer and model of your Ethernet adapter, and then click OK. To install TCP/IP: a. Click the Add button. b. Select Protocol, and then click Add. c.
Freecom FSG-3 Storage Gateway 6. If any gateways are shown, remove them. GB 7. Click OK. 8. Restart the PC. 2 Repeat steps 2 through 8 for each computer on your network. 2.2.3 Selecting Internet Access Method 1. On the Windows taskbar, click the Start button, point to Settings, and then click Control Panel. 2. Double-click the Internet Options icon. 3. Select "I want to set up my Internet connection manually" or "I want to connect through a Local Area Network" and click Next. 4.
Before you begin 2.3.1 Installing or Verifying Windows Networking Components GB You must have an Ethernet adapter (NIC), the TCP/IP protocol and the Client for Microsoft Networks installed. You do not have to remove any other network components shown in the Network components window. 2 If you need to install the adapter, please look at the instruction supplied with your adapter how to install the device. To install or verify the other components: 1.
Freecom FSG-3 Storage Gateway 2.4 MacOS 8.6 or 9.x GB Beginning with Macintosh Operating System 7, TCP/IP is already installed on the Macintosh. On each networked Macintosh, you will need to configure TCP/IP to use DHCP. 2 1. From the Apple menu, select Control Panels, then TCP/IP. The TCP/IP Control Panel opens: 2. From the "Connect via" box, select your Macintosh’s Ethernet interface. 3. From the "Configure" box, select Using DHCP Server. You can leave the DHCP Client ID box empty. 4.
Before you begin 2.5.1 Verifying TCP/IP Properties (Macintosh) GB After your Macintosh is configured and has rebooted, you can check the TCP/IP configuration by returning to the TCP/IP Control Panel. From the Apple menu, select Control Panels, then TCP/IP. 2 The panel is updated to show your settings, which should match the values below if you are using the default TCP/IP settings that FREECOM recommends: • The IP Address is between 192.168.1.2 and 192.168.1.254 • The Subnet mask is 255.255.255.
Freecom FSG-3 Storage Gateway 2.7 Internet configuration information GB For a single-user Internet account, your ISP supplies TCP/IP configuration information (such as IP address, subnet mask and default gateway) and VPI and VCI multiplexing information. Your ISP may also provide other login information, such as User Name and Password, in the case where the PPPoE or PPPoA protocol is required.
Before you begin If any of these items are dynamically supplied by the ISP, your gateway automatically acquires them. If an ISP technician configured your computer during the installation of the broadband modem, or if you configured it using instructions provided by your ISP, you need to copy configuration information from your computer’s Network TCP/IP Properties window (or Macintosh TCP/IP Control Panel) before reconfiguring your computer for use with the FSG-3. These procedures are described next.
Freecom FSG-3 Storage Gateway 2.7.4 Obtaining ISP Configuration Information (Macintosh) GB If you were using your computer directly attached to your modem to access the internet, you may need to collect configuration information from your computer so that you can use this information when you configure the FSG-3. If your ISP provided this information to you on paper or provides the configuration data dynamically, you do not require this information.
How to Install Chapter 3: How to Install GB 3.1 Hardware Installation 3 Setup of the FSG-3 is performed using the following steps: 1. Plug the FSG’s power cord into a power outlet. 2. Switch on DHCP on the PC, a DHCP server is automatically on on the FSG-3 3. Connect the included Ethernet Cable into the Ethernet port on the rear of FSG-3 into one of the LAN ports (1,2 or 3). 4. Connect the other end of the cable directly to the PC. 5.
Freecom FSG-3 Storage Gateway Chapter 4: Freecom Storage Gateway Assistant GB Please make sure you have you have setup your network as described in the "Before you begin" chapter. 4 The Freecom Storage Gateway Assistant helps you to find any FSG-3 in your network. When run, it shows you all the FSGs available in your network and helps you to install them as print servers or network folders. You can also configure basic settings with the FSG Assistant and easily find the configuration website.
Freecom Storage Gateway Assistant The default password and login for the FSG-3 is "admin". With the Freecom Storage Gateway Assistant you can: GB 4.2.1 Configure basic settings of your Freecom Storage Gateway 4 Assign IP address, subnet mask, FSG-3 device name and workgroup name. You have to enter your admin password to apply changes. 4.2.2 Setup the DSL account on your Freecom Storage Gateway A browser window will open where you can enter the login data for your DSL connection (admin login required).
Freecom FSG-3 Storage Gateway 4.2.4 Add a new printer GB A USB printer connected to the FSG-3 will be configured on the PC connected to FSG-3. 4 Attention: Each PC must be configured separately to get printer access! 4.2.5 Start recovery procedure This procedure can reset and repair an FSG-3 to factory default settings if you cannot access your FSG-3 anymore.
Freecom Storage Gateway Assistant GB Note: After recovery, all user data is still available on the FSG-3. To avoid problems, the administrator should backup all user data and format the hard disk. If an old configuration file was saved before, the administrator should load this configuration and afterwards copy the individual user data back to its folders. 4 4.2.6 Search again for available Freecom Storage Gateway devices Click here to search again for your FSG-3 if it was not detected.
Freecom FSG-3 Storage Gateway Chapter 5: Configuration GB This chapter explains all the configuration settings of the FSG-3. For most the default settings should work. 5 To configure the FSG-3, your computer needs to be connected directly to a LAN port of the FSG-3. DHCP must be enabled in the TCP/IP settings of the PC! For more information, you can read the " chapter. Use this PC to login to the FSG-3 "Before you begin" configuration menu. 5.
Configuration 5.2 First steps GB Even though you can start using the FSG-3 with no setup at all, you might want to configure some of the items of the FSG-3 to benefit from the full potential of the product. To start using the full potential of the FSG-3, several items will have to be configured. 5 1. Changing the administrator password 2. WAN or internet connection (If available). 3. Date and time. 4. Users, groups and folders. 5. Connection methods.
Freecom FSG-3 Storage Gateway 5.4.1 The FSG-3 WAN port connected to a router GB To first set up the FSG-3, your computer will have to be connected to a LAN port of the FSG-3. This can be changed in a later stage in the services / SMB section. 5 Connecting the hardware 1. Connect a RJ45 cable to a LAN port of your router. 2. Connect the other side of the cable with the WAN port of the Freecom Storage Gateway. 3. After setting up the FSG-3, network PCs can be connected to the FSG-3 and your router.
Configuration GB 5 4. Go to Connections -> WAN Options and activate "Open SMB/CIFS on WAN port" 5. To have HTTP and FTP access from outside to the FSG-3, you have to forward port 80 (HTTP) and port 21 (FTP) to the FSG-3 IP address. This is the fixed WAN IP address assigned in step 3 (e.g. 192.168.2.2).
Freecom FSG-3 Storage Gateway See the manual of your router for detailed information how to forward ports. GB Make sure to activate the options "Open HTTP server for the outside"/ "Open FTP server for the outside" under Services in the FSG-3 configuration menu. 5 Remark: DynDNS options of the FSG-3 will not work. Please use the DynDNS options of your router. 5.4.
Configuration 5.5 Set the Date and Time GB To set the date and time on the FSG-3, you should: • 5 Go to the configuration website of your FSG-3. • Log in with "admin" and the password • Click on Hardware section in the left menu • Click on Date & Time in the left menu • Set the date and time • Press apply 5.6 Setting up users, groups and folders Your FSG-3 is setup with 2 standard accounts. The admin account and the guest account. 5.6.
Freecom FSG-3 Storage Gateway 5.6.3 Creating a new account GB How to create a new account is described in the "Users" section of the "Configuration options explained" chapter. 5 When you create an account, a folder with the same name is automatically created. Only the user with that name can access that folder. You can give others rights to these folders by • Adding users to the folders in the folder dialog • Creating groups with rights to these folders and adding several users to these groups.
Configuration Please look at the "Configuration options explained" chapter and especially at the sections about opening these services to the outside (All in the Services menu): • GB 5 The HTTP server • The FTP server • The SSH server 5.8 The full potential These are some of the most common examples of configuration options for the FSG-3, but there are many more. Take a look at the "Configuration options explained" chapter for all the options and the full potential of the FSG-3.
Freecom FSG-3 Storage Gateway Chapter 6: Configuration options explained GB 6.1 Information 6 This is the information menu. Here you can find diagnostic and general information. 6.1.1 System Information Here you can find general system information, such as free disk space, processor information etc.
Configuration options explained 6.1.2 Version Information GB This menu item shows the OS version of your FSG-3: 6 6.1.3 Device Information All attached devices show up in this dialog. Please press refresh if the dialog does not show a device you have just plugged in. Remark: For S-ATA devices to be recognized by the FSG-3, the FSG3 needs to be shut down when connecting the S-ATA device. After booting the FSG-3, the S-ATA device will then be recognized.
Freecom FSG-3 Storage Gateway 6.1.4Network Information GB Both LAN and WAN (internet) Network information is found here for the FSG3. If you need the IP address of the FSG-3, please look for it here.
Configuration options explained 6.1.5 Log files GB If you encounter problems with you FSG-3, you can use the log file recording option to locate the issue. 6 The FSG-3 offers several log files for different software components, e.g. Kernel, DSL Connection, DHCP Server etc.
Freecom FSG-3 Storage Gateway 6.2 Hardware menu GB In this menu all hardware related software can be saved and restored. You can set the FSG-3 time here as well. 6 It is possible to save and restore all user settings of the FSG-3. Please backup your user settings to a different storage location than the FSG-3 after installing the FSG-3. 6.2.1 Save Configuration In this menu you can save the current configuration file on your computer.
Configuration options explained 6.2.2 Restore Configuration GB This menu lets you restore a previously saved configuration file. 6 Use the browse button to select a previous backup of your configuration file. Then press the Restore button to start the restore. Do not switch off the FSG-3 during restoring. This can lead to corrupt configuration files. You can select the button to delete all users that were created after the configuration file was backed up.
Freecom FSG-3 Storage Gateway 6.2.3 Reset Configuration GB Please press the Reset button if you want to restore the Factory Default configuration script. This will not alter the firmware version. You can select to remove all users. 6 Attention: Removing all users also removes all their data! 6.2.4 Date & Time Please set the appropriate date and time and press apply.
Configuration options explained 6.2.5 Hard drive menu GB The hard drive menu allows you to alter all the settings involving the hard drive. 6 6.2.6 Spin down time Hard drives are devices that spin round creating noise and heat and using energy. If the FSG-3 is not used for a long time, it is more beneficial to spin down the hard drive. This uses less power and creates less noise and heat. It also prolongs the lifetime of the hard disk.
Freecom FSG-3 Storage Gateway 6.2.8 Update Firmware GB Here you can update the firmware. New firmware usually fixes bugs and adds additional features to your FSG-3. Check on www.freecom.com if new firmware updates are available for the Freecom Storage Gateway. 6 Freecom will release new and updated firmware on a regular basis. It is also possible to obtain the source code and create your own firmware.
Configuration options explained 6.2.9 FSG Health GB This option allows you to change the fan speed. Reducing the fan speed means less noise but higher device temperatures. When operating the device in high ambient temperatures or the device is always in use, it is recommended to increase the fan speed in order to achieve a better cooling effect. 6 Attention: Do not permanently switch off the fan as this can lead to excessive heat which might cause damage to your device! 6.
Freecom FSG-3 Storage Gateway GB 6 Domain name server The IP address of the DNS server the clients should query. This should be the FSG-3 IP address or an other DNS system. IP address range The range of IP addresses the DHCP server can use. IP release time The time between refreshing IP addresses given to DHCP clients. 6.3.2 Dynamic DNS Dynamic Domain Name System gives the ability to provide an official DNS name such as www.yourname.com to the dynamic IP address you have gotten from your ISP.
Configuration options explained GB 6 6.3.3 HTTP Server These settings adjust the web server. The web server used is a version of Apache. Options Description Open HTTP server to the outside This allows the http server to be reached from IP addresses whose source address is located somewhere on the internet (if enabled, it is recommended to use SSL encryption as well).
Freecom FSG-3 Storage Gateway 6.3.4 FTP Server GB This server is a file server based on the File Transfer Protocol (FTP). 6 Options Description Run FTP server Switch the FTP server on Open FTP server for the outside This will allow users to access the FTP server from the internet (If enabled, it is recommended to also use SSL encryption!) Use SSL encryption This switches on SSL encryption for FTP. This is not supported by all browsers! 6.3.5 SSH Server The SSH server is a secure terminal client.
Configuration options explained GB 6 Attention: Starting the SSH server is a security risk. Only do so if you trust the users! 6.3.6 Port Forwarding Port forwarding is a form of NAT (Network Address Translation). It allows certain ports from the internet to access certain PCs on the inside. The firewall can be circumvented this way. The first list shows the active port forwarding. Pressing New will allow you to create a new port forwarding. Options Description Name This can be an arbitrary name.
Freecom FSG-3 Storage Gateway GB 6 6.4 Security Here you can adjust the security settings of the FSG-3. To change the Administrator password, user settings, group settings or folder settings, click the corresponding page. 6.4.1 Users The access control for all file retrieval systems (FTP, HTTP and SMB) is based on either group or user access rights. Access permissions can be set or removed using these menus. 48 • Pressing the New button gives you a dialogue to add new users.
Configuration options explained Adding a new user Options Description User name Place the login name here Password Please enter the user password here. The password is case-sensitive! That means "word" is something different from "Word" Retype password Please retype your password to be sure you typed it correct the first time GB 6 6.4.2 User Groups The access control for all file retrieval systems (FTP, HTTP and SMB) is based on either group or user access rights.
Freecom FSG-3 Storage Gateway GB 6 Adding a new group Please write the group name here and select some users to populate the group. Folder rights can be given in the Folder dialogue. 6.4.3 Folders The access control for all file retrieval systems (FTP, HTTP and SMB) is based on either group or user access rights. Access permissions can be set or removed using these menus. Folder permissions can be given either to a group or a user or both.
Configuration options explained Adding a new folder GB Pressing the new button will allow you to add a new folder. Please enter the new folder name and populate it with users and groups that have access. 6 6.4.4 Administrator Here you can alter the administrator password. Please enter the old password, the new password and a retype of the new password. If you have completely lost your administrator password, please do a reset to default values as described in Reset. 6.
Freecom FSG-3 Storage Gateway GB 6 6.5.2 WAN Connection Here you can setup your connection to the internet or different network. Options Description Run DHCP client Run the DHCP client. If the WAN port is connected to a DHCP server (for instance to another router) you will need to setup the WAN connection with this option. Run DSL client If the WAN port is connected to a DSL or cable modem directly, you often need to specify data given to you by your provider.
Configuration options explained GB 6 6.5.3 WAN Options These are options for experts. Only change them if you know what you are doing! Options Description MTU (for DSL only) (In Bytes) MTU settings (MTU = Maximum Transfer Unit) Answer ICMP packets (ping etc) This will allow others to ping the host.
Freecom FSG-3 Storage Gateway GB 6 6.5.4 Virtual Private Networks The listed VPN connections are shown with Name, Status, Action, Remote Host and Remote Net. • If you want to add a permanent new connection, please press Add Connection. • If you want to see and edit the properties of an existing connection, select the connection and press Properties. • If you want to delete a connection, press Delete Connection.
Configuration options explained Remote Host IP* This is the IP address of the remote host you wish to reach. If you which to allow any IP (Road Warrior) type enter: 0.0.0.0. GB Remote Network* This is the remote network you wish to reach. Example: 192.168.20.0/24 6 ESP encryption ESP encryption options IKE encryption IKE encryption options Pre-Shared Key Fill in your pre-shared key here.
Freecom FSG-3 Storage Gateway 6.6 Shutdown and reboot menu GB Here you can reboot or shutdown the FSG-3 (for safe power unplugging). 6 Attention: Always shutdown the FSG-3 properly before disconnecting the power. Failing to do so can result in a corrupted hard drive and a broken system. 6.6.1 Shutdown After pressing the Shutdown button, the FSG-3 will start shutting down. When all lights on the device are dark, you can unplug the power. This may take several seconds. 6.6.
Configuration options explained GB 6 6.6.3 Logout If you wish to leave the configuration menu, please press logout. Attention: Always press logout if you are working on a computer used by other persons than you as well. Also close your browser and empty the browser cache.
Freecom FSG-3 Storage Gateway Chapter 7: Accessing the FSG-3 from Windows GB There are several ways to access the FSG-3 from Windows: 7 7.1 Freecom Storage Gateway Assistant It is possible to map network drives using the Freecom Storage Gateway Assistant. Please see the Freecom Storage Gateway Assistant chapter for more information. 7.2 Manual mapping Accessing data is performed using the following steps: 1. Press the ‘Start’ menu, select the ‘Run...’ option.
Accessing the FSG-3 from Mac OS X Chapter 8: Accessing FSG-3 Data from Mac OS X GB Mac OS X v10.3.x and higher 8 In the Menu bar, select "Go" -> "Connect to Server". The FSG-3 address is smb://192.168.1.1 You can also type smb://FSG_NAME (Factory default is smb://FSG). Click on "Connect". In the next window you have to select a shared folder. Continue by clicking on OK.
Freecom FSG-3 Storage Gateway In the next window your authentication is required. When logging in as administrator, you have access to all folders on the FSG-3. GB 8 After clicking on OK, the FSG-3 will be mounted and an icon will be shown on your desktop.
Attaching external USB devices Chapter 9: Attaching external USB devices GB 9.1 USB external device information 9 Information on attached external USB mass storage devices can be found in the information section of the FSG-3 configuration pages. The USB information is located under the Devices heading: 9.
Freecom FSG-3 Storage Gateway 9.2.1 Power GB All host ports can deliver the USB specified power output of 500 mA. If more power is required, please use the AC adapter delivered with the external USB device for extra power. 9 9.2.2File systems The attached USB device must be formatted in a file system supported by the FSG-3.
Attaching external USB devices GB 9 6. In the next window a printer port must be selected. Choose "Create a new port" and select "Standard TCP/IP port". Click on "Next". 7. The "Add Standard TCP/IP Printer Port Wizard" opens. Click "Next" to continue. 8. The "Add port" window opens. Use the following settings: Printer name or IP address: or IP address of the FSG-3 Port Name: "FSG-3-Name" 9100. Click on "Next". 9. Additional port information is now required.
Freecom FSG-3 Storage Gateway 10. To finish the installation, the printer software needs to be installed now. Select the software for your printer. If your printer is not listed, select "Have Disk" and have the driver disk or CD for your printer ready. GB 9 9.3.1 Clear Printer Job Queue If the printer queue on the FSG-3 becomes corrupt, the print queue should be cleared. All submitted print jobs will need to be re-sent to the printer.
Attaching external S-ATA devices Chapter 10: Attaching external S-ATA devices GB To install a S-ATA external storage device, you must first shutdown the FSG-3. Go to the web interface and log in to the administration site. Go to the shutdown item of the Hardware menu and press shutdown. Wait till the FSG-3 is shutdown and plug in the eS-ATA connector of the external device into the FSG-3 eS-ATA port. Make sure the eS-ATA device is powered on and turn the FSG-3 back on.
Freecom FSG-3 Storage Gateway Chapter 11: Troubleshooting GB This chapter gives information about troubleshooting your Freecom Storage Gateway. After each problem description, instructions are provided to help you diagnose and solve the problem. 11 Basic Functioning If you are experiencing problems, please check if • Both the FSG-3 and the PC are powered on. • The Ethernet Cable is securely fastened to both devices.
Troubleshooting Troubleshooting the Web Configuration Interface GB If you are unable to access your FSG’s Web Configuration interface from a PC on your local network, check the following: • Check the Ethernet connection between your PC and the FSG-3 using the ping utility as described in this chapter. • Test the Ethernet cable by using a different cable. • Make sure your PC’s IP address is on the same subnet as the FSG-3.
Freecom FSG-3 Storage Gateway Troubleshooting the ISP Connection GB If your FSG-3 is unable to access the Internet, you should first determine whether you have an ADSL link with the service provider. The state of this connection is indicated with the WAN LED on the modem you were provided with your ADSL account. 11 If disconnecting telephones does not result in a green WAN LED the problem may be one of the following: • Check that the telephone company has made the connection to your line and tested it.
Troubleshooting Troubleshooting PPPoE GB The PPPoE connection can be debugged as follows: 1. Access the Main Menu of the FSG-3 configuration at http://192.168.1.1. 11 2. Click on the configuration icon. 3. Under the log files section of the information menu, look at all the logs. 4. If all of the steps indicate "OK" then your PPPoE connection is up and working. If any of the steps indicates "Failed", you can attempt to reconnect by clicking "Connect".
Freecom FSG-3 Storage Gateway Testing the LAN Path to Your Gateway GB You can ping the FSG-3 from your PC to verify that the LAN path to your FSG-3 is set up correctly. 11 To ping the FSG-3 from a PC running Windows 98 SE or later: 1. From the Windows toolbar, click the Start button and select Run. 2. In the field provided, type Ping followed by the IP address of the gateway, as in this example: ping 192.168.1.1 3. Click OK.
Troubleshooting If the path is functioning correctly, replies as in the previous section are displayed. If you do not receive replies: • • GB Check that your PC has the IP address of your gateway listed as the default gateway. If the IP configuration of your PC is assigned by DHCP, this information will not be visible in your PC’s Network Control Panel. Go to the Run… window and run winipcfg.
Freecom FSG-3 Storage Gateway • GB Time is off by one hour Cause: The FSG-3 does not automatically sense Daylight Savings Time. Please change the time in the Hardware / Date&Time section. 11 Persistent problems If problems still persist and you have read and tried all the answers in this manual, please try the website www.freecom.com or www.openfsg.com for more support and additional contact numbers. Support Freecom Technology offers technical support for all Freecom products.
Appendix Appendix GB CE, FCC and other certification CE EN 55 022 Declaration of Conformance. This is to certify that the Freecom Storage Gateway is shielded against the generation of radio interference in accordance with the application of Council Directive 89/336/EEC, Article 4a. Conformity is declared by the application of EN 55 022 Class B (CISPR 22). FCC This device complies with part 15 of the FCC Rules.
Freecom FSG-3 Storage Gateway Certificate of the Manufacturer/Importer GB It is hereby certified that the Freecom Storage Gateway has been suppressed in accordance with the conditions set out in the BMPT-AmtsblVfg 243/1991 and Vfg 46/1992. The operation of some equipment (for example, test transmitters) in accordance with the regulations may, however, be subject to certain restrictions. Please refer to the notes in the operating instructions.
Appendix Networks and Routing Basics GB This chapter provides an overview of IP networks, routing, and firewalls. This is by no means a complete overview! If you are looking for more information, you can use your favorite search engine to find information on the internet about the internet. Suffice to say, there is plenty.
Freecom FSG-3 Storage Gateway Domain Name Server GB Since this computer address is not very easy to read, there is a second system on the internet called DNS (Domain Name System) which translates human readable names such as "www.sharemydisk.com" to computer readable names such as "82.161.11.206". Everyone on the internet must have an IP address.
Appendix Class E GB Class E addresses are for experimental use. For each unique value of the network portion of the address, the base address of the range (host address of all zeros) is known as the network address and is not usually assigned to a host. Also, the top address of the range (host address of all ones) is not assigned, but is used as the broadcast address for simultaneously sending a packet to all hosts with the same network address.
Freecom FSG-3 Storage Gateway Subnet Addressing GB You can see that even with a Class C address, there are a large number of hosts per network. It would be a very inefficient use of the amount of IP addresses to supply every LAN with so many IP addresses. A smaller office LANs does not have that many devices. A more efficient technique is known as subnet addressing. Subnet addressing allows us to split one IP network address into smaller multiple physical networks known as subnetworks.
Appendix If your local network is not connected to the Internet (for example, when using NAT), you can assign any IP addresses to your computers without problems. But to prevent problems and ease configuration, the IANA has reserved the following three blocks of IP addresses specifically for private networks: GB 10.0.0.0 - 10.255.255.255 172.16.0.0 - 172.31.255.255 192.168.0.0 - 192.168.255.255 We recommend that you choose your private network number from this range.
Freecom FSG-3 Storage Gateway DHCP GB First, most users today have a dynamically given IP address or DHCP address from their provider. This means that the IP address given to you can change over time. This allows the provider to use the IP address for more then one person or device, since people are often online at different times. Optimal usage of IP addresses is guaranteed. Your FSG-3 gives its internal addresses to your computers in the same way.
Appendix Network Address Translation GB When you visit a website via your computer, your router, or more specifically your NAT, remembers which computer on the internal network asked for the information. When the information (in this case the website you asked for) comes back, the router knows which computer on the internal network to send the information to. This is Network Address Translation or NAT.
Freecom FSG-3 Storage Gateway MAC Addresses and Address Resolution Protocol GB An IP address alone cannot be used to deliver data from one LAN device to another. To send data between LAN devices, you must convert the IP address of the destination device to its media access control (MAC) address. Each device on an Ethernet network has a unique MAC address, which is a 48-bit number assigned to each device by the manufacturer.
Technical specifications Technical specifications GB Technical specifications LAN/WAN Standards IEEE 802.3u 100BASE-TX; IEEE 802.3 10BASE-T Transmission Types 100Mbps/10Mbps; 100BASE-TX 4B/5B, MLT-3;10BASE-T, Manchester Coding Access Media CSMA/CD RJ-45 Media Interface USB 2.0, e-SATA USB Standard Hi-Speed (HS) Full-Speed (FS) Low-Speed (LS) USB Connector USB type A female Connector (4) Data Transmission Speed USB Max: 480 Mbps (HS Mode) Max: 12 Mbps (FS Mode) eSATA: SATA I, 1.
WARRANTY (valid in Europe/Turkey only): We thank you for purchasing this Freecom product and hope you will enjoy using it. In order to avoid unnecessary inconvenience on your part, we suggest reading the quick install guide, instruction manual and any additional electronic and or printed manuals. When problems occur we have a database with Frequently Asked Questions (FAQ) on our Freecom website (www.freecom.com), please check this site before you contact the helpdesk.