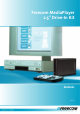
Freecom MediaPlayer 2.5" Drive-In Kit MANUAL Rev.
Freecom MediaPlayer Drive-In Dear customer, GB Thank you for buying the Freecom MediaPlayer-25 Drive-In Kit, a brand-new digital multimedia player that supports data access mode via 2.5" HDD inside (not supplied). With this player you can easily enjoy Digital Movies, Digital Music, Digital Photos from a 2.5" HDD (when assembled in the device) directly on your TV or HiFi set. Freecom Technologies • Germany www.freecom.com Warning ! All rights reserved.
Table of Contents Users manual GB General Information .......................................................................... page 4 Warnings and Safety Instructions ..................................................... page 6 Chapter 1: Explanation of the exterior Appearance ......................................... page 9 Chapter 2: Assembling a Hard Drive into the MediaPlayer .............................. page 10 Chapter 3: Connecting the player to a PC .....................................
Freecom MediaPlayer Drive-In Introduction GB The Freecom MediaPlayer-25 Drive-In Kit is 2.5" HDD interface type of MPEG4 player based on USB 2.0 High Speed. It can be connected to TV in home or a monitor. It is not only an external USB HDD but also the best portable AV device that displays Music, Movie and photo. Package Content Please check the contents of the box.
General Information Software Requirements • Windows XP, Windows 2000, Windows Me, Windows 98 Second Edition • Mac OS X or higher • Linux 2.4 or higher • For use under Mac OS and Linux, the drive needs to be FAT-32 formatted. GB Supported Media Formats Video • MPEG 1, 2, 4 (MPG, MPEG, AVI, M2V, DAT, VOB, etc) • DivX, XviD (Except GMC & Qpel option applied formats) Audio • MP3 • OGG Vorbis • WMA • WAV Main Specifications & Functions • An External USB HDD using 2.5" HDD.
Freecom MediaPlayer Drive-In Warnings and Safety Instructions GB Please read and follow the below mentioned instructions. They should be observed in order to prevent injury to the user, damage to the device and damage to property, as well as to ensure safe use of the product. Not following these instructions may cause the unit to malfunction. To ensure that your Freecom MediaPlayer-25 Drive-In Kit functions properly, please take note of the following precautions.
Warnings and Safety Instructions • In a car, we recommend you to use the supplied cigarette lighter jack (option) and we are not responsible for the damage or loss of data in a HDD by using another cigarette lighter jack. • Grip the side of the Freecom MediaPlayer-25 Drive-In Kit. The top & bottom cover may have heat due to aluminum case. • This Freecom MediaPlayer-25 Drive-In Kit does not supports the DivX, XviD codec of video files that has GMC, Qpel option.
Freecom MediaPlayer Drive-In Furthermore, warranty does not apply to: GB 8 • Damages or problems resulting from misuse, abuse, accident, alteration or incorrect electrical current or voltage. • Any product tampered-with or damaged serial number label. • Any product without a serial number label. • Consumable items delivered with or in the equipment.
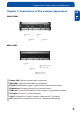
Explanation of the exterior Appearance Chapter 1: Explanation of the exterior Appearance GB FRONT VIEW 1 Power LED IR LED IR Receiver HDD LED REAR VIEW USB Port Composite / Stereo L-R / Component (Pb) DC Input S-Video / Coaxial / Component (Y, Pr) Power LED: Lights up when drive is powered HDD LED: Lights up when data is transmitted IR LED: Blinks when a signal is received from the remote control IR Receiver: Reception area of the remote control.
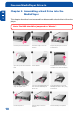
Freecom MediaPlayer Drive-In Chapter 2: Assembling a Hard Drive into the MediaPlayer GB 2 This chapter describes how to assemble or disassemble a hard drive to/from the player. Note: The HDD should be jumpered as "Master". 10 Pull a hasp to the arrow direction. Pull another hasp to the arrow direction. Grip the hasp and pull it out to the arrow direction. Open the top-cover and unscrew the PCB. Pull the PCB out. Grip HDD and insert it into the pins of PCB (be sure to match the 44 pins).
Connecting the player to a PC Chapter 3: Connecting the player to a PC GB Connect the player to the PC using the supplied USB Cable. 3 Note: Windows 98SE users have to install the Installation Driver first. Refer to the below instructions. 3.1. Instructions for Windows Users When the player is connected to the PC, a new volume will appear on [My Computer]. You can save any data on this volume. See the instructions below the various Windows versions.
Freecom MediaPlayer Drive-In GB 3 When you install [Win98_Freecom MediaPlayer-25.exe], the installation wizard will appear. Press [Next] button and complete the installation. Check the Driver Installation You can check whether the driver is installed correctly or not at [Appendix. Check the Driver Installation for the Freecom MediaPlayer-25 Drive-In Kit at Windows]. Check whether the hard drive is formatted or not If the assembled hard drive is not formatted, a PC will not detect the HDD.
Connecting the player to a PC 3.1.2 Windows ME/2000/XP Users GB There is no need to install any Installation Driver. 3 Connect the player to the PC using the supplied USB Cable. The PC will automatically detect the player as USB Mass Storage Device in [My Computer]. Check the Driver Installation You can check whether the driver is installed correctly or not at Appendix: "Check the Driver Installation for the Freecom MediaPlayer-25 at Windows".
Freecom MediaPlayer Drive-In Chapter 4: Connecting the player to external AV Devices GB 4 The player supports Composite, S-Video, and Component for Video and Stereo & 5.1Ch sound by Digital Output (Coaxial). Please refer to the below examples. 4.1 Connect by Composite for Video & Stereo for Audio This is the most commonly used method to connect the player to a TV. Connection for Video through Composite and for Audio through Stereo Connect AV 1 Cable (Yellow, White, Red) to AV Jack.
Connecting the player to external AV Devices 4.2 Connect by Composite for Video & 5.1Ch for Audio GB Connection for Video through Composite and for Audio through 5.1Ch (Coaxial) 4 After cable connection, set the Audio as 5.1Ch at Setup page of the player. Connect AV 2 Cable (Yellow, SVideo) to SV/5.1 Jack. Connect AV 1 Cable (Yellow, White, Red) to AV Jack. Black Yellow Yellow White Red Connect to Coaxial jack of an Amplifier (Receiver) Connect to Composite (CVBS) Jack of TV. 4.
Freecom MediaPlayer Drive-In 4.4 Connect by S-Video for Video & 5.1Ch for Audio GB Connection for Video through S-Video and for Audio through 5.1Ch (Coaxial) 4 After cable connection, set the Audio as 5.1Ch at Setup page of the player. Connect AV 2 Cable (Yellow, SVideo) to SV/5.1 Jack Black Yellow Connect S-Video (black color) to S-Video Jack of TV.
Connecting the player to external AV Devices 4.5 Connect by Component for Video & Stereo for Audio GB Connection for Video through Component and for Audio through Stereo 4 When the main screen does not appear after connecting the proper cables and powering the player on, press [F1] button on the remote control until you see the main page (Freecom MediaPlayer-25 Drive-In Kit LOGO PAGE) and then press [Setup] button in order to match the [Video] setup with TV.
Freecom MediaPlayer Drive-In 4.6 Connect by Component for Video & 5.1Ch for Audio GB Connection for Video through Component and for Audio through 5.1Ch (Coaxial) 4 After cable connection, set the Audio as 5.1Ch at Setup page of the player. In case, the main screen does not appear...
Basic Setup of the player Chapter 5: Basic Setup of the player GB 5.1 Video Setup 5 The default Video Setup is Composite Connection for general TV. If a general cable (Yellow) is connected, there is no need to change the settings. If you want to connect the device by using other cables, select the proper TV system (NTSC / PAL) for the TV to receive a correct video signal. For Video Setup, press [Setup] button on the remote control.
Freecom MediaPlayer Drive-In 5.1.2 Setup of HD Component (Progressive) GB NTSC, PAL: Standard of TV Output. 5 Select the proper one for using in your country. • C(Composite): If a general cable (Yellow) is connected, no need to change. • S-Video: When connected by S-Video cable (Black) and the screen color is black&white, you need to change the configuration.
Basic Setup of the player GB If you see an abnormal/distorted screen, your TV does not support [Progressive]. In this case, press [Video] button on a remote controller until you have a normal screen. Some TVs may not support [720P]. 5 5.2 Audio Setup Select [Setup] button on the remote control. Select [Audio Setup] by using [ or ] button. Select the proper audio output (Stereo (Analog) or Digital 5.1Ch (Encoded Digital) by using [ ] button and press [Enter] button.
Freecom MediaPlayer Drive-In 5.3 Other Setup functions GB Select [Setup] button on the remote control. Select [Other Setup] by using [ 5 or ] button. Select the menu you want to change and press [Enter] button. Set other configurations by using arrow buttons or go to other setup pages by pressing [Setup] button. 22 • Setup of TV Type (Screen Ratio Configuration): Select one (4:3 Letter Box, 4:3 Pan Scan, 16:9).
Play Video, Audio and Photo files Chapter 6: Play Video, Audio and Photo files GB 6.1 Play Video Files 6 Select [Video] -> Press [Enter] button then you will see a list of video files that you saved onto the player. Select the file you want to play, press [Enter] or [Play] button to start playback. Menu Description • Play All: All video files will be played in order.
Freecom MediaPlayer Drive-In Various functions of the buttons on the remote control GB You can use the following buttons when you are playing a video file: 6 • [Audio] button: You can select Audio 01, Audio 02 if the audio format is multi-audio. • [Caption] button: Supports the following three functions. Subtitle move & size: Control Screen Location & Size. Subtitle select: The files that have caption will be displayed. Select the preferred caption. Subtitle lang.
Play Video, Audio and Photo files 6.2 Play Audio Files GB Select [Audio] -> Press [Enter] button; you will see the list of audio files that you saved onto the Player. Select the file you would like to play and press [Enter] or [Play] button; playback will start. 6 Menu Description • Play All: All audio files will be played in order. • Media Select: You can move to another menu like Video, Photo, Playlist without returning first to the main page while you are in [Audio] menu.
Freecom MediaPlayer Drive-In 6.3 Play Photos GB Select [Photo] -> Press [Enter] button; you will see a list of all photo files you saved onto the Player. Select the file you want to view and press [Enter] or [Play] button to start playback. 6 Menu Description • Play All: All photo files will be played in order. • Media Select: You can move to another menu like Video, Audio, Playlist without returning first to the main page while you are in [Photo] menu.
Play Video, Audio and Photo files Available Buttons when display photos • Volume +: Enlarge photos (Zoom In) • Volume -: Reduce photos (Zoom Out) • F2 Button: Rotate photos (Rotation) • / / / GB 6 buttons: Move photos to up, down, left and right (Panning) Slide Show by using [Play All] Select [Display] -> press [Enter]; all photos will be displayed in order. 6.4 Play List You can create a [Play List] to play back files in the order you prefer.
Freecom MediaPlayer Drive-In GB 6 Menu Description • Display: shows all files added to the Play List. • Media Select: Move to [Video], [Audio], [Photo] without returning first to the main page. • Play all: Play all files in order. • Random Play: Play the files in random order. • Remove All: All the added files in the current Play List will be deleted. Change the order of [Play List] Select [Display] -> Select a file -> scroll the files and select a file you would like to switch.
Play Video, Audio and Photo files 6.5 Remote Control – description of all buttons and functions GB 6 Power: Power On/Off TV Type: Select 4:3 letterbox, panscan, 16::9 wide Audio: Select Audio files or dual-audio Caption: Setup of location / size / multi-title Mute: Mute the sound. Disable Mute by pressing again Scr.
Freecom MediaPlayer Drive-In 6.6 DVD Manager GB The player has DVD manager function which supports playing ripped DVD Files, in the same way as playing an original DVD. Create a folder (when player is connected to the PC), then save all ripped files into this folder. After connecting TV(or Monitor), select the VIDEO_TS.IFO file from the folder. Make sure that all the ripped files including VIDEO_TS.IFO from one DVD title will be located in one folder. 6 VIDEO_TS.
Play Video, Audio and Photo files Available buttons when playing ripped DVD files rippés • Audio button: Audio type will be changed when button is pressed. • Caption button: Caption type will be changed when button is pressed. • Scr. Size button: Screen size will be changed when button is pressed. • F1 button: Move to main menu while playing DVD. • F2 button: Play slowly 1/2, 1/4, 1/8 • Number 1 button: Set chapter, title repeat • Number 2 button: Set the A-B repeat.
Freecom MediaPlayer Drive-In Chapter 7: Format the Built-in HDD via USB GB If the assembled HDD is not formatted, a PC will not detect the hard disk drive. If your harddisk is not formatted,follow the below mentioned instructions.
Format the Built-in HDD via USB Example for different partitions with different file systems on one MediaPlayer-25 Drive-In Kit Total size of the Drive File system 120 GB NTFS FAT32 90GB 30 GB GB 7 The example above is a good solution for Windows 2000/XP users who sometimes exchange data with Windows 98SE/ME PCs. For storing the data under Windows 2000/XP both partitions can be used.
Freecom MediaPlayer Drive-In 3. Enter "fdisk" and confirm with "OK". GB 7 4. Answer the question "Do you wish to enable large disk support?" by pressing the 'Return' key. FAT32 is now activated. 5. Choose Option "5 (Change current fixed disk drive)" by pressing '5' and 'Return'.
Format the Built-in HDD via USB 6. Select the hard disk by its number where the "Usage" contains no value but only a percent symbol. Select the number of the corresponding hard disk and confirm by pressing the "Return" key. GB 7 Now your hard disk is activated and ready to be partitioned. Note: Partition size of large hard disks will not be displayed correctly! However partitioning results will be OK. 7.
Freecom MediaPlayer Drive-In 9. If only one partition is required then answer "Y" to the question: "Do you wish to use the maximumavailable size for a Primary DOS partition?" If more than on partition is required go to the next section "Create two or more partitions on the MediaPlayer-25 Drive-In Kit under Windows 98 / Windows ME". GB 7 Now the whole disk will be partitioned as one primary partition. Wait until the drive integrity check is completed. 10. Press the 'ESC' key to return to the fdisk options.
Format the Built-in HDD via USB 12. Stop your hard disk by using the hot unplug icon in the lower right corner of your screen and remove the USB cable from your hard disk. Afterwards connect your hard disk again with your computer. The hard disk will now be recognized by Windows. GB 7 As Windows tries to access your hard disk an error message will appear. This happens, because your hard disk is not yet formatted. Formatting partitions on the MediaPlayer-25 Drive-In Kit under Windows 98SE / ME 1.
Freecom MediaPlayer Drive-In Deleting a partition on the MediaPlayer-25 Drive-In Kit under Windows 98SE / ME GB The following steps will explain how to delete a partition on your MediaPlayer25 Drive-In Kit. 7 1. Click on the "Start" button. 2. Select "Run". 3. Enter "fdisk" and confirm with "OK". 4. fdisk will be started. Answer the question "Do you wish to enable large disk support?" by pressing the 'Return' key. FAT32 is now activated. 5.
Format the Built-in HDD via USB 7.2 Partitioning your MediaPlayer-25 Drive-In Kit under Windows XP / 2000 GB Creating a partition on the MediaPlayer-25 Drive-In Kit under Windows XP / 2000 7 The following steps will guide you through the process of creating partitions on your MediaPlayer-25 Drive-In Kit. After this procedure your Freecom MediaPlayer-25 Drive-In Kit will be ready for use and it will be allocated a drive letter. 1.
Freecom MediaPlayer Drive-In 5. Click with the right mouse button on the "unallocated" area and select the option "New Partition" (Windows 2000: "Create Partition Wizard"). The "New Partition Wizard" opens. Click on "Next". GB 7 6. Select "Primary partition" and click on "Next".
Format the Built-in HDD via USB 7. Now you can adjust the size of your partition. Click on "Next" if only one partition is to be created. See next chapter (Creating two or more partitions on the MediaPlayer-25 Drive-In Kit under Windows XP/2000) how to create more than one partition. GB 7 8. Assign a drive letter to your hard disk. Normally you can use the default options. Click on "Next". 9. Select the formatting option.
Freecom MediaPlayer Drive-In GB 7 Creating two or more partitions on the MediaPlayer-25 Drive-In Kit under Windows XP / 2000 1. Repeat the steps from the previous chapter (Creating a partition on the MediaPlayer-25 Drive-In Kit under Windows XP/2000) for creating the first partition. 2. Click with the right mouse button on the "My Computer" icon on your desktop. 3. Select the option "Manage". 4. Select the option "Storage" -> "Disk Management". 5.
Format the Built-in HDD via USB 7. Now you can adjust the size of your partition. Enter the size and click on "Next". GB 7 8. Click on "Finish" to create the "Extended partition". The unallocated space now changed to "Free space". 9. Right-click on "Free Space" and select "New Logical Drive" (Windows 2000: "Create Logical Drive"). The "New Partition Wizard" (Windows 2000: "Create Partition Wizard") opens. Click on "Next".
Freecom MediaPlayer Drive-In GB 7 10. "Logical drive" is already selected. Click on "Next". 11. Specify the partition size and click on "Next". 12. Assign a drive letter and click on "Next". 13. Select the formatting option. Choose either "FAT32" or "NTFS", the "Allocation Unit Size" should remain on "Default". Finally select "Perform Quick Format" and click on "Next". 14. Click on "Finish" to complete partitioning. Your partition will be formatted now and is ready-to-use.
Appendix Appendix GB Check the Driver Installation for the player in Windows Windows 98SE Check at [Start > Settings > Control Panel > System > Device Manager > Hard disk controllers > Hi-Speed USB-IDE Bridge Controller] Windows ME Check at [Start > Settings > Control Panel > (view all Control Panel options) > System > Device Manager > Universal Serial Bus controllers > USB Mass Storage Device] 45
Freecom MediaPlayer Drive-In Windows 2000/XP GB Check at [Start > Settings > Control panel > (switch to classic View on Windows XP) > system > Hardware > Device manager > Universal Serial Bus controllers > USB Mass Storage Device ] 46
Appendix Product Specifications Product Name Freecom MediaPlayer-25 Drive-In Kit Power DC 5V/2A Weight 130g (without HDD) Dimension 80 x 148 x 24 mm Working Temperature 0° C ~ 5° C Working Humidity 10% ~ 75% Available OS Windows 98SE/ME/2000/XP, Mac OS X higher, Linux 2.4 higher PC Interface 480Mbps USB 2.0 High-Speed(USB 1.1 compatible) HDD Type 2.
WARRANTY (valid in Europe/Turkey only): We thank you for purchasing this Freecom product and hope you will enjoy using it. In order to avoid unnecessary inconvenience on your part, we suggest reading the quick install guide, instruction manual and any additional electronic and or printed manuals. When problems occur we have a database with Frequently Asked Questions (FAQ) on our Freecom website (www.freecom.com), please check this site before you contact the helpdesk.