FREEDOM-WEB Ready-To-Assemble VersaRail INSTALLATION INSTRUCTIONS Read all instructions prior to installing product. Refer to manufacturers safety instructions when operating any tools. To register your product, please visit: freedomproduct.
WARNING: • Improper installation of this product can result in personal injury. Always wear safety goggles when cutting, drilling and assembling the product. • Incorrect installation may cause harm to the product or individual. NOTICE: • DO NOT attempt to assemble the kit if parts are missing or damaged. • DO NOT return the product to the store. For assistance or replacement parts call: 1-800-336-2383.
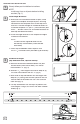
STRAIGHT RAIL INSTALLATION Closely follow post installation instructions. 1 2 Fig. 1 NOTE: Install base trims on all posts before installing brackets (Fig. 1). Base Trim Install Brackets: Fig. 2 a. With base trim installed on bottom of post, unroll paper install template and tape to post, ensuring the bottom of the template rests on the top of the base trim. Pre-drill through all marked locations on installation template "L" (not "A") into aluminum post with a 1⁄8" drill bit.
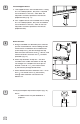
Assemble Your Railing Section: Fig. 6 Top Rail Opening Facing Up a. Place top and bottom rail on a smooth, flat and clean surface. Then, align the top and bottom rails so that the ridges inside the rails are oriented on the same side (Fig. 6). NOTE: There are two (2) ridges on both sides that are different sizes. b. Push all balusters through the holes in rails, being careful to have the hole in each baluster going in the same direction facing the side with the two (2) small ridges (Fig. 7).
Install Support Brace: Fig. 11 a. Two support braces are included with 6' railing kits. For code purposes, only one is required for installations in the U.S., while both are required in Canada. Spread out the braces proportionately (Fig. 11). b. Four support braces are included with 8' railing kits. For code purposes, only two are needed for installations in the U.S., while all four are required in Canada. Spread out the braces proportionately. 6 Rails to Posts: Fig. 12 a.
ANGLED RAIL INSTALLATION Closely follow post installation instructions. 1 2 Fig. 1 NOTE: Install base trims on all posts before installing brackets (Fig. 1). Base Trim Install Angle Brackets: a. With base trim installed on bottom of post, unroll paper install template and tape to post, ensuring the bottom of the template rests on the top of the base trim. Pre-drill through all marked locations on installation template "A" (not "L") into aluminum post with a 1⁄8" drill bit.
4 Assemble Your Railing Section: Top Rail Opening Facing Up Fig. 6 a. Place top and bottom rail on a smooth, flat and clean surface. Then, align the top and bottom rails so that the ridges inside the rails are oriented on the same side (Fig. 6). NOTE: There are two (2) ridges on both sides that are different sizes. b. Push all balusters through the holes in rails, being careful to have the hole in each baluster going in the same direction facing the side with the two (2) small ridges (Fig. 7).
5 Install Support Brace: Fig. 11 a. Two support braces are included with 6' railing kits. For code purposes, only one is required for installations in the U.S., while both are required in Canada. Spread out the braces proportionately (Fig. 11). b. Four support braces are included with 8' railing kits. For code purposes, only two are needed for installations in the U.S., while all four are required in Canada. Spread out the braces proportionately. 6 Rails to Posts: Fig. 12 a.
BARRETTE OUTDOOR LIVING 7830 FREEWAY CIRCLE MIDDLEBURG HEIGHTS, OHIO 44130 TEL: (888) 418-4400 WWW.FREEDOMPRODUCT.