
Installation Guide


3
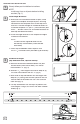
Closely follow post installation instructions.
NOTE:
Install base trims on all posts before installing
brackets (Fig. 1).
Install Brackets:
a. With base trim installed on bottom of post, unroll
paper install template and tape to post, ensuring
the bottom of the template rests on the top of the
base trim. Pre-drill through all marked locations on
installation template "L" (not "A") into aluminum post
with a
1
⁄
1
⁄
1
8
⁄8⁄
" drill bit. Do this for all marked locations for
both top and bottom brackets (Fig. 2).
b. Screw bottom brackets into post using #8x1
1
⁄
1
⁄
1
2
⁄2⁄
" Pan
Head screws (2 per bracket).
c. Screw top brackets into post using #8x1
1
⁄
1
⁄
1
2
⁄2⁄
" Pan
Head screws (4 per bracket).
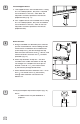
Cut Rails to Length
(Top & Bottom Rails, Top Rail Profi le):
a. Place bottom rail across post opening leaving
equivalent spacing from last baluster to post on
each end. Make sure there is even spacing from
baluster hole to post (Fig. 3)
b. Mark rail ush to post.
c. From marked lines, mark additional parallel line
3
⁄
3
⁄
3
8
⁄8⁄
"
from rst line to allow for bracket clearance (Fig. 4).
d. Align top rail and top rail pro le with the bottom rail
and mark all before cutting to size.
e. Then, cut to the same length using a saw with a
ne-tooth carbide blade (Fig. 5).
Fig. 1
Fig. 2
Base Trim
Base Trim
STRAIGHT RAIL INSTALLATION
Fig. 3
Fig. 4
3
⁄
3
⁄
3
8
⁄8⁄
"
Fig. 5
1
2
3