
Installation Guide


6
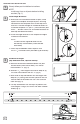
ANGLED RAIL INSTALLATION
Closely follow post installation instructions.
NOTE:
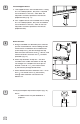
Install base trims on all posts before installing
brackets (Fig. 1).
Install Angle Brackets:
a. With base trim installed on bottom of post, unroll
paper install template and tape to post, ensuring
the bottom of the template rests on the top of the
base trim. Pre-drill through all marked locations on
installation template "A" (not "L") into aluminum post
with a
1
⁄
1
⁄
1
8
⁄8⁄
" drill bit. Do this for all marked locations for
both top and bottom brackets.
b. Install the angle brackets at the respective heights
instead of line brackets.
NOTE:
The base of the angled bracket installs
horizontally in orientation (screws beside
each other)
c. Attach top and bottom bases to posts with
#10 x 1
1
⁄
1
⁄
1
2
⁄2⁄
" at head screws provided (2 per bracket).
Cut Rails to Length
(Top & Bottom Rails, Top Rail Profi le):
a. Measure the distance between bottom rail post
bracket bases (from hole to hole). This will be
measurement "X" (Fig. 3).
b. Subtract 1
1
⁄
1
⁄
1
4
⁄4⁄
" from length measured in Step 3a (X).
This nal measurement will be "Y" (Fig. 4)
c. Mark ends of top and bottom rails the length from
Step 3b ("Y") being sure that the space for the last
baluster hole to the end of the rail is the same on
each end (Fig. 4).
d. Cut top and bottom rails and top rail pro le at the
same lengths using a saw with a ne tooth carbide
blade (Fig. 5).
Fig. 5
X
Fig. 3
Mark
5/8"
5/8"
Mark
Y
X
Fig. 4
Fig. 1
Fig. 2
Base Trim
Base Trim
1
3
2