
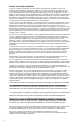
Installation Guide


3
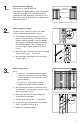
1.
2.
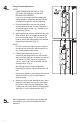
3.
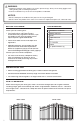
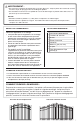
Determine Gate Opening:
Refer back to “How to Measure”
Gate opening is determined by width of gate plus
clearance for hinge, latch, and drop rod (latch
and drop rod sold separately); refer to latch and
drop rod installation instructions for speci c space
requirements (Fig. 1).
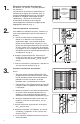
Mount Hinges on Gates:
For best results, work on a clean, at, stable
surface when mounting hinges to gates.
a. Place hinges at desired position on each
gate. For equal spacing, we recommend the
bottom hinge be placed 6" from the bottom
gate upright, and the top hinge be placed 6"
from the top upright. Tabs on hinges must
rest rmly against gate upright or U-frame
(Fig. 2)
b. Mark pilot holes through screw holes on hinge
then pre-drill using
3
⁄
3
⁄
3
32
⁄32⁄
" bit (Fig. 3).
c. Secure hinges to each gate with included 1"
screws (Fig. 3).
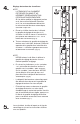
Mount Gate to Post:
NOTE:
• Gate posts must be plumb prior to gate
installation. Posts must also have set for
at least 24 hours in concrete prior to any
gate installation.
• Cut two (2) 2" spacer blocks to help
support each gate during installation.
a. Set gate on spacer blocks and hold it up to
the gate post. Tabs on hinges must rest rmly
against gate post (Fig. 4)
b. Mark pilot holes on the post, through the
screw holes in the hinges.
c. Remove gate and pre-drill
3
⁄
3
⁄
3
32
⁄32⁄
" pilot holes.
d. Re-position gate on post and secure hinges
with 1" included screws (Fig. 5).
e. Repeat for additional gate(s).
Determine
location and gate
opening before
installing fence.
Fig. 1
Gate
Tab
Fig. 2
Fig. 3
Gate
Gate
Gate
Gate
Gate
Panel
Panel
Panel
Panel
Panel
2" Spacer Blocks
1" Screws1" Screws
Fig. 4
Fig. 5