
Installation Instructions


6
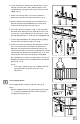
Attaching Bottom Rail Bracket Cover:
Test t the rail panel. Once proper t is ensured, press
bottom bracket covers onto the ends of the bottom rail
(Fig. 11) and set panel in place on brackets.
Connect Rails to Brackets:
a. Press top rail cap and bracket covers onto the top rail
that was cut in step 1 onto the top of the panel. Press
down on the top rail cap to ensure that it ts snug
onto the panel and that the top rail bracket end covers
are being held in place by the line bracket (Fig. 12).
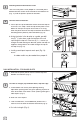
b. Using the holes in the bracket as a guide, pre-drill
two (2)
1
⁄
1
⁄
1
8
⁄8⁄
" holes from under the bottom of the rail
up through the top rail. Drive two (2) 1
5
⁄
5
⁄
5
8
⁄8⁄
" screws up
though the hole locking the bracket, panel and top rail
together, being careful not to drill though the top of
the top rail (Fig. 13).
c. Install pyramid post top onto each post (Fig. 14).
NOTE:
A rubber mallet may be needed for a proper t.
4
5
Fig. 11
Fig. 12
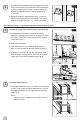
a. Slide metal spacer pieces over the end of top and
bottom rail channels (Fig. 1).
1
2
RAIL INSTALLATION - FOR GLASS SLATS
Fig. 2
Bottom Bracket Cover
Fig. 14
Pyramid Top
Post
Fig. 1
Rail Channel
Metal Spacer
Rail Channel
Cut Rails to Length (Top & Bottom Rails, Top Rail Cap):
a. Place bottom rail across post opening leaving
equivalent spacing from last glass opening to post on
each end. Make sure there is even spacing from glass
hole to post (Fig. 2)
b. Mark rail ush to post.
c. From marked lines, mark additional parallel line
1
⁄
1
⁄
1
4
⁄4⁄
"
from rst line to allow for bracket clearance (Fig. 3).
d. Cut rails to length (Fig. 4).
Fig. 4
Fig. 13
Fig. 3
1
⁄
1
⁄
1
4
⁄4⁄
"
Tape Measure
Tape Measure
Tape Measure
Tape Measure
Tape Measure
Tape Measure
Tape Measure
Tape Measure
Tape Measure