
Installation Instructions


8
Assemble rail panels as described in "Rail Installation."
NOTE:
• Do not install glass slats on stair railings, only
use square or twisted balusters.
• Taller posts (sold separately) may be needed for
either bottom or top of the stairs, depending on
the angle of the stairway or the location of where
the posts will be installed relative to the nose of
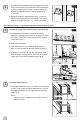
the stair tread. Bottom stair posts may also be
moved out from bottom step (Fig. 1).
See "Post Installation" section for "Deck/Wood Surface
Installations."
Place a deck board on the stair noses spanning from
post to post. Place the stair panel on the board across
the opening and plumb balusters while ensuring equal
spacing on each end. Clamp the panel in place at this
location (Fig. 2).
NOTE:
Use the proper deck board thickness to result in the
desired nished rail height.
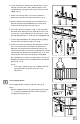
Temporarily assemble top and bottom stair mounting
brackets. Brackets slide into bracket bases, bracket
cover is aligned, and the bracket is fastened together
using the hinge bolt provided (Fig. 3 & 4).
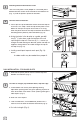
a. Hold each respective bracket (angled) against the
post face, align bracket with stair panel and mark all
four (4) ends of the rail panel (Fig. 5).
b. Repeat this on the opposite side of the panel and be
sure to label the top rail to simplify placement after
cutting.
1
2
3
4
STAIR RAIL INSTALLATION
Fig. 1
Fig. 2
Clamps
Deck
Board
Stair Panel
Stair Panel
Stair Panel
Stair Panel
Stair Panel
Stair Panel
Stair Panel
Stair Panel
Stair Panel
Stair Panel
Stair Panel
Stair Panel
Stair Panel
Stair Panel
Stair Panel
Stair Panel
Stair Panel
Stair Panel
Stair Panel
Stair Panel
Stair Panel
Stair Panel
Stair Bracket Base
Top Bracket
Bracket Cover
Bottom Bracket
Hinge Bolts
Fig. 3
Fig. 4
Fig. 5