
Installation Guide


4
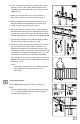
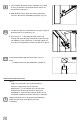
a. Cut out bracket template from side of post box, and
align it with the base trim and post. Secure template
in place using a piece of tape. Pre-drill through the
desired marked locations on the template using a
1
⁄
1
⁄
1
8
⁄8⁄
" drill bit.
b. Remove template, align brackets (Fig. 7) with the
holes ensuring the brackets are square, and fasten
brackets in place using the 1
1
⁄
1
⁄
1
2
⁄2⁄
" screws provided.
2
Fig. 7
TopTop
Bracket
Bracket
Bracket
Bottom
Bottom
Bracket
Bracket
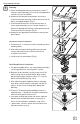
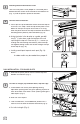
Cut Rails to Length (Top & Bottom Rails, Top Rail Cap):
a. Place bottom rail across post opening leaving
equivalent spacing from last baluster to post on each
end. Make sure there is even spacing from baluster
hole to post (Fig. 1)
b. Mark rail ush to post.
c. From marked lines, mark additional parallel line
1
⁄
1
⁄
1
4
⁄4⁄
"
from rst line to allow for bracket clearance (Fig. 2).
d. Align top rail and top rail cap with bottom rail and
mark all before cutting to size. Then cut all to same
length with a ne-tooth carbide blade. (Fig. 3).
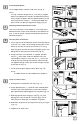
Assemble Railing Section:
a. Place top and bottom rail on a smooth, at and clean
surface. Then, align the top and bottom rails so that
the ridges inside the rails are oriented on the same
side (Fig. 4).
NOTE:
There are two (2) ridges on both sides that are
different sizes.
1
2
RAIL INSTALLATION - FOR SQUARE AND/OR SPIRAL BALUSTERS
Fig. 1
Fig. 3
Fig. 2
1
⁄
1
⁄
1
4
⁄4⁄
"
Tape
Measure
Fig. 4
Top Rail Opening Facing Up
2 Small Ridges
2 Small Ridges
2 Large Ridges
2 Large Ridges
Bottom Rail Opening Facing Down
2 Small Ridges