
Installation Guide


6
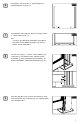
Snap plastic post adaptor strips into post channel (Fig.
14).
NOTE:
If installing mid-rail at 36": bottom post
adaptors are the shorter length at 27" long.
If installing mid-rail at 42": bottom post
adaptors are the longer length at 31
5
⁄
5
⁄
5
16
⁄16⁄
".
Fig. 14
Adaptor Strips
Next, install horizontal boards (see Step 5 for
calculations on cutting in ll boards if necessary):
Install (6) boards* horizontally into bottom rail (Fig.
15).
* Depending on desired height of mid-rail
(36" or 42") you will need a different number
of boards on top and bottom.
For 36" height:
• 5 boards below mid rail
• 6 boards above mid rail
For 42" height:
• 6 boards below mid rail
• 5 boards above mid rail
NOTE:
Lightly use rubber mallet as needed to fully nest
the boards on top of each other. Boards may
need to be inserted at an angle to start for easier
installation.
Remove the 2" spacer blocks from under the
bottom rail.
Install mid-rail (Fig. 16). Snap second set of post
adaptor strips into post channels above mid-rail
(Fig. 17). Insert the next (6) boards* over mid-rail.
Install top rail on top of the boards, pre-drill with
a
1
⁄
1
⁄
1
8
⁄8⁄
" drill bit, and screw all three rails into place
(Fig 18). Screws should be 2" apart from each
other with bottom screw attached about
3
⁄
3
⁄
3
4
⁄4⁄
"
above the bottom of the rail.
NOTE:
Screw all three rails into place at both ends
of the rail through both posts. This is done by
securing two screws through the mid rail and
two screws in the top rail at each end (Fig. 19).
Fig. 17
Fig. 16
Fig. 15
Fig. 18
Fig. 19
Adaptor Strips
Mid Rail
Boards
2"
2"
3/4"
3/4"
Top RailTop Rail
Mid Rail
Mid Rail
Mid Rail
Mid Rail
10
11
12
13
14