
Installation Guide

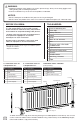


Assemble Your Railing Section:
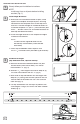
a. Place top and bottom rail on a smooth, at and
clean surface. Then, align the top and bottom rails
so that the ridges inside the rails are oriented on the
same side (Fig. 6).
NOTE:
There are two (2) ridges on both sides that
are different sizes.
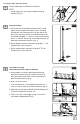
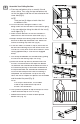
b. Push all balusters through the holes in rails,
being careful to have the hole in each baluster going
in the same direction facing the side with the two (2)
small ridges (Fig. 7).
c. Make sure the balusters in the rails are about 2"
above the rail and in-line with each other (Fig. 7).
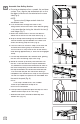
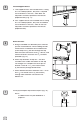
d. Snap in bumps from locking strip into holes of the
baluster for both top and bottom rails. Make sure
arrows on locking strip face rails (Fig. 8).
e. If the rails were cut shorter in step 3, then there will
be some extra locking strip at the end of install. Use
scissors or a utility knife to trim off the excess, while
leaving approximately 2" after the last engaged
bump.
f. Pull the top and bottom rails towards ends, guiding
the rails over the locking strips until snug.
g. Stand rail section up and fully lock balusters into
the rails. Place one foot on the top of the bottom
rail, between the second and third baluster while at
the same time placing a hand under the bottom of
the top rail between the second and third baluster.
Push with foot and pull with hand until locking is
completed. You should hear a snap as the strip
locks into the rail. Repeat this process for the middle
and the end of the panel (Fig. 9).
NOTE:
If no snap is heard or felt, use a rubber
mallet to tap underneath of top rail to
ensure a full connection.
h. Line up hand rail pro le on top of the top rail. Press
it down onto the top rail so it ts snug.
i. Slide bracket covers on ends of both top and
bottom rails (Fig. 10).
Fig. 7
Two Large Two Large
Ridges Side
Ridges Side
Ridges Side
2"
2"
2"
2"
Fig. 9
Arrows
Arrows
Arrows
Arrows
Pointing Down
Pointing Down
Pointing Down
Pointing Down
Pointing Down
Pointing Down
Pointing Down
Fig. 8
Arrows
Arrows
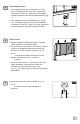
Fig. 6
Top Rail Opening Facing Up
2 Small Ridges
2 Small Ridges
2 Large Ridges
2 Large Ridges
Bottom Rail Opening Facing Down
2 Small Ridges
Fig. 10
Two Small
Two Small
Two Small
Two Small
Two Small
Two Small
Two Small
Two Small
Ridges Side
Ridges Side
Ridges Side
Ridges Side
Ridges Side
Ridges Side
Ridges Side
Ridges Side
Ridges Side
Ridges Side
Ridges Side
Ridges Side
4