FREEDOM-WEB Privacy Railing Kit INSTALLATION INSTRUCTIONS Read all instructions prior to installing product. Refer to manufacturers safety instructions when operating any tools. To register your product, please visit: freedomproduct.
WARNING: • Improper installation of this product can result in personal injury. Always wear safety goggles when cutting, drilling and assembling the product. • Incorrect installation may cause harm to the product or individual. NOTICE: • DO NOT attempt to assemble the kit if parts are missing or damaged. • DO NOT return the product to the store. For assistance or replacement parts call: 1-800-336-2383.
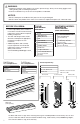
IMPORTANT NOTE: Privacy railing has been designed to meet IBC code requirements. Please follow the guidelines listed throughout and contact customer service with any additional information, questions, or concerns. In areas where wind loading is a concern and code requirement, railing systems may require shorter spans depending on height and potential increased loading. In these areas, please see the maximum railing spans listed in the table at the right.
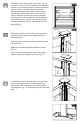
b Through bolt application: Fig. 5 a. Install blocking at post locations determined in Step 2b. b. Beneath all post locations install at least two (2) 2x8 blocks (Fig. 5) using at least three (3) #10x31⁄2" deck screws (sold separately) penetrating through the joists at least 11⁄2" into the blocks (Fig. 6). c. Use the post assembly to mark the holes for the surface mounting plate (Fig. 7). Mark and pre-drill 3 ⁄8" holes through wood deck (Fig. 7). Fig. 6 d.
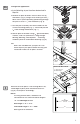
6 Once posts are set, place 2" spacer blocks to support bottom rail (Fig. 10). Fig. 10 2" 7 Place bottom rail inside the posts, resting it on the 2" spacer blocks (Fig. 11). Fig. 11 TIP: The rail may need to be inserted at an angle in one post to start before resting it fully on the blocks and in both posts. 8 Pre-drill rail using a 1⁄8" drill bit. Attach bottom rail using two 3⁄4" Hex Head screws. Bottom screw should be 3⁄4" from the bottom of the bottom rail.
10 Snap plastic post adaptor strips into post channel (Fig. 14). Fig. 14 NOTE: If installing mid-rail at 36": bottom post adaptors are the shorter length at 27" long. Adaptor Strips If installing mid-rail at 42": bottom post adaptors are the longer length at 315⁄16". 11 Next, install horizontal boards (see Step 5 for calculations on cutting infill boards if necessary): Fig. 15 Boards Install (6) boards* horizontally into bottom rail (Fig. 15).
15 Each post comes with sixteen (16) screws, but not all screws are used in each assembly. For additional security, use remaining screws to fasten infill boards to posts. Screws should be distributed evenly between top and bottom sections of the rail and used on each end of the boards. Locate screws midway between all three rails (halfway between mid and top rail, halfway between mid and bottom rail) for best results.
Installation For Half-Privacy Railing 1 A half privacy railing kit creates a 42" tall railing section. Posts are spaced 64" inside edge of post to inside edge of post and use full length infill boards (66" long) and rails (667⁄8") during assembly (Fig. 1). NOTE: • Six (6) infill boards are required for a 42" high panel, and five (5) boards for 36". Fig. 1 64" 423⁄8" • Posts are 423⁄8" and designed to allow a little room above the top rail so that other rail systems can attach to it if required.
4b Through bolt application: Fig. 5 a. Install blocking at post locations determined in Step 2b. b. Beneath all post locations install at least two (2) 2x8 blocks (Fig. 5) using at least three (3) #10x31⁄2" deck screws (sold separately) penetrating through the joists at least 11⁄2" into the blocks (Fig. 6). c. Use the post assembly to mark the holes for the surface mounting plate (Fig. 7). Mark and pre-drill 3 ⁄8" holes through wood deck (Fig. 7). Fig. 6 d.
6 Once posts are set, place 2" spacer blocks to support bottom rail (Fig. 10). Fig. 10 2" 7 Place bottom rail inside the posts, resting it on the 2" spacer blocks (Fig. 11). Fig. 11 TIP: The rail may need to be inserted at an angle in one post to start before resting it fully on the blocks and in both posts. Fig. 12 8 Pre-drill rail using a 1⁄8" drill bit. Attach bottom rail using two 3⁄4" Hex Head screws. Bottom screw should be 3⁄4" from the bottom of the bottom rail.
Install horizontal infill boards as shown. Boards should fit inside adaptor strip (Fig. 15). Fig. 15 NOTE: Lightly use rubber mallet to fully nest vinyl boards on top of each other. For 42" rail installations use 6 boards. For 36" rail installations use 5 boards. 12 Once horizontal infill boards are installed, lift the top rail 3 ⁄8" to ensure that the top rail is at 42" or 36" depending on installation and code requirements.
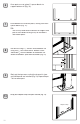
16 Assemble post base trim over plate. Take one side of trim ring and push plastic plugs through hole underneath. Take second half of the trim ring and push together (Fig. 20). Slide over plate for a finished look. Fig. 20 Transitioning from Full Privacy to Half Privacy Panel 1 If transitioning to a half-privacy panel from the full privacy panel (Fig 1), use the 36" transition cover provided in post kit to conceal top of Line or Corner post.