
Installation Guide


11
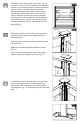
Once horizontal in ll boards are installed, lift the top rail
3
⁄
3
⁄
3
8
⁄8⁄
" to ensure that the top rail is at 42" or 36" depending
on installation and code requirements. In ll board will
still sit inside the top rail channel and provide desired
privacy and required security (Fig. 16).
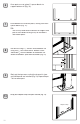
Install top rail using two
3
⁄
3
⁄
3
4
⁄4⁄
" Hex Head screws.
Screws should be 2" apart from each other with
bottom screw attached about
3
⁄
3
⁄
3
4
⁄4⁄
" above the bottom
of the rail (Fig. 17).
Install horizontal in ll boards as shown. Boards
should t inside adaptor strip (Fig. 15).
NOTE:
Lightly use rubber mallet to fully nest vinyl
boards on top of each other.
For 42" rail installations use 6 boards.
For 36" rail installations use 5 boards.
Fig. 19
End Cap
Line Cap
Corner Cap
Cover
Cover
StripStrip
Cover
Strip
Line Cover
Fig. 15
Fig. 16
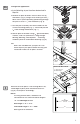
Snap/slide post cover (from post kit) into place by holding cover approximately 6" from
top of post. Hook one side of the cover and push down to snap the other side. Slide the
cover down the post to hide the screws (Fig. 19). Install post cap to top of post. Use a soft
rubber mallet if necessary to obtain a rm t. (Fig. 19)
Fig. 17
3/4"
2"
Remove the 2" spacer blocks from under the
bottom rail.
Each post comes with sixteen (16) screws, but not
all screws are used in each assembly. For additional
security, use remaining screws to fasten in ll boards
to posts. Screws should be distributed evenly
between top and bottom rail and used on each end
of the boards. Locate screws midway between top
rail and bottom rail for best results. These screws will
go into the channel aligned with screws used to lock
rails into place (Fig. 18).
Fig. 18
Distribute screws
evenly (minimum 1
per center)
11
12
13
14
15