
Installation Guide


3
IMPORTANT NOTE:
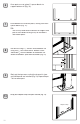
b. Determine the placement of the posts by evenly
spacing them along the deck. Ensure suf cient
mounting structure exists at these locations. Note
that the maximum distance between posts can be
64" inside edge of post to inside edge of post See
Step 5 (Fig. 9) for reference.
NOTE:
A minimum of 4" solid blocking is required
for standard installation. However,
additional structure may be required
depending on application. Always
refer to local building codes for
installation requirements.
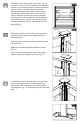
Before installing posts, be sure that all posts are
facing the same direction (with side requiring post
cover all facing the same direction).
Snap a chalk line onto the mounting surface to
ensure that all posts are aligned properly (Fig. 2).
Plumb and level the posts (Fig. 3).
Secure posts into position.
a. Posts are designed and manufactured to accept
3/8" fasteners (sold separately) for bolting to
surface. Be sure to use appropriate fasteners for
your installation.
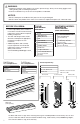
A full privacy railing kit creates a 72" tall railing
section. Posts are spaced 64" inside edge of post to
inside edge of post and use full length in ll boards
(66" long) and rails (66
7
⁄
7
⁄
7
8
⁄8⁄
") during assembly.
NOTE:
Eleven (11) in ll boards are requried for a
72" high panel.
Privacy railing has been designed to meet IBC code
requirements. Please follow the guidelines listed throughout
and contact customer service with any additional information,
questions, or concerns.
In areas where wind loading is a concern and code
requirement, railing systems may require shorter spans
depending on height and potential increased loading. In these
areas, please see the maximum railing spans listed in the table
at the right.
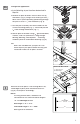
Concrete application:
Use the post assembly to mark the holes for the
concrete anchors as required by applicable building
codes. The holes in the surface mounting plate will
allow for a max size of a
3
⁄
3
⁄
3
8
⁄8⁄
" anchor (Fig. 4).
Installation For Full-Privacy Railing
Fig. 4
3
⁄
3
⁄
3
8
⁄8⁄
" Hardware
Post
Concrete
3
⁄
3
⁄
3
8
⁄8⁄
" Holes
Fig. 2
Fig. 3
Chalk Line
Chalk Line
Deck
Deck
Deck
Deck
Mounting Plate
Mounting Plate
Mounting Plate
Mounting Plate
Mounting Plate
Post
Post
Post
Post
Level
Level
Fig. 1
64"
64"
72
5
⁄
5
⁄
5
8
⁄8⁄
"
Wind Table – Post Spacing
Panel Height
(In inches)
Post Spacing
(Inside edges)
(In inches)
≤ 48
64
≤ 48 – 54
50
≤ 54 – 60
38
≥ 66 – 72 Max
30
1
2
3
4a