
Installation Guide


Deck Board Fastening Methods (Continued)
2. The Hidden Fastening Clip System.
a. Install a Starter pro le board using capped composite deck screws 5/8"
(16 mm) from the outer board edge. Screw down the outer edge of the
Starter pro le board at every joist location. Using #10 x 2-3/4" color
matched, capped composite deck screws (similar to Starborn
®
Deckfast
Cap-tor xd or FastenMaster
®
TrapEase 3) or the Cortex
®
color-matched
plug system in a grooved pro le decking installation.
b. Do not overhang Starter pro le boards over joists by more than 1"
(25 mm) widthwise and 2" (51 mm) lengthwise.
c. Always place one hidden fastening clip in the slot in the board edge at
every joist, between deck boards, regardless of the joist spacing. (Side to
side spacing is maintained by the hidden fastening clips.)
d. Use a #7 x 2-1/4" stainless steel screw through the center of the hidden
fastening clip at a 90° angle (or use a hidden fastening clip with a pre-
installed #7 x 2 ¼" star drive trim head screw).
e. Starting at one end… slide the next Scalloped pro le board onto the
exposed hidden fastening clip
®
Clips of the rst board and install a single
hidden fastening clip at one end of the out-board edge to hold the board
in place.
f. While standing on the new board and straddling each joist, pound it tight
into the clip with a non-marring dead blow hammer. Repeat steps “c”
through “f” for the remaining boards, installing hidden fastening clip at
each joist.
g. Always face-fasten the outer most edge of the rst and last board with
capped composite deck screws or the Cortex
®
plug system (Starter
pro les only).
Helpful Hints:
• Store hidden fastening clip indoors before use. Hidden fastening clip
install best between 40°F and 80°F (4°C and 27°C).
• Use a non-marring dead blow hammer as necessary to tap the hidden
fastening clip into the slot.
• A non-marring dead blow hammer or BoWrench
®
tool can also be used to
help secure the next Scalloped pro le board into place.
• If the joists are uneven, apply pressure to the deck board where it does
not touch the joist. As pressure is being applied, tap the board into the
hidden fastening clip using the non-marring dead blow hammer.
• In the case of a low joist, shim the hidden fastening clip as necessary to
seat in the slot in the edge of the deck board.
• Take a measurement of the total width of the installed boards to make
sure they are parallel every 3-4 courses
• Walking along joists and non-secured deck boards can be dangerous and
is therefore not recommended.
3. Installing Scalloped and Starter profi le decking via surface screws
method using capped composite decking screw fasteners or the Cortex
Hidden Fastener System:
a. Use #10 x 2-3/4" capped composite deck screws when installing
Scalloped pro le decking. (Similar to Starborn
®
Deckfast Cap-Tor xd
or FastenMaster
®
TrapEase 3 color matched capped composite deck
screws. Both are available at local building product retailers.)
b. When using non-capped composite decking fasteners (as outlined above),
pre-drill and countersink for the screw size (#8 x 2-1/2" typical.)
c. Two fasteners are required at each joist, one on each side of the board,
regardless of the joist spacing.
d. Drive fasteners straight and directly through the deck boards at a 90°
angle to the decking surface. Do not “toe nail” or drill at an angle.
e. Never place fasteners closer than 5/8" (16 mm) from the edge or ends of
the board.
f. For the best appearance, use a white chalk line to ensure straight fastener
lines. Colored chalk can stain the decking and can be very dif cult to
remove.
g. When using the Cortex
®
Hidden Fastening System (Starter pro les only)
with surface screws and plugs, please refer to the instructions inside the
box to ensure the most up-to-date installation method.
Helpful Hints:
• In the case of a low joist, shim the deck board as necessary before
securing the deck board.
• Take a measurement of the total width of the installed boards to make
sure they are parallel every 3-4 courses
• Walking along joists and non-secured deck boards can be dangerous and
is therefore not recommended.
Fascia and Riser Board Installation
1. Fasten fascia and riser boards using #8 x 2" stainless steel capped
composite deck screws or #9 x 1-7/8" fascia screws (similar to the
Starborn Deckfast Fascia System). Use three fasteners equally spaced
across the width of the fascia board at the top, middle and bottom locations
of the board (2 fasteners for riser board) and spaced approximately every
12" (305mm) along the length of the board. Never place fasteners closer
than 5/8" (16 mm) from the edge or ends of the board.
2. When decking boards are installed picture framing the deck, fasten the
fascia board to the rim joist, leaving a 1/8" (3.2 mm) gap between the top
of the fascia and the bottom of the deck boards. Decking boards should
not overhang the outer rim joists by more than 2" (51 mm).
3. When decking boards are installed without picture framing the deck, trim
the deck boards so they run past the outer rim joists by less than 2"
(51 mm). Fasten the fascia board to the rim joist, leaving a 1/8" (3.2 mm)
gap between the top of the fascia and the bottom of the deck boards.
Do not extend fascia to cover deck board ends.
NOTE:
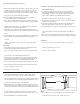
When using fascia to cover joists wider than 11-1/2" (292 mm), either
stack multiple layers of fascia or use a combination of fascia boards, deck
boards and 2x4s as accents to create a unique look. (Fig. 2)
Fascia beneath deck board - preferred
Fascia beneath 2x4 or 5/ 4x6 deck board band
Fig 2.
Fig 2.
5/ 4x6 decking
2x4 or 5/ 4x6 trim band
2x PT rim joist
2x PT rim joist
2x PT rim joist
2x PT rim joist
2x PT rim joist
2x PT rim joist
1/2" x 11-1/2" fascia,
trimmed to exposed rim joist width,
with nominal 1/2" extension below rim joist