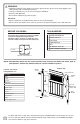
FREEDOM-WEB Vinyl Privacy & Picket Gates INSTALLATION INSTRUCTIONS Read all instructions prior to installing product. Refer to manufacturers safety instructions when operating any tools. To register your product, please visit: freedomproduct.
WARNING: • Improper installation of this product can result in personal injury. Always wear safety goggles when cutting, drilling and assembling the product. • Incorrect installation may cause harm to the gate or individual. • Not pool code approved. • Do not allow children to play with the gate. NOTICE: • DO NOT attempt to assemble the kit if parts are missing or damaged. • DO NOT return the product to the store, for assistance or replacement parts call: 1-800-336-2383.
Full Privacy Gate Component list: Upright Inserts Description Full Privacy Gussets Boards Upright Cap Top Rail Bottom Rail Gate Uprights Upright Inserts Upright Caps Vinyl Cement Top Rail Boards Screws Bottom Rail Hinges Hinges Gate Upright Gusset Hardware Kit Screws Open Top Picket Gate Component list: Vinyl Cement Open Top Picket Upright Inserts Pickets Description Pickets Boards Upright Cap Gussets Top Rail Middle Rail Bottom Rail Gate Uprights Upright Inserts Upright Caps Top Ra
NOTE: Components shown are for visual reference only and may not depict the exact style of your product. Please see product label for correct number of pieces.
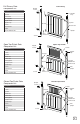
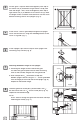
1 2 Lay gate components on a smooth, flat and clean surface. Begin by arranging the rails in the correct orientations. Fig. 1 1 Pickets For Styles With Two Rails: a. Slide the pickets/boards into the bottom rail. If pickets/boards are numbered, follow the sequence from left to right (Fig. 1). b. Slide the top rail over the pickets (Fig. 2). For Styles With Three Rails: Bottom Rail a. Slide the pickets/boards into the bottom rail.
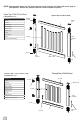
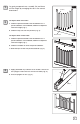
4 Ensure gate is square. Measure diagonally from top of left corner rail (A) to bottom of right corner rail (B) and note the length. Then, measure diagonally from top of right corner rail (C) to bottom of left corner rail (D). Note the length. Make sure both measurements are the same before installing screws into uprights (Fig. 6). 5 Install two 6" screws (provided) through each upright insert and into the rail using the molded grooves on the insert as a guide (Fig. 7).
BARRETTE OUTDOOR LIVING 7830 FREEWAY CIRCLE MIDDLEBURG HEIGHTS, OHIO 44130 TEL: (888) 418-4400 WWW.FREEDOMPRODUCT.