
4-bay Desktop Network Storage USER'S MANUAL freeStor 4020

90
indicated by Yes in the Backup View Open column), select the open backup view and click
“Close View”.
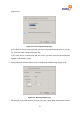
4. In the Backups list, select the backup that you want to recover.
5. Click “Restore Disk”.
6. When the confirmation message appears, click “Yes”.
The disk or partition is recovered to exactly its state at the date and time of the selected
backup.
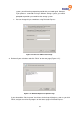
To let you monitor the progress of this activity, the Status page appears automatically. The
Current activity area displays the percentage of the recovery that has completed, and the
speed at which the data is being sent over the network. The Progress bar graphically
indicates how much of the recovery is complete.
Note: You can cancel this operation at any time by clicking “Stop Current
Activity”. However, this will leave the local disk or partition in an incomplete
state, and you will have to recover it again before you can use it.
7. When you are prompted to restart the computer, click “Yes”.
You do not have to restart your computer immediately, but you cannot access the
recovered disk or partition until you do.
As soon as you restart the computer, you must start DiskSafe Express and back up the
recovered disk or partition manually (as described in Manually backing up your disk) to
resume protection. In addition, if you recovered a partition and any other partitions on the
same disk were protected, you must manually back up those partitions as well.
4.3.3 Recovering a System Disk or Partition
To recover a system disk or partition using the recovery CD:
1. Using the appropriate procedure for your system, configure the computer to boot from the
CD-ROM drive.
2. Insert the recovery CD into the CD-ROM drive.
When responding to the prompts, use the arrow keys to highlight the desired item, use the
space bar to select or clear options (an X appears in the brackets when the option is
selected), and press “Enter” to make your selection. You can also tab between fields.
3. When the hardware list appears, select the network interface card (NIC) that you want to
use when recovering the data, and then select “Next”.