Model No. FMPW11.0/FMRPM11.0 QUESTIONS? USER’S MANUAL If you have questions, or if parts are damaged or missing, please see HOW TO CONTACT CUSTOMER CARE on the back cover of this manual. CAUTION Read all precautions and instructions in this manual before using this equipment. Keep this manual for future reference. www.freemotionfitness.
TABLE OF CONTENTS FCC/IC INFORMATION. . . . . . . . . . . . . . . . . . . . . . . . . . . . . . . . . . . . . . . . . . . . . . . . . . . . . . . . . . . . . . . . . . . . . . .2 IMPORTANT PRECAUTIONS. . . . . . . . . . . . . . . . . . . . . . . . . . . . . . . . . . . . . . . . . . . . . . . . . . . . . . . . . . . . . . . . . . 3 CONSOLE FEATURES . . . . . . . . . . . . . . . . . . . . . . . . . . . . . . . . . . . . . . . . . . . . . . . . . . . . . . . . . . . . . . . . . . . . . . .4 SPECIFICATIONS. .
IMPORTANT PRECAUTIONS WARNING: To reduce the risk of serious injury, read all important precautions and instructions in this manual and all warnings on your console before using your console. FreeMotion Fitness assumes no responsibility for personal injury or property damage sustained by or through the use of this product. 1. Before beginning any exercise program, consult your physician. This is especially important for persons over age 35 or persons with pre-existing health problems. 7.
CONSOLE FEATURES OVERMOLDED CONSOLE COVER HEART RATE MONITOR COMPATIBLE To prevent moisture from entering the console, the entire upper surface of the console, including the buttons, is overmolded in a thin rubber membrane. This surface can be easily cleaned with a soft, damp, nonabrasive cloth. The console is compatible with popular heart rate monitor telemetric chest straps, including ANT+ Sport (2.4 GHz) models and Polar®-compatible 5kHz models.
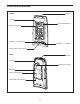
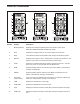
CONSOLE DIAGRAM FRONT USB Port Console LCD Message Banner Backlit LCD Display Backlight / - / Down Button AVG/END / + / Up Button STAGE / Enter / Select Button REAR USB Port Console Battery Cover Screw Batteries Battery Compartment Pairing Button Access Hole 5
POWER SENSOR DIAGRAM Battery Cover Screw Battery Cover Pedal Mounting Threads Crank Arm Batteries Battery Compartment Pairing Button Access Hole Power Sensor Crank Arm Bolt 6
DISPLAY DIAGRAM 1 4 5 6 3 2 7 8 9 10 11 12 Number Display Description 1 Message Banner Displays text messages indicating the current mode or menu option. Examples: WARM UP, STAGE #, RESULTS, RIDE. 2 AVG Displays the average values for the current stage or the entire ride. 3 MAX In the RESULTS mode and the RIDE mode, displays the maximum values. 4 WATTS* Displays power output in watts—instantaneous, average, and maximum.
DISPLAY DEFINITIONS WARM UP RIDE The console has a WARM UP mode designed to allow a user to adjust the exercise bike, to warm up, and to prepare for an actual ride. In a studio cycling class, users can use this mode to warm up before the class begins. During the ride, a user can press the AVG/END button to select the RIDE mode and view data for the entire ride. While the RIDE mode is selected, the console will show the time and distance for the entire ride.
KJ (KILOJOULES) First, the kilojoules value is converted to the kilocalories equivalent (4.186 kilojoules = 1 kilocalorie). Then, this value is divided by the standard assumption of human mechanical efficiency (22 percent). The result is the approximate amount of food energy used. IMPORTANT: The console will measure kilojoules if it is used with the power sensor. If the console is used with the RPM sensor, the console will not measure kilojoules.
SPEED DISTANCE The console will measure and show the user’s pedaling speed in miles per hour (MPH) or kilometers per hour (KMH). Note: The unit of measurement can be changed in the SETTINGS mode. The console will measure and show the distance traveled in miles (MI) or kilometers (KM). Note: The unit of measurement can be changed in the SETTINGS mode.
HOW TO USE THE CONSOLE To activate the console, see this page. To turn off the console, see this page. To use the backlight, see this page. To set up the console, see page 12. To use the WARM UP mode, see page 13. To use the STAGE mode, see page 14. To use the RIDE mode, see page 15. To use the Auto Pause mode, see page 16. To use the Auto Pause Off mode, see page 16. To use the RESULTS mode, see page 17.
HOW TO SET UP THE CONSOLE 4. Enter your weight if applicable. 1. Activate the console. See HOW TO ACTIVATE THE CONSOLE on page 11. 2. Select the User Setup mode. When you activate the console, the User Setup mode will be selected automatically. 3. Insert a USB drive into the USB port if desired. I f the console is used with the RPM sensor, the console will prompt you to enter your weight. Note: Your weight is used to calculate KCAL values.
HOW TO USE THE WARM UP MODE 4. Follow your progress with the displays. 1. Activate the console. See the DISPLAY DIAGRAM on page 7. See HOW TO ACTIVATE THE CONSOLE on page 11. When the WARM UP mode is selected, the console will show instantaneous data in the left displays. However, the console will not show the elapsed time, will not show average values, and will not save ride data to a USB drive. 2. Set up the console if desired.
HOW TO USE THE STAGE MODE The STAGE mode is designed to allow you to divide your ride into specific elements that can be tracked and analyzed. For example, you can divide the high-intensity and low-intensity portions of an interval ride into separate stages. You can also save the data for each stage to a USB drive (see step 3 on page 12). 1. Activate the console. See HOW TO ACTIVATE THE CONSOLE on page 11. 2. Set up the console if desired. 6. Follow your progress with the displays.
HOW TO USE THE RIDE MODE The time and distance displays will show the elapsed time for the entire ride and the distance for the entire ride. The left displays will show the maximum values achieved for the ride and the right displays will show the average values for the ride. 1. Select the STAGE mode. See steps 1 to 4 on page 14 and select the STAGE mode. Note: When the RIDE mode is selected, you can still press the STAGE button to enter a new stage. 2. Select the RIDE mode. 4.
HOW TO USE THE AUTO PAUSE MODE HOW TO USE THE AUTO PAUSE OFF MODE The console has an Auto Pause mode that allows you to stop your ride temporarily and then resume your ride without affecting the average value data shown and saved by the console. The console has an Auto Pause Off mode designed to be used by studio cycling class instructors.
HOW TO USE THE RESULTS MODE If there is a USB drive inserted into the USB port (see step 3 on page 12), the data for the ride will also be saved to the USB drive. 1. Select the RESULTS mode. To end a ride and select the RESULTS mode, press and hold the AVG/END button for 3 seconds (see steps 1 to 9 on page 14). See the DISPLAY DIAGRAM on page 7. The time and distance displays will show the time for the entire ride and the distance for the entire ride.
HOW TO LINK ANT+ COMPATIBLE DEVICES THE ANT+ MODULE AND COMPATIBLE DEVICES HOW TO LINK A HEART RATE MONITOR The console has a secure, digital ANT+ module that allows the console to communicate with ANT+ compatible heart rate monitors, fitness watches, and mobile devices. Follow the manufacturer’s instructions to use your ANT+ compatible heart rate monitor. 1. Put on the heart rate monitor and position yourself near the console.
HOW TO LINK A FITNESS WATCH OR MOBILE DEVICE Follow the manufacturer’s instructions to use your ANT+ compatible fitness watch or mobile device. Note: The console must be in the WARM UP mode to link to an ANT+ compatible fitness watch or mobile device. The fitness watch or mobile device cannot link to the ANT+ module when the console is in the STAGE mode. 1. Make sure that your device is in linking mode and position the device near the console. 3.
HOW TO CONFIGURE THE CONSOLE To select the settings mode, see this page. To pair the console, see page 21. To change display settings, see page 23. To change system settings, see page 24. To manage console firmware, see page 25. To use a bike number, see page 27. The settings menu contains the following menu options: PAIRING—Select this menu option to pair the console to a power sensor or an RPM sensor.
HOW TO PAIR THE CONSOLE Power Sensor IMPORTANT: The console must be paired to a power sensor or to an RPM sensor. The console cannot pair to more than one sensor at a time. Access Hole Pairing allows the console to communicate with a power sensor or an RPM sensor mounted to the exercise bike. The pairing process uses ANT+ digital wireless technology to link the console to the sensor.
4. Select the type of sensor to be paired. 7. Troubleshoot the pairing process if necessary. Select the RPM SENSOR or the PWR (power) SENSOR menu option. If the pairing process fails, follow these steps: Make sure that the menu option you select matches the type of sensor that will be mounted on the exercise bike.
HOW TO CHANGE DISPLAY SETTINGS When the ON backlight duration is selected, the backlight will stay lit the entire time the console is activated. Note: This backlight duration is not recommended for high-use environments, such as fitness clubs. 1. Activate the console and select the DISPLAY menu option. See HOW TO ACTIVATE THE CONSOLE on page 11. When the OFF backlight duration is selected, the backlight will not light. Then, see HOW TO USE THE SETTINGS MODE on page 20.
HOW TO CHANGE SYSTEM SETTINGS 1. Activate the console and select the SYSTEM menu option. When the USB OFF option is selected, the USB port cannot be used to save ride data (see step 3 on page 12) and cannot be used to save or import custom console settings (see page 26). See HOW TO ACTIVATE THE CONSOLE on page 11. Select the desired USB ON or USB OFF option. Then, return to the system menu. Then, see HOW TO USE THE SETTINGS MODE on page 20. 4.
HOW TO MANAGE CONSOLE FIRMWARE How to Upgrade Firmware Firmware is the programming that allows the console and sensor to function. Using the firmware menu, you can do the following: IMPORTANT: Upgrading the firmware is an advanced procedure. Make sure to read all instructions before upgrading the firmware. • View information about the console firmware and the power sensor firmware 1. The manufacturer will provide the upgraded firmware file in a specific xxxx.HEX file format.
How to Save Custom Console Settings How to Import Custom Console Settings The following custom console settings can be saved to a USB drive: You can import saved custom console settings from a USB drive to the console. 1. Make sure that the USB port on the console is enabled (see step 3 on page 24). • Unit of measurement • Backlight duration • Contrast level • Auto pause setting • USB port setting 2. Make sure that the desired custom console settings file (import.
How to Restore Default Settings How to Assign the Bike Number You can restore the following console settings to the manufacturer’s default settings. The default settings are indicated in parentheses: 1. Activate the console and select the BIKE # menu option. See HOW TO ACTIVATE THE CONSOLE on page 11.
MAINTENANCE HOW TO CLEAN THE CONSOLE The console and the power sensor can also use C and AA NiMH (nickel-metal hydride) rechargeable batteries. These batteries have longer battery life for each charge compared to standard alkaline batteries and can be charged up to five hundred times. These rechargeable batteries are a good option for high-use environments, such as fitness clubs. Make sure to use low discharge rechargeable batteries that have at least a 2500mAh capacity.
TROUBLESHOOTING Problem Possible Cause Solution Console does not activate Console batteries dead or improperly installed Make sure fresh batteries are properly installed in console. Console does not display data Console not attached to correct paired sensor and exercise bike Press and hold STAGE and AVG/END buttons to view bike number. Attach console to correct paired sensor and exercise bike.
HOW TO CONTACT CUSTOMER CARE If you have questions after reading this manual, if parts are damaged or missing, or to order replacement parts, please contact Customer Care at the phone numbers or addresses listed below. Please note the model number and the name of the product (see the front cover of this manual) before contacting Customer Care. In the United States and Canada Call: 1-800-201-2109, Mon.–Fri. 8 a.m.–5 p.m.