
Owner's Manual

9
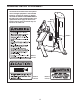
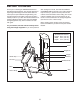
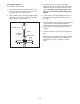
Top Weight Adjustment
Tools required: 5/32” hex key
1. If the cable needs to be shortened 3/4 in. (2 cm)
o
r more, follow the instructions in steps 1 and 2
on page 8; then, go to step 2 below.
2. Lift the coupler cover from the top weight coupler.
Loosen but do not remove the two set screws in
each side of the weight coupler.
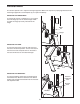
3. Pull the cable out of the top weight coupler.
Determine the amount that the cable needs to be
s
hortened, and cut that much off the end of the
cable. The cable must be long enough to be
h
eld by the set screws without lifting the top
weight.
4. Cut the cable to the desired length and strip 1 in.
(2.5 cm) of the vinyl sheath from the cut end of
the cable.
5. Insert the cable into the top weight coupler until all
four set screws can be tightened against the
cable. Tighten each set screw alternately 1/4 turn,
until all are set to 85 inch/pounds (9.6 Newton-
meters)
6. Lower the coupler cover over the top weight cou-
pler.
7. Slowly perform a repetition using a light load and
have someone make sure that the cable is not
derailed from a pulley or rubbing on a cable
guard.
Set Screws
Cable
T
op Weight
Coupler
Coupler Cover