
Owner's Manual

7
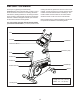
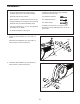
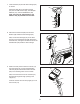
L:' J#$"/4'45"'K7#$?54'.P2'%/0'45"'!5$"&0'D89"#'.W2'
%6'658Y/:'!&$0"'45"'!5$"&0'D89"#')7Y%#0'8/48'
45"'K7#$?54:
' Q%9"'%'6"-8/0'7"#68/'58&0'45"'K7#$?54'.P2'
%/0'45"'!5$"&0'D89"#'.W2'/"%#'45"'1#8/4'81'45"'
N#%*"'.V2:
E8-%4"'45"'Y$#"'4$"'$/6$0"'45"'K7#$?54'.P2:'H$"'
45"'&8Y"#'"/0'81'45"'Y$#"'4$"'48'45"'G%$/'3$#"'
Q%#/"66'.Rb2:'
' F)&&'45"'845"#'"/0'81'45"'Y$#"'4$"')7Y%#0')/4$&'45"'
G%$/'3$#"'Q%#/"66'.Rb2'$6'#8)4"0'45#8)?5'45"'
K7#$?54'.P2:'
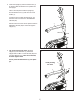
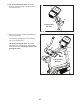
P:' Tip: Avoid pinching the wires.'!&$0"'45"'
K7#$?54'.P2'8/48'45"'N#%*"'.V2:'@44%-5'45"'
K7#$?54'Y$45'18)#'GV]'^'VR**'!-#"Y6'.SR2'%/0'
18)#'GV]'3%65"#6'.LV2g'start all four Screws,
and then tighten them.
Do not press the Shield Cover (7) into place
yet.
L
P
P
P
V
W
W
Rb
V
SR
SR
LV
LV
3$#"'H$"
Avoid pinching
the wires