
Operation Manual


21
BATTERY INSTALLATION
Your Companion Scooter is equipped with two maintenance
free 12 volt batteries. The batteries are linked together by
wiring cables to supply the electronic system with 24 volts of
power
Warning: It is imperative that the two batteries are
connected correctly to prevent a short circuit between the
two batteries.
When first installing the batteries follow these assembly
instructions.
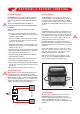
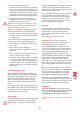
1. Connect the red wire of the battery cable to the positive
(+) terminal of the battery, with the screw, nut and washer
provided (see diagram below).
2. Connect the black wire of the battery cable to the negative
(-) terminal of the battery, with the screw, nut and washer
provided (see diagram below).
3. Repeat this procedure on the second battery making certain
the plastic red/black terminal covers are secured over each
terminal (see also page 17)
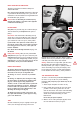
4. Position each battery onto the Scooter frame as the diagram
below, making certain that the black arrows are positioned
to the front of the Scooter (fig 24, page 18)
5. Secure the two batteries into position with the velcro®®
hold down adhesive technique.
6. Connect the two black plugs of the batteries into the two
black sockets of the wiring circuit (fig 23, page 18)
7. Switch on your Scooter, the battery meter will now move to
show the state of charge in the batteries and your Scooter is
ready to drive
8. Switch off your Scooter, fit the battery cover and seat.
BATTERY CONNECTIONS
Warning: Batteries are heavy, always handle with two hands.
Do not allow metal tools to touch both battery terminals
together, this will cause an electrical short and may damage the
battery and injure you. Make certain the red and black battery
wires are correctly attached to the ‘+’ and ‘-’ terminals as the
diagram below. Failure to observe this warning may cause an
explosion, short circuit, fire or injury to your person.
BATTERY CHARGING
Your Companion has a lot of power for a small Scooter.
Keeping it working to its maximum potential means that its
two batteries must be maintained with full power. Nightly
recharging, after use, will help you to give them a longer life
and will ensure your Companion is always ready to go when
you are.
BATTERIES
Your Companion is fitted with two sealed maintenance-free
batteries, especially designed for motive traction use. This
means that you do not have to worry about topping up the
cells. Warning: Do not attempt to remove the safety valves
situated in the top of the battery. Failure to observe this
warning will invalidate your battery guarantee.
Your Companion batteries are virtually maintenance-free
because the electrolyte is immobilised in a special form and
therefore will not leak out, even if the battery is accidentally
overturned.
Because your Freerider batteries are sealed they are more
likely to be accepted for carriage on aircraft. Please consult
your carrier prior to departure, as they will need advance
warning that you wish them to carry batteries.
Please note: Each carrier reserves the right not to carry
what may be termed ‘HAZARDOUS CARGO‘. Freerider
cannot be held responsible for their final decision.
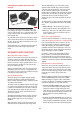
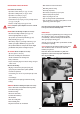
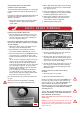
BATTERY CHARGER
The battery charger supplied (fig 33), is special to your
Companion and it may not be suitable for any other
powered mobility product. Only use the charger supplied
with your Companion; other makes of charger may
permanently damage your batteries and would invalidate the
Guarantee.
BATTERIES & BATTERY CHARGING
BATTERIES & BATTERY CHARGING
BLACK PLUG
FIG 33
FRONT