
Operation Manual


22
CHARGING THE BATTERIES
Your Companion batteries will need to be recharged when
the battery condition indicator gauge located on the
handlebar console (Fig 8 page 8), is reading in the far left
of the green scale or into the red sector. ‘Green’ indicates a
full charge (to the far right), down to half charge (to the far
left of the scale). ‘Red’ indicates that less than half charge is
remaining in the batteries. NOTE: The batteries will have a
longer life if you do not use up all of the battery’s power
and recharge as soon as the battery condition gauge enters
the red sector of the scale, rather than letting it go right
over to the far left of the red scale.
To charge your batteries follow these simple steps:
1. Switch off your Companion and remove the key.
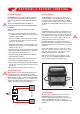
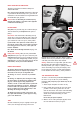
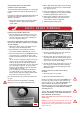
2. Your Charger has two leads exiting from it. One lead has
a 3-pin mains plug fitted to it. The second lead has a 3-
pin round charging connector on its end. Connect the
round 3-pin charging connector to the 3-pin charge
socket, which is located in the centre rear body cover
and marked “CHARGE” (Fig 34).
3. Plug the 3-pin mains plug from the Charger into a
convenient wall socket and switch the wall socket on.
Note: If you need to use an extension lead for your
mains supply, make certain that it is safe and suitable for
the charge current.
4. The Charger’s red neon mains-on light will now
illuminate continuously, the three remaining neon
indicator lights will flash twice to show a correct
connection has been made; shortly after this the 90%
charge light will flash twice to indicate the charger’s
internal controls are working correctly. In approximately
5 seconds the ‘Bulk-Charging’ light (first yellow light)
will illuminate and the Charger will start to recharge
your batteries. During the bulk charging stage, an
internal fan will be audible. The fan keeps the internal
parts of the charger cool and operates automatically
when required. Do not cover the fan ventilation
louvres.
5. When the batteries are 90% recharged, the ‘90%
Charged’ indicator light will illuminate (second yellow
light). The charging cycle is complete when the green
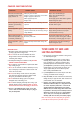
‘Charge Complete Light’ illuminates. The four coloured
lights on the front panel of the Charger provide charging
status indication as shown below. It is not necessary to
disconnect your Charger immediately the ‘Charge
Complete’ light illuminates. By leaving the Charger
connected to the batteries and switched on at the mains
you will ensure the batteries are maintained in a fully-
charged condition, the Charger will operate in a
‘maintenance’ float charge mode. NOTE: Your
Companion will not drive if the charger is connected.
CHARGING STATUS INDICATION
SYMBOL LIGHT COLOUR STATE OF CHARGER
Red Mains On
Yellow Bulk Charging
Yellow 90% Charged
Green Charge Complete
GENERAL
Depending on the depth of discharge, the minimum time
taken to re-charge serviceable batteries fully will vary from 8
hours up to 12 hours. Please note that recharge time will
vary between the minimum and maximum times indicated
due to the varying states of battery use. Although your
Freerider Companion may be considered ready for use for
short journeys when the third ‘90% Charged’ light
illuminates, at least once per week or prior to a longer
journey leave it charging until the green “Charge Complete’
light illuminates. During periods without use (perhaps
during winter) it is wise to charge batteries monthly.
Charging instructions are also found on the side panel of
your charger and on a separate leaflet (NO.702-60030/1)
supplied within the Charger carton. You will find that the
distance or operating time which your Companion can
travel, will gradually increase over the first few weeks of
use, i.e. running in period.
Your batteries reach their optimum efficiency after
approximately 12 cycles of discharge and recharge. Please
only use your Scooter for short journeys during the early
days of your batteries life as they need time to condition
themselves for longer periods of operation.
Please be patient
FIG 34
~