
Operation Manual
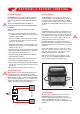

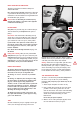

4. Slide the wheel from the mounting axle.
Rear wheels are fitted to the drive axle via a hub which
locates onto a key. These wheels fit tight onto the axle
and may need some pressure from a bearing puller onto
the wheel hub to release them from the axles. Look for
spacing washers and take care not to mislay the drive
key which fits between the wheel hub and the axle shaft.
5. First deflate the air from the wheel assembly by
removing the valve core from the valve with a suitable
valve key (purchased from auto shops).
Warning: Please note the rims of your wheel are a split
rim system, do not dismantle the wheel from the hub
without first letting air out of the tyre.
With the aid of 13mm spanners (not supplied) remove the
four nuts and washers from the rear of the wheel hub.
6. Remove the four wheel bolts and part the hub from the
wheel rims. Part the inner and outer wheel rim from the
side wall of the tyre.
To re-assemble the wheel and hub simply follow the above
procedure in reverse order noting the following points:
1. Make certain you have tightened the two wheel rims to
the centre hub.
2. Make certain your tyre is re-inflated to the
recommended pressure (see specifications at the rear of
this manual).
3. Make certain that you replace any spacing washers and
keys in the order that they were removed.
4. Locking Nut : The special nylon ‘locking’ centre hub nut
may lose it’s effectiveness when it has been removed
over a number of times. If the plastic locking ring at the
end of the nut becomes worn or damaged, then the nut
should be replaced with a new part obtained from your
Freerider Agent.
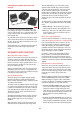
TYRE SERVICING FRONT WHEEL
Your front wheel is fitted with a solid tyre which requires
minimum maintenace. The tyre should be exchanged when
the tread has worn out. Remove the wheel from the fork
with the aid of 19mm and 21mm spanners. The front
wheel has two bearings which may have various spacing
washers between the fork, please note the order of these
washers.
Remove the tyre from the wheel by following point 6 above
for Rear Wheels, using a 10mm spanner and 4mm hex key.
Re-assembly is the reverse procedure making certain that all
washers supplied are replaced correctly.
TYRE PRESSURES
The Companion Scooter rear wheels are pneumatic and their
pressure needs to be maintained at 30 p.s.i. (210 kpa)
Warning: Pressures exceeding those recommended will
result in an uncomfortable ride. Underinflation will result in
poor battery and motor performance. Do not exceed the
maximum pressures marked on the side wall of the tyre, this
could damage the tyre or wheel rim.
Caution: The fitting of solid inserts into the rear wheels to
replace the pneumatic tube (puncture proofing) is not
recommended as these products detract from the natural
cushioned ride produced from ‘air’ filled tyres. If you
require puncture proof tyres, your dealer can, at an extra
cost, insert a liquid puncture proofing agent.
BATTERIES
Keep your batteries well charged (see Battery Charging
section of this manual). Keep batteries clean and in a dry
frost-proof place. Keep battery terminals tight. Your
Freerider Agent will be able to test your batteries for their
state of service.
Note: a charge may be made for this service.
IMPORTANT: It is not possible to predict the life
expectancy of your batteries. This is mainly due to the
different workloads a battery can be subjected to.
Some Freerider Companion users will use their vehicle
every day and for long periods of time. Their batteries will
receive a near total discharge, and the life of the batteries
will be short (less than 12 months in some cases).
Other Companion users will use their machines less
frequently, putting their batteries through a less demanding
discharge lifestyle. These batteries will probably have a
longer life in excess of 12months). This can only be a
general guide and one cannot be more specific, due to other
factors such as; motor loads, tyre pressures, general service
factors, working conditions, periods of non-use and abuse
etc.
When you need to purchase batteries, always insist on the
model fitted as standard equipment to your Companion. Do
not use less expensive car starter batteries. If in doubt,
consult your local Freerider authorised agent. Warning:
Correct disposal of exhausted batteries is advised.
Please note: The charger supplied with your Freerider
Scooter is specifically designed for sealed type batteries and
may not work correctly with other battery designs. (See also
Batteries and Battery Charging section of this manual).
LUBRICATION
The Freerider Companion has been designed with low
maintenance in mind. Wheel bearings and steering bearings*
are sealed for life. The following points will need
checking/lubricating at the following service intervals:
*(Read also ‘Handlebar Bearings’ page 27 and ‘Lubrication’
page 29)
28