
Installation Instructions
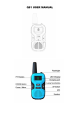
Operating the unit
1. Turning unit on/off:
After inserting the battery, press and hold the MENU button for 1 second to turn on the unit,
first displays the character of “8 “for one second, then displays the current channel.
Press and hold the MENU button for 1 second, the unit will be turned off, and the LED screen
will turn off.
2. Transmitting (sending speech)
a. Press and hold the PTT (Push to Talk) button to transmit your voice. The transmit
signal icon “P” will display on the screen.
b. Hold the unit in a vertical position with the Mic (Microphone)2-3 cm away from the
mouth. While holding the PTT button, speak into the microphone in a normal tone
of voice.
c. Release the PTT button when you have finished transmitting.
When a signal is received on the current channel, “A” icon will be displayed
on the screen.
The unit is continuously in the Receive mode when the unit is turned ON and no
transmitting.
Note: Both parties must be same channel.
3. Channel settings
In standby mode, press the MENU button one time, the current channel will be displayed,
press the UP button or DOWN button to adjust the channel. Numbers 1-0 represent channels
1-10 in turn.
4. Volume settings
In standby mode, press the MENU button twice, the current volume (L/C/H three gears) will be
displayed, press the UP button or DOWN button to adjust the volume. L is low volume; C is
medium volume; letter H is high volume.
5. Flashlight function
In standby mode, press the Lamp button once the flashlight turns on; press the Lamp button
again to turn off.
6. Key lock function
In standby mode, press and hold the Lamp /lock button for 1 second, the button will be locked,
and character”b” will be display on LED. After the buttons are locked, the UP, DOWN buttons
are prohibited to use except for the MANU ,PTT and Lamp /lock functions. If the locked
buttons are pressed, the character”b” will be displayed, indicating that the button are locked.
Note: After the buttons are locked, long press MENU to turn on and off the unit.
7、key to unlock
After the button is locked, press and hold the Lamp /lock button for 1 second, and the unit will
return to the standby state.
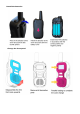
8、Charging function
According to the positive and negative symbols in the battery compartment of the walkie-talkie,
install AAA ni mAh 3 pcs rechargeable batteries ,then Plug in the Micro USB cable, the green line
flashes up and down on the LED. After charging for about 12 hours, the LED will display “F”,
which means the charging is complete.
Remark: 1) During charging, to protect the walkie-talkie, it is forbidden to turn it on and operate,
unplug the USB cable, and it can be turned on normally.
2) This product does not include rechargeable batteries and Micro USB cables
9. Battery Caution:
1:If you use Alkaline battery ,please use AAA size Alkaline battery ,but don’t attempt to charge
alkaline batteries.
2:Please don’t mix old and new batteries ,it will affect the battery lifetime .