
Installation Guide

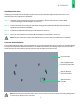
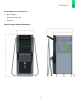

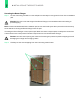
Table Of Contents

17
2 Installation of the Boost Charger
The steps outlined in this procedure require the use of a forklift or
crane to lift, move, and mount the Boost Charger. A crane setup
using a four-point sling, similar to the example pictured to the
right, may be used in situations when a forklift cannot be used for
installation. It is recommended that the crane and four-point sling
are certified and capable of carrying at least 5,000 lbs.
When using a crane, be sure to check for height restrictions and
clearances around the work area. Any cables, nylon straps, hooks,
and shackles should be laid out to support the Boost Charger
and prevent it from swaying or tilting. Pay specific attention to the
Boost Charger’s center of gravity to avoid the unit from falling. Add
additional nylon straps and sling pick up points around the front
and back of the unit to keep it from swaying or shifting.
Warning: Improper lifting of the Boost Charger may result
in severe damage or injury.
Caution: The Boost Charger is not designed to be lifted
from the top or sides by a crane or lifting straps. Only lift
the Boost Charger from the bottom.
As needed, add chaff protection between the straps and the
Boost Charger.
Overview of Steps
• Uncrating the Boost Charger (page 17)
• Mounting the Boost Charger (page 23)
• External Safety Shutoff (page 25)
• Connecting Electrical Power (page 26)
• Installing the Kick Panels (page 27)
2 INSTALLATION OF THE BOOST CHARGER