
Installation Guide
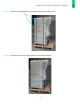
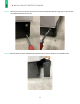
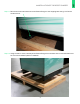
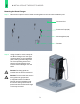
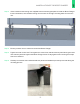
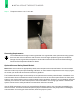


Table Of Contents

29
Step 9 Bundle the wires together using cable ties as necessary.
Step 10 Verify that the Boost Charger breakers are on.
Step 11 Seal the conduit openings using duct seal.
Step 12 Close the front access door of the Boost Charger and lock it using the provided keys.
Step 13 Unwrap the cable connectors and insert each connector into its corresponding holster.
Important: You have now completed the physical installation of the Boost Charger. Follow the
steps in the next section to complete the installation. Do not leave the installation site until you
have completed all steps in the next section and have verified that the Boost Charger is operating
correctly.
Warning: Risk of Fire or Electric Shock. This Device is Intended for Charging Vehicles Only.
Caution: Do Not Use this Product if There is Any Damage to the Charging Cable or Charging
Connectors.
Powering on the Boost Charger
There is an emergency stop button, however there is no separate on/off switch for the Boost Charger.
Note: The emergency stop button should not be used as an on/off switch.
Boost Charger is powered on during the installation by energizing the site’s electrical panel. Immediately
after completing installation and the electrical breaker is turned on, the system will turn on and run a series
of self-tests to ensure safe operation.
These tests include:
• Electrical component safety checks
• Lighting and display checks
• Battery charging system checks
• Component operation checks (such as fans, pumps, and contactors)
• Cellular connectivity checks
If any errors are found, the display will report that the charger is not available for use and the indicator lights
will turn red. Please contact FreeWire support at support@freewiretech.com or 415-484-9590.
2 INSTALLATION OF THE BOOST CHARGER