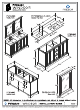
FVN2460 WINDSOR INSTALLATION GUIDE FVN2460 FCT2060WH-D-CMB Vanity front Counter Top front FCB2460 Cabinet front FCB2460 Cabinet back All dimensions & specifications are approximate and subject to change without notice. © FVN2460 WINDSOR | INSTALLATION GUIDE S018 PFRESCA™ Al rights reserved, This malted may not be reproached, displayed, codified or distributed without the express prior written passionless of the copyright holder.
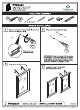
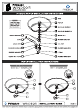
FVN2460 WINDSOR INSTALLATION GUIDE TOOLS FOR ASSEMBLY 1/4" & 3/87 Drill Bit MIRROR INSTALLATION 2] Press the anchors Into the holes. ps Measure distance between the holes and mark it on the wall using a level. Verify level and mark the mounting holes. 2] Hang mirror on the screws. LE IMPORTANT: Consult an expert for the proper thunderbolts to use when attaching to various constructions. Screws provided do not attach to all wall construction types, Anchors are not required if brackets are installed in stud.
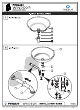
FVN2460 WINDSOR INSTALLATION GUIDE CABINET INSTALLATION 2] Mark anchor mounting hole locations on the wall as shown. IMPORTANT: Consult an expert Tor the proper screws/Dolts to use when attaching to various constructions. Screws provided do not attach to all wall construction types. Anchors are not required if brackets are installed in stud, Flip counter top upside down and attach 4 | Apply silicone to the top of the cabinet sink to It using provided brackets & screws.
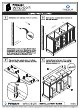
FVN2460 WINDSOR INSTALLATION GUIDE SINK o Your tern may POP-UP appear slightly different from the illustration.
FVN2460 WINDSOR INSTALLATION GUIDE P-TRAP INSTALLATION [2] Install p-trap (J) © FVN2460 WINDSOR | INSTALLATION GUIDE S018 PFRESCA™ Al rights reserved, This malted may not be reproached, displayed, codified or distributed without the express prior written passionless of the copyright holder.