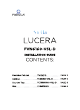
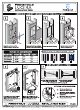
FVN6160-VSL-D ULCERATE INSTALLATION GUIDE FVN6160-VSL-D Vanity Ensemble Front FMC8010 Medicine Cabinet FCT6160WH-VSL-D / FVS6119WH "Counter Top Front Sink Front FCB6160-VSL-D Cabinet Back r FCB6160-VSL-D Cabinet Front 65" r >All dimensions & specifications are approximate and subject to change without notice. & FVN6160-VSL-D | ULCERATE | INSTALLATION GUIDE ©2019 FRESCA™ All rights reserved.
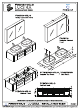
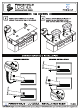
FVN6160-VSL-D ULCERATE INSTALLATION GUIDE TOOLS FOR ASSEMBLY 1/8" Drill Bit SUPPLIED PARTS X29 Nn le THANES EN | Led aes eal FMC8058 19.5" 26" 5" SIDE MIRROR SIDE BRACKET FMC8090 26" 5" FMC8010 39.5 5" MOUNTING BRACKET (top) MOUNTING SMALL SCREW BRACKET (bottom) %13/8" Flat Head Screw INSIDE GLASS SHELF ‘WARNING: Risk of property damage. Use anchors rated for the loaded weight of the product. Refer to the anchor manufacturer's Instructions.
FVN6160-VSL-D ULCERATE INSTALLATION GUIDE IMPORTANT: Consult an expert for the proper screws/bolts to use when attaching to various constructions. Screws provided do not attach to all wall construction types. Anchors are not required if brackets are installed in stud.
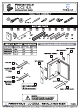
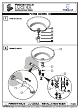
FVN6160-VSL-D ULCERATE INSTALLATION GUIDE Place and hold the medicine cabinet in the cutout opening. Draw the perimeter of the medicine cabinet on the wall. Frame the cutout opening. Cut the marked perimeter with appropriate tool. ROUGH IN DIMENSION FMC80S8 FMC8090 FMC8010 19.5" 29.5" 39.5" STEPS TO FRAME THE CUTOUT OPENING HEL aa] a. Push a side of the glass shelf {C} Into left or right pins (J). b. Snap the glass shelf (C) Into the opposite side. c. Fill remaining holes with the plugs (K).
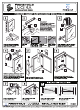
FVN6160-VSL-D ULCERATE INSTALLATION GUIDE CABINET INSTALLATION 2 Attach wall brackets (E) to the wall with the screws (F). Place cabinet (D) in designated location and mark the bracket position on the wall. Apply a bid of the silicone and hang a cabinet (D) on the brackets (E). IMPORTANT: Consult an expert for the proper screws/bolts to use when attaching to various constructions. Screws provided do not attach to all wall construction types. Anchors are not required if brackets are installed in stud.
FVN6160-VSL-D ULCERATE INSTALLATION GUIDE CABINET INSTALLATION Apply a bead of silicone on top of the Apply a bead of silicone on the top of cabinet. Place counter top on the cabinet. counter top and the bottom of the sinks. Connect sinks to the counter top. & FVN6160-VSL-D | ULCERATE | INSTALLATION GUIDE ©2019 FRESCA™ All rights reserved. This material may not be reproduced, displayed or distributed without the express prior written permission of the copyright holder.
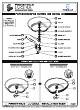
FVN6160-VSL-D ULCERATE INSTALLATION GUIDE P-TRAP AND POP-UP INSTALLATION INSTRUCTIONS [Teh Your item may appear slightly different from the illustration. oa" —10 SILICONE WASHER 2 & MOUNTING RING BRASS NUT RING Ld RUBBER WASHER DRAIN PIPE TAIL PIPE MOUNTING RING 2 a Tn RUBBER WASHER 2 RUBBER WASHER — P-TRAP CLEAN OUT PLUG RUBBER WASHER 3 POP-UP INSTALLATION INSTRUCTIONS FOR SINKS FOR SINKS WITHOUT OVERFLOW WITH OVERFLOW & FVN6160-VSL-D | ULCERATE | INSTALLATION GUIDE ©2019 FRESCA™ All rights reserved.
FVN6160-VSL-D ULCERATE INSTALLATION GUIDE P-TRAP INSTALLATION Install tale pipe (G). Connect P-trap (J). & FVN6160-VSL-D | ULCERATE | INSTALLATION GUIDE ©2019 FRESCA™ All rights reserved. This material may not be reproduced, displayed or distributed without the express prior written permission of the copyright holder.