OPULENT INSTALLATION GUIDE FRESCO MEDICINE CABINET ont view VANITY ENSEMBLE front view ALL DIMENSIONS & SPECIFICATIONS ARE APPROXIMATE AND SUBJECT TO CHANGE WITHOUT NOTICE. & FVN8O13 OPULENT | INSTALLATION GUIDE ©2017 FRESCA™ All rights reserved. This material may not be reproduced, displayed, modified or distributed without the express prior written permission of the copyright holder.
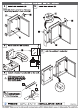
Berle gel = Side Mirror Side Bracket Anchor SN Mounting Bracket (Top) Anchor Mounting Bracket (Bottom) Note: Only use anchors (J) if stud (2"x4” frame) is not available. Anchor Bracket & FVN8O13 OPULENT | INSTALLATION GUIDE ©2017 FRESCA™ All rights reserved. This material may not be reproduced, displayed, modified or distributed without the express prior written permission of the copyright holder.
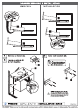
DRAWER REMOVAL & INSTALLATION REMOVAL INSTALLATION Remove a drawer (0). Locate a cabinet (F) & mark location. NOTE: Consult an expert for the proper screws/bolts to use when attaching to various constructions. Screws provided do not attach to all wall construction types. & FVN8O13 OPULENT | INSTALLATION GUIDE ©2017 FRESCA™ All rights reserved. This material may not be reproduced, displayed, modified or distributed without the express prior written permission of the copyright holder.
4 | Apply silicone and install a cabinet (F). Apply silicone and place a sink (E) on the cabinet (F). & FVN8O13 OPULENT | INSTALLATION GUIDE ©2017 FRESCA™ All rights reserved. This material may not be reproduced, displayed, modified or distributed without the express prior written permission of the copyright holder.
MEDICINE CABINET INSTALLATION 1 Install side brackets (B). Install side mirrors Skip STEP 7 and STEP 2.1 if brackets (B) already attached to side mirrors (C). Attach a bottom bracket (K) to the wall. NOTE: Consult an expert for the roper screws/bolts to use when attaching to various constructions. crews provided do not attach to all wall construction types. & FVN8O13 OPULENT | INSTALLATION GUIDE ©2017 FRESCA™ All rights reserved.
MEDICINE CABINET INSTALLATION 6 | Once joint, place connected cabinets (A) on the bottom bracket (K). #I%E% Consult an expert for the proper screws/bolts to use when attaching to various constructions. Screws provided do not attach to all wall construction types. HYGIENE This step requires assistance to hold cabinet in place until top bracket is securely attached. HIE This step requires assistance to hold cabinet in place until top bracket is securely attached.
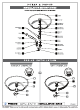
P-TRAP & POP-UP INSTALLATION INSTRUCTIONS Your Item may appear slightly different from the Illustration. POP-UP SILICONE WASHER MOUNTING 3 SILICONE RING WASHER 2 BRASS NUT RUBBER WASHER DRAIN PIPE TAL PIPE MOUNTING RING 2 TT a austerer WASHER 2 RUBBER WASHER RAP CLEAN OUT a ag RUBBER PLUG WASHER 3 POP-UP INSTALLATION FOR SINKS min WITHOUT OVERFLOW WITH OVERFLOW & FVN8O13 OPULENT | INSTALLATION GUIDE ©2017 FRESCA™ All rights reserved.
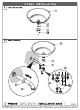
P:TRAP INSTALLATION Install P-trap (J). & FVN8O13 OPULENT | INSTALLATION GUIDE ©2017 FRESCA™ All rights reserved. This material may not be reproduced, displayed, modified or distributed without the express prior written permission of the copyright holder.