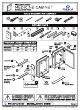
FMC8014/8020 o, MEDICINE CABINET INSTALLATION GUIDE FRESCO TOOLS REQUIRED FOR ASSEMBLY FMC8020 ANCHOR B—\ MOUNTING BRACKET (top) Anchor [~ MOUNTING BRACKET (bottom) INSIDE CABINET GLASS SHELF CHANGE WITHOUT NOTICE. TO THE ANCHOR MANUFACTURER’S INSTRUCTIONS. ALL DIMENSIONS & SPECIFICATIONS RISK OF PROPERTY DAMAGE. USE ANCHORS RATED ARE APPROXIMATE AND SUBJECT TO FOR THE LOADED WEIGHT OF THE PRODUCT. REFER {& FMC8014/8020 | INSTALLATION GUIDE ©2018 FRESCA™ All rights reserved.
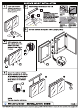
SURFACE-MOUNT INSTALLATION Level and mark the cabinet’s location on the wall from point a to the point b. IMPORTANT: K Consult an expert for the proper | elev and Drill the holes screenshots to use when mark. in the wall. attaching to various constructions. Screws provided do not attach to all wall construction types. Anchors are not required If brackets are Installed In stud. Insert the Attach bottom anchors in the bracket to the holes. Connect cabinets (A) together with a ganging kit (L).
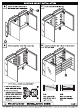
SURFACE-MOUNT INSTALLATION Attach the side mirrors (C) to Push and twist shelf clips (J). the cabinet with a screwdriver. 9 Insert the shelves (E). Follow the steps below OPTIONAL DOOR ADJUSTMENT a. This screw allow you to adjust pitch side to side. b. This screw releases cabinet’s door and allows G up and down adjustment. D 9.a ¢. This screw allow you to Push a side of the Snap the shelf (E) adjust the gap between @ shelf (E) into left or down into opposite the doors. right pins (J). side.
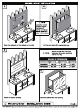
RECESS-MOUNT INSTALLATION Determine overall medicine cabinet dimensions. If recessing medicine cabinet, determine rough in dimensions. Cut the perimeter with appropriate tool. 3 Please consult with a licensed contractor for proper medicine cabinet framing. FMC8014 481/2" 351/8" 33/4" FMC8020 | 581/4" 351/8" 33/4" L Frame the cutout opening. Insert the cabinet into the opening. {& FMC8014/8020 | INSTALLATION GUIDE ©2018 FRESCA™ All rights reserved.
FMC8014/8020 MEDICINE CABINET 9 INSTALLATION GUIDE RECESS-MOUNT INSTALLATION Insert the shelves (E). Follow the steps below Fill the remaining holes with a plugs (K). for each shelf, OPTIONAL DOOR ADJUSTMENT P This screw releases cabinet’s door and allows up and down adjustment. 8.a Push a side of the Snap the shelf (E) RW This screw allow shelf (E) into left or down into opposite This screw allow you you to adjust pitch i side. to adjust the gap (S8 side to side shelf clips (3. between the doors.