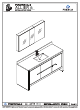
© FRESCO ¢& FYNSN9HA-S TALLIER | INSTALLATION GUIDE ©2018 FRESCA™ All rights reserved. This material may not be reproduced, displayed, modified or distributed without the express prior written permission of the copyright holder.
FVNB8119HA-S TALLIER © INSTALLATION GOOD! FRESCO DIMENSIONS Medicine Cabinet FRONT VIEW ag" Cabinet REAR VIEW Cabinet FRONT VIEW ALL DIMENSIONS & SPECIFICATIONS ARE APPROXIMATE AND SUBJECT TO CHANGE WITHOUT NOTICE. FVN8STI9HA-S TALLIER ®i{: INSTALLATION GUIDE ©2018 FRESCA™ All rights reserved. This material may not be reproduced, displayed, modified or distributed without the express prior written permission of the copyright holder.
CABINET DIMENSIONS h—18 7/8" —rll—18 7/8" ALL DIMENSIONS & SPECIFICATIONS ARE APPROXIMATE AND SUBJECT TO CHANGE WITHOUT NOTICE. MEDICINE CABINET INSTALLATION Attach side mirrors (C) to the medicine cabinet (A). ¢& FYNSN9HA-S TALLIER | INSTALLATION GUIDE ©2018 FRESCA™ All rights reserved. This material may not be reproduced, displayed, modified or distributed without the express prior written permission of the copyright holder.
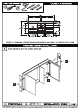
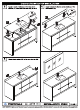
MEDICINE CABINET INSTALLATION Mark cabinet's (A) location. 3 | Attach bottom bracket (K) to the wall. CENTER LINE IMPORTANT: Consult an expert for the proper ! screws/bolts to use when attaching to various constructions. Screws provided do not attach to all wall construction types. Anchors are not 7 required if brackets are installed in stud. Zz #8 x 13/8" Flat Head Screw * Place cabinet (A) on the bottom bracket (K) and secure it with a top bracket (L). Join the cabinets (A) together.
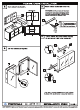
DRAWER REMOVAL & INSTALLATION REMOVAL INSTALLATION Remove the drawers and open the doors then Apply a bead of silicone on the top of the sink attach cabinet to the wall using a drill. (E) and connect the sink to the counter-top (D). IMPORTANT: CONSULT AN EXPERT FOR THE PROPER SCREWS/BOLTS TO USE WHEN ATTACHING TO VARIOUS CONSTRUCTIONS. SCREWS PROVIDED DO NOY ATTACH TO ALL WALL CONSTRUCTION TYPES. ¢& FYNSN9HA-S TALLIER | INSTALLATION GUIDE ©2018 FRESCA™ All rights reserved.
[72] the bottom of the back-splash (G). the top of the enter-top (E) on i cabinet (C) then place coil Apply a bead of silicone on enter-top (E). 5 Attach back splash (G) to the cou 72 INSTALLATION GUIDE | rage 6 § {& FYNSN9HA-S TALLIER # copyright holder. press prior written permission of the raved.
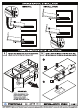
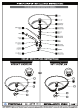
P-TRAP & POP-UP INSTALLATION INSTRUCTIONS C SILICONE WASHER MOUNTING SS] SILICONE RING WASHER 2 BRASS NUT RUBBER HEADPIN WASHER PFE TAIL PIPE MOUNTING RING 2 RUBBER WASHER 2 RUBBER WASHER pored CLEAN OUT a a Austen PLUG WASHER 3 POP-UP INSTALLATION INSTRUCTIONS WITHOUT OVERFLOW WITH OVERFLOW ¢& FYNSN9HA-S TALLIER | INSTALLATION GUIDE ©2018 FRESCA™ All rights reserved. This material may not be reproduced, displayed, modified or distributed without the express prior written permission of the copyright holder.
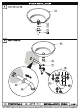
P-TRAP INSTALLATION Install P-trap (J). ¢& FYNSN9HA-S TALLIER | INSTALLATION GUIDE ©2018 FRESCA™ All rights reserved. This material may not be reproduced, displayed, modified or distributed without the express prior written permission of the copyright holder.