F R E S C O™ i u s e r ’ s m a n u a l MA R T I N LOGA N ® the loudspeaker technology company
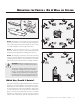
CONTENTS AND INTRODUCTION Contents Contents and Introduction . . . . . . . . . . . . . . . . . . .2 Contents Introduction Installation in Brief . . . . . . . . . . . . . . . . . . . . . . . .3 Operation . . . . . . . . . . . . . . . . . . . . . . . . . . . . . . .4 Signal Connection On Wall/Off Wall Switch Break-In Mounting the Fresco i On A Wall or Ceiling. . . . . .5 Which Way Should It Rotate? Preparing For Vertical Installation . . . . . . . . . . . . . . .
INSTALLATION IN BRIEF We know you are eager to hear your new Fresco i loudspeaker, so this section is provided to allow fast and easy set up. Once you have it operational, please take the time to read, in depth, the rest of the information in this manual. It will give you perspective on how to attain the greatest possible performance from this most exacting transducer. Step 1: Unpacking Remove your new Fresco i speaker from the packing.
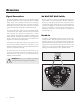
OPERATION Signal Connection Use the best speaker cables you can. The length and type of speaker cable used in your system will have an audible effect. Under no circumstance should a wire of gauge higher (thinner) than #16 be used. In general, the longer the length used, the greater the necessity of a lower gauge, and the lower the gauge, the better the sound. A variety of speaker cables are now available whose manufacturers claim better performance than standard heavy gauge wire.
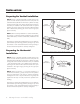
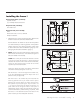
MOUNTING THE FRESCO I ON A WALL OR CEILING Figure 2. The parts of the Fresco i bracket assembly. NOTE: MartinLogan recommends using 5 wall anchors to secure each Fresco i to a wall. During the installation, if any of the screw/wall anchor positions are over a stud, it is recommended to screw directly into the stud. NOTE: To assure that your Fresco i is safely wall mounted, these instructions must be carefully followed. Study them thoroughly before installing your Fresco i's. Figure 3.
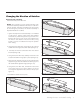
INSTALLATION Preparing For Vertical Installation NOTE: Fresco i’s bracket assembly consists of two main parts: the wall bracket (attaches to the wall) and the cabinet bracket (attaches to the Fresco i). When correctly configured the wall and cabinet brackets should each have one pin installed—the wall bracket with an upward pointing pin in the upper hinge, and the cabinet bracket with a downward pointing pin in the lower hinge (see figures 5 and 6).
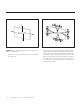
Changing the Direction of Rotation Required tools (included): 2.5mm Allen tool, 6mm Allen tool NOTE: This procedure can be performed either with the bracket assembly installed on the Fresco i cabinet or with the bracket assembly uninstalled. For the purpose of illustrating this procedure, the bracket assembly is depicted installed on a cabinet. 1 Ignore this step if the bracket assembly is not installed on the Fresco i. Prepare a flat surface with padding and sheets to protect the speaker as you work on it.
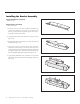
Installing the Bracket Assembly Required hardware (included): (6) M4 screws Required tools (included): 2.5mm Allen tool 1 Prepare a flat surface with padding and sheets to protect the speaker as you work on it. Remove the Fresco i's grill cloth and carefully place the Fresco i face down on the work surface. Figure 12. Loose the 2 cap nuts. 2 Using the 6mm Allen tool, loosen the 2 cap nuts (see figure 12). 3 Rotate/open the wall bracket away from the cabinet bracket (see figure 13).
Installing the Fresco i Required hardware (included): (5) wall anchors (5) 1" Phillips head wood screws Required tools (included): 6mm Allen tool Required tools (not included): Level Electric drill and 1/4" and 1/8" drill bits Phillips screwdriver 1 Hold the Fresco i at the mounting location. Examine the location to assure the wall is free of obstructions. Test the direction of rotation to assure that the speaker can rotate toward your listening position.
Figure 19. Mark the center points. Figure 20. Use a level to square the wall bracket and mark the other 4 holes. NOTE: Figures 19–24 illustrate the Fresco i mounted in 4 different configurations. 4 Using a level, square the wall bracket and hold it flush against the wall with the wall bracket's center hole over the point you just marked. The cylindrical hinges on the wall bracket should point away from the wall and the flat plane of the wall bracket should be flush against the wall.
Figure 21. Drill pilot holes and/or sink wall anchors at the 5 marked locations. Figure 22. Using a level, square the wall bracket and install the screws. 5 Set the wall bracket aside. Using a 1/8" bit, drill a pilot hole at all five points marked in the previous steps. 6 Mount the wall bracket to the center wall anchor (or pilot hole) using a 1" Phillips head screw driven through the wall brackets center point.
Figure 23. Install the Fresco i and the washers and cap nuts. Figure 24. Rotate the Fresco i into position and tighten the cap nuts. 9 Place the Fresco i onto the wall bracket and carefully slide the Fresco i into place (see figure 23). 10 Using a 6mm Allen tool, attach a washer and cap nut onto each pin. Do not fully tighten the cap nuts (see figure 23). 11 Make the signal connections from the amplifier (see ‘ Operation’, pages 4). Figure 25.
HOME THEATER It had long been the practice of stereo buffs to connect their television to a stereo system. The advantage was the use of the larger speakers and more powerful amplifier of the stereo system. Even though the sound was greatly improved, it was still mono and limited by the broadcast signal. In the late 1970’s and early 1980’s two new home movie formats became widely available to the public: VCR and laser disc. By 1985, both formats had developed into very high quality audio/video sources.
ATF (ADVANCED THIN FILM) ATF Operation The MartinLogan ATF transducer (based on RADIA planar technology) consists of a micro-thin, low-mass Kaladex diaphragm with an ultra-light, etched conductive aluminum surface suspended between two high field strength neodymium super magnet arrays (see figure 27). When an electrical current (music signal) passes through the etched aluminum on the diaphragm's surface it is simultaneously pulled towards one of the neodymium arrays and pushed away from the opposing array.
FREQUENTLY ASKED QUESTIONS AND TROUBLESHOOTING Frequently Asked Questions Troubleshooting How do I clean my speakers? Just use a dust free cloth or a soft brush to remove the dust from your speakers. We recommend a specialty cloth (available at the Xtatic shop at www.martinlogan. com) that cleans your speakers better than anything else we have tried. Do not spray any kind of cleaning agent on or in close proximity to the ATF element. Output • Check that all your system components are turned on.
DIMENSIONAL DRAWINGS 16 Dimensional Drawings
GENERAL INFORMATION Specifications System Frequency Response 75–20,000 Hz ± 3 dB Sensitivity 90 dB/2.83 volts/meter Impedance 5 ohms Crossover Frequency 500, 3200 Hz Components Air core coils, metal film and low dissipation electrolytic capacitors Woofer Type Two 4” (10.2cm) high rigidity aluminum cone with extended throw drive assembly, non-resonance asymmetrical chamber format; bass reflex; unshielded ATF Mid-Range Driver 1.5" x 6" (3.8cm x 15.2cm) ATF Transducer ATF High Frequency Driver 1.5" x 2.25" (3.
GLOSSARY OF AUDIO TERMS AC. Abbreviation for alternating current. DC. Abbreviation for direct current. Active crossover. Uses active devices (transistors, ICs, tubes) and some form of power supply to operate. Diffraction. The breaking up of a sound wave caused by some type of mechanical interference such as a cabinet edge, grill frame or other similar object. Amplitude. The extreme range of a signal. Usually measured from the average to the extreme. Arc.
Inductance. The property of an electrical circuit by which a varying current in it produces a varying magnetic field that introduces voltages in the same circuit or in a nearby circuit. It is measured in henrys. Inductor. A device designed primarily to introduce inductance into an electrical circuit. Sometimes called a choke or coil. Linearity. The extent to which any signal handling process is accomplished without amplitude distortion. Midrange. The middle frequencies where the ear is the most sensitive.
MA R T I N LOGA N ® the loudspeaker technology company Lawrence, Kansas, USA tel 785.749.0133 fax 785.749.5320 ©2006 MartinLogan. All rights reserved. w w w. m a r t i n l o g a n . c o m Rev.