CCW06B10A CCW08B10A CCW10B10A CCW12B10A CEW08B11A CEW12B33A
INTRODUCTION IMPORTANT SAFETY INSTRUCTION ...........................................................................1 ELECTRICAL REQUIREMENTS ................................................................................... 2 PACKING LIST ............................................................................................................ 3 INSTALLATION&ASSEMBLY INSTRUCTIONS .............................................................. 4 THROUGH-THE-WALL INSTALLATION INSTRUCTIONS.................
1
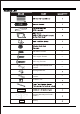
(6K cooling) 10A time-delay fuse or circuit breaker (8K-12K cooling & 8K heating) 15A time-delay fuse or circuit breaker (12K heating) 20A time-delay fuse or circuit breaker 2 6K/8K/10K/12K Cooling 8K Heating 12K Heating
3/8" Short Screws 5 1/2" Length Screws 4 3/4" Long Screws 3 5/8" Big Flat Head Bolt and Locknut 2 Sill Angel Bracket 1/2" Small Flat Head Bolt and Locknut Chassis Lock Support Bracket(with R and L remark) Battery 3 4
ALL INFORMATION AND THE TECHNICAL SPECIFICATIONS PRESENTED IN THIS USER’ S MANUAL ARE THE PRESENTATION OF THE MANUFACTURE. PLEASE READ AND FOLLOW THESE INSTRUCTIONS CAREFULLY. Window preparation 1. This air conditioner is designed to be installed In a standard double-hung window with a window width between 23” and 36” (660mm-914mm). 2. The air conditioner can be installed without the accordion panels fit in a narrow window opening. 3.
REMOVE FRONT PANEL AND CHASSIS 1. Pull down the front panel and remove the filter. 5. Remove the control panel screw and WI-FI module screw (if available) from the front panel. 2. Lift the front panel upwards to remove and place to the side. 3. Locate the two faceplate screws and remove. These screws will need to be re-installed prior to mounting the air conditioner. 6.Remove the screws from the cabinet. 4. After removing the screws, gently pull away the faceplate from the air conditioner cabinet. 7.
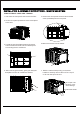
Top Rail Assembly Top Foam 1. Place the cabinet on a hard flat surface. 2. Remove top rail from the top form of the packaging material as shown in FIG. A. 3. Align the hole in the top rail with those on the top of the unit as shown in FIG. B. 4. Secure the top rail to the unit with the 3/8” screws as shown in FIG. C.
Accordion Panel and cabinet Assembly 4.Use two or more people, place the air conditioner into the window opening so the bottom of the air conditioner frame is against the window sill. Tilt the back of the unit slightly download to allow accumulated rain water to drain out. 1.Hold the Accordion Panel in one hand and gently pull the center to free the open end. Air conditioner Bottom channel STOOL OFFSET SILL 2.Slide the free end of the panel into the cabinet as shown.
1.Hold each support bracket flush against the outside of the window sill. Tighten each bracket to the bottom of the cabinet as shown. Mark the brackets at top lever of the window sill and then remove. Support bracket Bolt and Locknut Sill angle bracket 4. Tighten all the bolts with locknuts securely. Sign marking 1.Team lift (two people or more) the air conditioner chassis and carefully slide it into the cabinet. Let the front of the air conditioner hang out approximately 6”. 2.
5.Extend the side accordion panels out against the window frame as shown. 7.To secure lower sash in place, attach right angle sash lock with 3/4” screws as shown. Sash lock 6.Drive 1/2” locking screws through frame holes, and drive one 3/4” screw through top rail into window sash as shown. 8.Cut foam seal and insert in the space between the upper and lower sashes as shown.
THROUGH-THE-WALL INSTALLATION INSTRUCTIONS - OPTIONAL The case may be installed through-the-walll as optional. Read completely, then follow step-by-step. NOTE: Obtain all materials locally for mounting the air conditioner through-the-wall. NOTE: The allowed maximum wall thickness is less than 8 9/10”. Otherwise, the wall will block the air inlet of outdoor side, it will effect the normally operation of unit. IMPORTANT Building a wooden frame is required when install the case through-the-wall.
For Cooling model Cool Mode: The cooling function allows the air conditioner to cool the room and at the same time reduces air humidity. Press the MODE button to activate the cooling function. To optimize the function of the air conditioner, adjust the temperature and the speed by pressing the button indicated. Dry Mode: This function reduces the humidity of the air to make the room more comfortable. Press MODE button to set the DRY mode.
6. Money Saver Button: When the unit is in Money 10. Directional Louvers: To direct the airflow, horizontal wheel to control the horizontal direction, Saver mode, the light will turn on. In Money Saver air deflector to control the vertical direction. mode, the unit will turn-off once the room is cooled to the user set temperature. The unit will turn back on when the room temperature rises above the user set temperature.
1. Power: Turn the air conditioner on and off. This button will clear the TIMER setting. 2. MODE: Press the button to select the mode of operation, AUTO, COOL, DRY, FAN ONLY, HEAT. Note: The HEAT mode is only for some heating models. If you do not need it, press the MODE button for more than 5 seconds to delete the HEAT function, and the COOL mode will be selected automatically. Press the MODE again for more than 5 seconds to add the HEAT function, and the HEAT mode will be selected automatically. 3.
15 FIG.
15
16