
Installation and Operations Manual (2019, 2020, 2021)
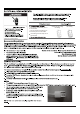
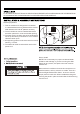
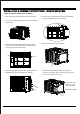

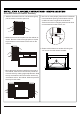
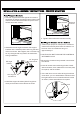
Table Of Contents

8
1.Hold each support bracket flush against the outside of
the window sill. Tighten each bracket to the bottom of the
cabinet as shown. Mark the brackets at top lever of the
window sill and then remove.
Sign marking
1/2” long bolt
and locknut
Sill angle
bracket
5/8” long bolt
and locknut
4. Tighten all the bolts with locknuts securely.
1.Team lift (two people or more) the air conditioner
chassis and carefully slide it into the cabinet. Let
the front of the air conditioner hang out
approximately 6”.
2.CAUTION: DO NOT PUSH ON THE CONTROLS
OR FINNED COILS.
3.Be sure the chassis is firmly seated in the back of
the cabinet.
4.Insert all screws removed during window install-
ation and fasten, then reattach the front face plate,
front panel, and the air filter.
5. If the wall is too near to effect driving the cabinet
screw back, you can assemble the chassis lock at
the right bottom corner of chassis with 3/8” screw
as shown, before assemble the front panel.
2.Assemble the sill angle brackets to the support
brackets at the marked position with long bolt and
locknut as shown. Hand tighten, but not all the way
for any changes that may need to be made later
during installation.
3.Install the support brackets (with sill angle bra-
ckets) to the bottom of the cabinet as shown.
Sill angle bracket
Support bracket
Bolt and
Locknut
Chassis Lock