
Installation and Operation Manual


18
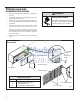
1. Lift unit level and slide unit into wall sleeve until from seal rests
rmly against front of wall sleeve.
2. Locate the four supplied chassis mounting screws. Insert the
screws through the chassis mounting ange holes that are aligned
with the speed nuts in the wall sleeve. Tighten all four screws (two
per side).
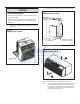
3. Place tabs over top rail (1). Push inward at bottom until panel
snaps into place (2).
4. Reinstall front panel. See Figure 24.
Figure 23
Securing Unit
FRP023
POWER
SUPPLY
CORD
High
Med
Low
Fan
Cool
Heat
Fan Speed Mode
Temperature
Power
Figure 24
Replacing Front Panel
CAUTION
Excessive Weight Hazard
Use two or more people when installing
your air conditioner.
Failure to do so can result in back
or other injury.
NOTICE
Copper refrigerant tubes are NOT handles.
Do NOT use tubing to lift or move chassis.
Chassis Installation
To remove the front cover, pull the bottom end forward and lift it up to clear
the L bracket across the top of the chassis.
5. Plug the cord (if applicable) into the appropriate receptacle.
Restore power to the unit.
FRP024
1
2