
Spec Sheet

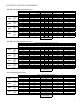


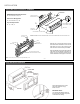
Table Of Contents

10
Typical Wall Sleeve Installation (PDXWSA)
INSTALLATION
Note the use of a lintel under the rst course
of bricks above the wall sleeve. Do not use the
wall sleeve as a lintel. The mounting screw
holes shown are to be made by the installer.
Note: All 230/208V units are manufactured with
a 60" power cord and all 265V units with an 18"
power cord. The receptacle locations above
must be followed to ensure proper connections.
FRP008
20
"
MAX.
16-¼
"
42-¼
"
MIN.
LINTEL TO SUPPORT
MASONRY WALLS
ELECTRICAL
RECEPTACLE
ELECTRICAL
RECEPTACLE
WALL OPENING
WALL SLEEVE
INSULATION
INSULATION
SMOOTH SIDE OF SCREW
CLIP FACING INTO ROOM
NOTE: All 230/208V units are manufactured with a 72” power cord and all 265V units with a 20” power cord.
60
"
MAX.
13-¾
"
FRP010
NO
TE: Construct wall opening to comply with all applicable building codes.
MAIN STUDS
JACK STUDS
LINTEL
MOUNTING
SCREW HOLES
NO HOLES IN BOTTOM OF WALL
SLEEVE UNLESS DRAIN KIT IS USED
MAIN STUDS
JACK STUDS
PDXWSA Wall Sleeve Dimensions:
16" H x 42" W x 13
3
/4" D
Front Cover Dimensions:
16" H x 42" W x 7
3
/4" D
Cut-Out Dimensions:
16
1
/4" x 42
1
/4"
IMPORTANT NOTE:
The silicone bead MUST extend up
the side of the two anges to prevent
condensate from leaking.
Seal condensate drip pan to wall
sleeve with sealant on all (4)
bottom corners.
Deep Wall Sleeve Installation