930310ϭϬ_03
ﺗﺣﺫﻳﺭ ﺍﻻﺭﺗﻔﺎﻉ ﺍﻷﻗﺻﻰ ﻻﺳﺗﺧﺩﺍﻡ ﺍﻟﺟﻬﺎﺯ ﻫﻭ 2000ﻣﺗﺭ. ﻻ ﺗﺳﺗﺧﺩﻡ ﺍﻟﺟﻬﺎﺯ ﻋﻧﺩ ﺍﺭﺗﻔﺎﻉ ﺃﻋﻠﻰ ﻣﻥ 2000ﻣﺗﺭ. ﺗﺣﺫﻳﺭ ﻫﺫﺍ ﺍﻟﺟﻬﺎﺯ ﻏﻳﺭ ﻣُﺧﺻّﺹ ﻟﻼﺳﺗﺧﺩﺍﻡ ﻣﻥ ﻗِﺑَﻝ ﺍﻷﺷﺧﺎﺹ )ﺑﻣﺎ ﻓﻲ ﺫﻟﻙ ﺍﻷﻁﻔﺎﻝ( ﻣﻥ ﺫﻭﻱ ﺍﻟﻘﺩﺭﺍﺕ ﺍﻟﺟﺳﺩﻳّﺔ ﺃﻭ ﺍﻟﺣﺳﻳّﺔ ﺃﻭ ﺍﻟﻌﻘﻠﻳّﺔ ﺍﻟﻣُﻧﺧﻔﺿﺔ ﺃﻭ ﺍﻟﺫﻳﻥ ﻟﺩﻳﻬﻡ ﻧﻘﺹ ﻓﻲ ﺍﻟﺧﺑﺭﺓ ﻭﺍﻟﻣﻌﺭﻓﺔّ ،ﺇﻻ ﺇﺫﺍ ﻛﺎﻧﻭﺍ ﻗﺩ ﺗﻠ ّﻘﻭﺍ ﺇﺷﺭﺍﻓﺎ ً ﺃﻭ ﺗﻌﻠﻳﻣﺎ ً ﻓﻳﻣﺎ ﻳﺧﺹّ ﺍﺳﺗﺧﺩﺍﻡ ﺍﻟﺟﻬﺎﺯ ﻣﻥ ﻗِﺑَﻝ ﺷﺧﺹ ﻣﺳﺅﻭﻝ ﻋﻥ ﺳﻼﻣﺗ ِِﻬﻡ. ٍ ﻳﺟﺏ ﺍﻹﺷﺭﺍﻑ ﻋﻠﻰ ﺍﻷﻁﻔﺎﻝ ﻟﺿﻣﺎﻥ ﻋﺩﻡ ﻟﻌﺑﻬﻡ ﺑﺎﻟﺟﻬﺎﺯ.
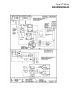
ﻣ ّ ُﺧﻁﻁ ﺍﻟﺗﻭﺻﻳﻝ SH20M30SA-B
Table of Contents Operation and Care Instructions Your Sa555555ty and the safety of others................................................................................................................................... 3 5 General 5Instructions ............................................................................................................................................................ 3 6 Filter information ....................................................................................
Congratulations! Thank you for your decision to purchase the Friedrich Hazardgard (Hazardous Duty Room Air Conditioner). Your new Friedrich has been carefully engineered and manufactured to give you many years of dependable, efficient operation, maintaining a comfortable temperature and humidity level. Many extra features have been built into your unit to assure quiet operation, the greatest circulation of cool, dry air, and the most economic operation.
Filter Information The ſlter in your Friedrich removes dust, pollen and other impurities from the air as they are drawn through the unit. The ſlter is permanent and reusable, and has a germicidal treatment which is not affected by periodic washing. A clogged, dirty ſlter reduces the air ƀow through the unit and reduces its efſciency. You should check the ſlter every seven to ten days, depending on the amount your unit is used. Clean the ſlter regularly.
5
InstallationInstructions ModelsSH15andSH20 SH20 SH15, NOTE: THISMANUALINCLUDESINSTALLATIONINSTRUCTIONSFORBOTHWINDOWMOUNTANDTHROUGH- THEWALLINSTALLATIONS WARNING ExplosionHaza rd ElectricalShock Haza rdElectricallyconnectunitinacco rdancewith NEC CodeArticle501.Failu retodosocan resultin re,orelectricalshock. ElectricalRequirements ALLFIELDWIRINGMUSTMEETTHEREQUIREMENTSOFTHENATIONALELECTRICALCODE(ANSI/NFPA70) ARTICLE501.
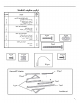
WindowMountInstallationHardware ITEM No. DESCRIPTION QTY. 1 2 3 4 SHELLMOUNTINGPARTS SUPPORTBRACKET SCREW,10- 24x 1"HEXHEAD 10- 24FLATWELDNUT SCREW,SHEETMETAL#12Ax 2" 2 4 4 7 5 6 7 WINGBOARDANGLEMOUNTING WINGBOARDANGLE,TOP WINGBOARDANGLE, SIDE SCREW,SHEETMETAL#8Ax 3/8" 1 2 2 8 9 10 11 WINGBOARDMOUNTINGPARTS WINGBOARD(MASONITE)-(NOTSHOWN) "J"TYPE SPEED NUT WINGBOARDCLIP(SPRINGSTEEL) SCREW.#8Ax 1/2"PHILLIPSTRUSSHD.
ﺗﻔﺭﻳﻎ ُﻣﺣﺗﻭﻳﺎﺕ ﺍﻟﻭﺣﺩﺓ ﺍﻟﺧﻁﻭﺓ 1 ﻣﻛﺎﻥ ﺁﻣﻥ ﺑﻌﻳﺩﺍً ﻋﻥ ﺍﻟﻭﺣﺩﺓ. ﺃﺯﻝ ﻭﺍﻗﻲ ﺍﻟﻬﻭﺍء ﺍﻟﻣُﺭﺗﺟﻊ ﺍﻟﺑﻼﺳﺗﻳﻛﻲ ﺍﻟﻣُﺯﺧﺭﻑ ﺇﻟﻰ ٍ ِ ﺍﻟﺧﻁﻭﺓ 2 ﺃﺯﻝ ﻣُﻌﺩّﺍﺕ ﺍﻟﺗﺭﻛﻳﺏ ﻭﺍﻟﻠﻭﺡ ﻭﺍﻟﺣﺷﻭﺗﻳﻥ ﺍﻻﺛﻧﺗﻳﻥ )ﻭﺍﺣﺩﺓٌ ﻣﻧﻬﻣﺎ ﻓﺎﺗﺣﺔ ﺍﻟﻠﻭﻥ ﻭﺃﺧﺭﻯ ﺩﺍﻛﻧﺔ ﺍﻟﻠﻭﻥ( ﻣﻥ ﻋﻠﻰ ﺟﺎﻧﺑﻲ ﺍﻟﻭﺣﺩﺓ ﻭﺿﻌﻬُﻡ ﻓﻲ ﻣﻧﻁﻘﺔ ﺁﻣﻧﺔ ﺑﻌﻳﺩﺍً ﻋﻥ ﺍﻟﻭﺣﺩﺓ. ﺍﻟﺧﻁﻭﺓ 3 ﻭﺃﺑﻕ ﻋﻠﻰ ﺍﻟﺑﺭﻏﻲ ﻹﻋﺎﺩﺓ ﺗﺭﻛﻳﺏ ﻭﺍﻗﻲ ﺍﻟﻬﻳ َﻛﻝ ﺑﻌﺩ ﺃﺯﻝ ﻭﺍﻗﻲ ﺍﻟﻬﻳ َﻛﻝ ﻋﺑﺭ ﺇﺯﺍﻟﺔ ﺍﻟﺑﺭﻏﻲ ﻓﻲ ﺃﻗﺻﻰ ﺍﻟﻳﻣﻳﻥ ﺍﻟﻣﻭﺟﻭﺩ ﻓﻲ ﺍﻟﺣﻭﺽ ﺍﻟﻘﺎﻋﺩﻱّ ﺍﻧﻅﺭ ﺍﻟﺷﻛﻝ )(A؛ ِ ِ ﺍﻟﺗﺭﻛﻳﺏ .
ﺍﻟﺧﻁﻭﺓ : 1ﺃﺧﺭﺝ ﺻﻧﺩﻭﻕ ﺍﻟﺗﻭﺻﻳﻝ ﻣﻥ ﻣﻭﺿﻊ ﺍﻟﺷﺣﻥ ﺃﺳﻔﻝ ﻣﺣﺭﻙ ﺍﻟﻣﺭﻭﺣﺔ .ﻗﻡ ﺑﺗﺭﻛﻳﺏ ﺃﺭﺟﻝ ﺻﻧﺩﻭﻕ ﺍﻟﺗﻭﺻﻳﻝ ﺑﺎﻟﺟﺯء ﺍﻟﺧﻠﻔﻲ ﻣﻥ ﺻﻧﺩﻭﻕ ﺍﻟﻭﺻﻼﺕ ﺑﺎﺳﺗﺧﺩﺍﻡ 4ﺑﺭﺍﻏﻲ ﺁﻟﻳﺔ ﻣﺭﻓﻘﺔ )ﺍﻟﺷﻛﻝ R- .( 1ﻗﻡ ﺑﺗﺭﻛﻳﺏ ﺻﻧﺩﻭﻕ ﺍﻟﻭﺻﻼﺕ ﻋﻠﻰ ﺍﻟﻔﺗﺣﺎﺕ ﺍﻟﻣﻭﺟﻭﺩﺓ ﻋﻠﻰ ﺟﺎﻧﺏ ﻛﻡ ﻣﻛﻳﻑ ﺍﻟﻬﻭﺍء ﺑﺎﺳﺗﺧﺩﺍﻡ 4ﺑﺭﺍﻏﻲ ﻣﻌﺩﻧﻳﺔ ﻣﺭﻓﻘﺔ ﻭ 4ﺣﻠﻘﺎﺕ ﻣﺳﻧﻧﺔ .ﺗﺄﻛﺩ ﻣﻥ ﻭﺟﻭﺩ ﺍﻟﺣﻠﻘﺎﺕ ﺍﻟﻣﺳﻧﻧﺔ ﺑﻳﻥ ﺃﺭﺟﻝ ﺻﻧﺩﻭﻕ ﺍﻟﻭﺻﻼﺕ ﻭﺍﻟﻛﻡ ﺍﻟﻣﻌﺩﻧﻲ ﺍﻟﻣﻁﻠﻲ )ﺍﻟﺷﻛﻝ .
ﺍﻟﺧﻁﻭﺓ : 4ﺍﺳﺗﻛﻣﺎﻝ ﺗﻭﺻﻳﻝ ﺃﺳﻼﻙ ﺻﻧﺩﻭﻕ ﺍﻟﺗﻭﺻﻳﻝ ،ﻭﺗﻐﻁﻳﺔ ﺍﻟﺑﺭﺍﻏﻲ ﻭﺇﺣﻛﺎﻡ ﺭﺑﻁﻬﺎ )ﺍﻟﺷﻛﻝ (T-6ﻟﻣﻧﻊ ﺩﺧﻭﻝ ﺍﻟﻐﺑﺎﺭ ﻭﺍﻟﺭﻁﻭﺑﺔ. ﻣﻼﺣﻅﺔ :ﻭﻓ ًﻘﺎ ﻟﻠﻣﻌﻳﺎﺭ ،EN/IEC 60079-0ﻗﺩ ﻳﻛﻭﻥ ﺍﻟﺗﺄﺭﻳﺽ ﺍﻟﺧﺎﺭﺟﻲ ﺃﻭ ﺍﻟﺗﻭﺻﻳﻝ ﺍﻷﺭﺿﻲ ﺿﺭﻭﺭﻳًﺎ. ﺇﺫﺍ ﻟﺯﻡ ﺍﻷﻣﺭ ،ﻓﺎﺳﺗﺧﺩﻡ ﻣﺷﺑﻙ ﺍﻟﺗﻭﺻﻳﻝ ﺍﻷﺭﺿﻲ ﺍﻟﺧﺎﺭﺟﻲ ﺍﻟﻣﺭﻓﻕ ﺍﻟﺫﻱ ﻳﻣﻛﻧﻪ ﻗﺑﻭﻝ ﻛﺑﻠﻳﻥ ﻳﺻﻝ ﻁﻭﻟﻬﻣﺎ ﺇﻟﻰ 6ﻣﻡ )ﺍﻟﺷﻛﻝ .(T-7 ﺍﻟﺗﻭﺻﻳﻝ ﺍﻷﺭﺿﻲ ﺍﻟﺧﺎﺭﺟﻲ -ﺍﻧﻅﺭ ﺍﻟﻣﻼﺣﻅﺔ- ﺍﻟﺷﻛﻝ T ﻣﻼﺣﻅﺔ :ﻳﺗﻡ ﺗﺭﻛﻳﺏ ﻣﻛﻳﻑ ﺍﻟﻬﻭﺍء ﻫﺫﺍ ﻭﻓ ًﻘﺎ ﻟﻠﻭﺍﺋﺢ ﺍﻟﻭﻁﻧﻳﺔ ﻟﺗﻭﺻﻳﻝ ﺍﻷﺳﻼﻙ ﺍﻟﺳﺎﺭﻳﺔ ﻓﻲ ﺍﻟﺑﻠﺩ ﺍﻟﺫﻱ ﻳﺗﻡ ﺗﺭﻛﻳﺑﻪ ﻓﻳﻪ.
Shell(Cabinet)Preparation 4 Itwillbenecessarytorelocatethesillplateofthecabinet2" eachendofthetopangle(Item#5)withthetoploopsofthesidebackfromitsshippingposition,andtheshellguides4"forward, angle. Install two(2)screws(Item#7)tosecurethetopangletotheforward-mostholeintheshellrail. Discardthechassis tabsandthesideangletotherear-mostholesinthesideoftheretainerwiredisconnectedinSectionII,Step3. Thejunction cabinet(SeeFigureB,below).
ShellInstallation:SashWindowInstallations WARNING FallingObjectHaza rd NotfollowingInstallationInstructionsf ormountingyourairconditionercanres ultinp ropertydamage,injury,ordeath. STEP1 Checkthewindowsillandframetobesuretheyareingoodconditionand¿rmlyanchoredtothewall. Repairif necessary. STEP2CABINETMOUNTING:Raisethelowerwindowsash1/4"morethantheheightofthecabinet.
NOTICE ShellInstallation:ThickWall Theillustrationsbelowshowastandardframeconstruction installationaswellassomesuggestedwaysofadapting the Instructionsformountingsleevewithslopemustbeobservedtoprevententryofwaterintoroom. Failureto followinstructionscanresultinpropertydamage. supportbracket tothick wallsandlargebrickledges.
FigureG "J"TYPESPEEDNUT(ITEM#9) 2REQUIRED SPRINGSTEELCLIP(ITEM#10) 2REQUIRED CUTWINGBOARDPANEL CUTEDGE SLIDECLIPOVERCUTEDGEOFWINGBOARDPANEL CENTERTHEHOLEINTHESPEEDNUTOVER THESLOTINTHEWINGBOARDPANEL STEP5 ASSEMBLECLIPSTOWINGBOARDPANELS:Assemble"J"type speednuts(Item#9)andspringsteelclips(Item #10)totheedgesofthecutwingboardpanels(SeeFigureG). TOPOFCABINET PLACEWINGBOARDPANELINWINDOWJAM TO COMPRESSTHESPRINGSINSIDETHERUNNERS, ANDSWINGTHEPANELINTOPLACEINDICATED BYTHEDOTTEDLINE.
ShellInstallation:Through-the-wallInstallations WARNING FallingObjectHaza rd NotfollowingInstallationInstructionsfo rmountingyourairconditionercanresult inp ropertydamage,injury,ordeath. WallPreparation Themaximum wallthicknesspermissiblewithoutspecialconstructionisdeterminedbythemodelsizetobeinstalled.THEOUTSIDECABINETCONDENSERAIRINTAKELOUVERSMUSTNOTBE BLOCKEDBYEXTENDINGINSIDETHEWALL AREA.Observethemaximum wallthicknessshownasdimension"A"inFigureJ.
FigureL FRAMEWALL CONSTRUCTION CAULKALLSIDES WEATHERCABINET SHIMTHEVOIDSPACEATTHETOPAND SIDESWITHWOODASREQUIRED FigureM CAULKALLSIDES BRICKVENEER CONSTRUCTION WEATHERCABINET SHIMVOIDSPACESATTOPAND SIDESWITHWOODASREQUIRED FigureN SOLIDMASONRY CONSTRUCTION CAULKALLSIDES CABINET MORTAR 18 14
STEP3Slidethecabinetintotheholefarenoughtoallowtheguide-channelofthesillplatetocontacttheinsidewallsurface(SeeFigureO). STEP4Drill three (3)5/32" diameterpilot holes through holes in sill-plateinto the framing andinstall three (3)#12 x 2" longscrews(Item#4)(SeeFigureO). NOTICE Instructionsformountingsleevewithslopemustbeobservedtopreventen tryofwaterintoroom. Potentialpropertydamagecanoccurifinstructionsarenotfollowed.
Chassis Installation STEP 1 Slide the chassis into the cabinet stopping approximately 3" from full insertion. Stuff the chassis seal gasket (Item #14) one inch deep between the chassis and the cabinet (See Figure P). Begin at either bottom corner and go up the side, across the top, and down the opposite side. Make sure that the gasket is behind the conduit connector (furthest from you). Push the chassis into the shell the remaining distance so that the plastic front shrouds the front edge of the shell.
STEP 2 Be sure that the ſlter is in place then install the return air grille (See Figure Q). The top of the return air grille can be butted against the bottom of the discharge plenum. Snap the grille into place by pushing the grille up and onto the unit's latches at the bottom. (See Detail 4). Figure Q Discharge Air Plenum DETAIL 2 Slot Tab Return Air Grille Slot Tab DETAIL 1 DETAIL 1 Latches DETAIL 3 Latch Return air grille DETAIL 4 Side view (Cutaway) STEP 3 You have completed your installation.
Friedrich Air Conditioning Company 10001 Reunion Place, Suite 500 San Antonio, TX 78216 800.541.6645 www.friedrich.com HAZARDGARD® ROOM AIR CONDITIONERS LIMITED WARRANTY LIMITED ONE YEAR PARTS WARRANTY 1. Limited warranty – One year. Friedrich warrants that it will provide a replac Conditioner found defective in material or workmanship for a period of one (1) year ement for any part of this HazardGard Room Air from the date of original purchase. 2. Limited warranty – One year.
Friedrich Air Conditioning Company 10001 Reunion Place, Suite 500 San Antonio, TX 78216 800.541.6645 www.friedrich.com INTERNATIONAL LIMITED WARRANTY TERMS OF LIMITED WARRANTY Friedrich Air Conditioning Co.warrantsto the and workmanship.
930310ϭϬ_03