
Manual
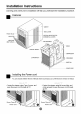


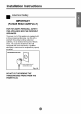


Installation Instructions
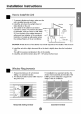
Installation Kits Contents
NO. NAME OF PARTS QTY
1 Curtain 1
2 Curtain Frame 1
3 Upper Guide 1
4 Side Guide 2
5 Support Bracket 1
6 Bracket 1
7 Leveling Bolt & Nut 1
8 Bolt 2
9 Nut 2
10 Washer 2
11 Side Guide seal 1
12 Foam Seal Strip 1
13 Window Track Seal 1
14 Window Locking Bracket 1
15 Screw (Type A) 9
16 Screw (Type B) 3
17 Screw (Type C) 8
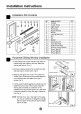
Horizontal Sliding Window Installation
1. Loosely attach thesupport bracket to the bottomof
bracket using bolts, washer, and nuts. Attach the
leveling bolt and nut. (Fig. 1)
2. Remove protective backing from window track seal
and apply seal to window track. (Fig.2)
.
Measure and lightly mark a line 8-1/4 inches from
window jamb. Center thesupport bracket assembly
on the window track and fasten with 4-type C
screws.(Fig. 2)
.
Put the support bracket against the outside wall and
tighten the bolts on top of the bracket. Adjust the
leveling bolt so that the air conditioner will be
installed with a very slight tilt (about 1/4") downward
toward the outside for proper drainage. Tighten the
nut. (Fig. 3)
NOTE: DO NOT drill a hole in the bottom of the base
pan. The air conditioner is designed tooperate
with the bottom of the base pan approximately
half-full of water.
Bracket
Support Leveling Bolt & Nut
Fig. 1
rJ
_ . Windo',d Track
About
Fig. 3