
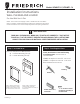
Accessory VPAWP Manual (2020)
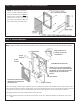


Flashing
Sealant
1" –3" Screws to attach
the plenum assembly to
the wall studs
Header materials /
wall studs
Shim
There are two parts to a Wall Plenum:
A) 1-Outside Assembly (Part A)
B) 1-Inside Assembly (Part B)
Step 2: Field Supplied PartsStep 1: Included Parts
PART A CORRECT ORIENTATION:
LOUVER ATTACHMENT FLANGES
TOWARD THE BUILDING OUTSIDE,
45° DRIP LEDGE AT THE BOTTOM.
PART B CORRECT ORIENTATION:
LARGE OPENING TO BOTTOM
3/4" FLANGE TOWARD THE INSIDE OF
THE BUILDING.
92006906_02
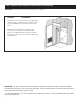
VERY IMPORTANT!
YOUR WALL PLENUM WILL WORK ONLY IF INSTALLED CORRECTLY. TAKE NOTICE
TO INSTALL IT IN THE CORRECT ORIENTATION AS SHOWN IN THE ILLUSTRATIONS.
ALWAYS FOLLOW LOCAL AND NATIONAL CODES FOR PROPER INSTALLATION.
Caulk, Attachment screws and Flashing
are eld supplied. Silicone caulk is
recommended.
VPAWP1-8 adjusts for walls 5.5 - 8.0" thick.
VPAWP1-14 adjusts for walls 8 - 14.0" thick.
Both installations are similar.
Installation Instructions
WALL PLENUM AND LOUVER
For Use With Vert-I-Pak
NOTE: These instructions apply to Vert-I-Pak® A Series Units ONLY.
Refer to Chassis Installation/Operation Manual for additional information.
Please read these instructions completely before attempting installation.
Models VPAWP1-8 / VPAWP1-14
A
B