
Accessory VPAWP Manual (2020)
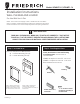


3
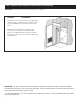
NOTE The VPAL2 Architectural
Louver is best installed onto the
Outside Plenum (Part A) prior to
Wall Plenum installation. Louver
installation is easier at this point,
and it will help keep the Wall Ple-
num square during installation.
Step 4: Install Architectural Louver on the Outside Plenum
After the rough cut opening is prepared, you are ready to assemble the two wall plenum parts. Before ap-
plying sealant and permanent attachment, dry t the outside plenum into the rough opening and check for
t and level. Caulk (silicone recommended ) the parts well and insert them into the wall as shown.
A) Apply sealant and insert Outside Part A into the hole.
B) Apply sealant and insert Inside Part B into Part A. Be sure that Part A does not back out of the wal-
hole.
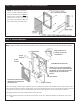
Step 5: Plenum Installation
Note Proper header and wall penetration must conform to all national and local building codes.
Apply sealant to all
8 ange corners and
unused holes
Proper Header
Proper
Flashing
Proper Flashing
Proper Sealant
Outside
Wall
Proper
Sealant
Architectural louver VPAL2
mounted on the outside wall
plenum (Part A)
Inside Wall Plenum (Part B)
Install anchor screws approximately
four inches from the top and bottom of
the plenum. Do not make penetration
through the top or bottom of the
plenum