
Service & Parts Manual (2019, 2020, 2021, 2022)
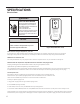
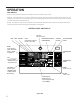

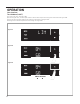
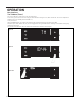
Table Of Contents
- INTRODUCTION
- SPECIFICATIONS
- OPERATION
- ROUTINE MAINTENANCE
- REMOVE AND INSTALL THE CHASSIS
- R-410A SEALED SYSTEM REPAIR
- COMPONENT TESTING
- Hermetic Components Check
- Reversing Valve Description And Operation
- Testing The Reversing Valve Solenoid Coil
- Checking The Reversing Valve
- Replace The Reversing Valve
- Touch Test Chart : To Service Reversing Valves
- Compressor Checks
- Compressor Replacement
- Fan Motor
- Capacitors
- Heating Element
- Drain Pan Valve
- Testing the User Interface and Electronic Control Board
- Thermistors Description
- Electronic Control Board Identification
- Replace the Electronic Control Board
- Replace the User Interface
- TROUBLESHOOTING
- WIRING DIAGRAMS
- PARTS CATALOG
- Available Accessories

19 PB
MENU RETURN
OPERATION
User Interface
The TM Menu (Timer)
This is the TM menu used to set a timer. See Figure 310.
In the menu, you set the current time using the arrow buttons. See Figure 311. (Note: These two “set clock” steps will be
skipped if the unit is already connected to Wi-Fi.)
First, set the hour.
Using the MENU button, you switch to the minutes and complete setting the time. See Figure 306.
You select your mode. Either cool, heat, or auto. Toggle these using the mode button. See Figure 312. (Note: cooling-only
models skip this step.)
The process is the same for all three modes. Auto mode will be shown as the example.
Figure 310
MENU
RETURN
Figure 311
MENU RETURN
Figure 312