
Service & Parts Manual (2019, 2020, 2021, 2022)
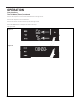
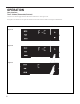
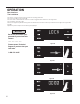
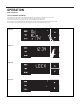
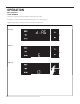
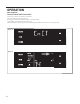
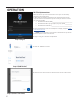
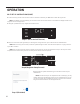
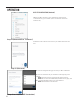
Table Of Contents
- INTRODUCTION
- SPECIFICATIONS
- OPERATION
- ROUTINE MAINTENANCE
- REMOVE AND INSTALL THE CHASSIS
- R-410A SEALED SYSTEM REPAIR
- COMPONENT TESTING
- Hermetic Components Check
- Reversing Valve Description And Operation
- Testing The Reversing Valve Solenoid Coil
- Checking The Reversing Valve
- Replace The Reversing Valve
- Touch Test Chart : To Service Reversing Valves
- Compressor Checks
- Compressor Replacement
- Fan Motor
- Capacitors
- Heating Element
- Drain Pan Valve
- Testing the User Interface and Electronic Control Board
- Thermistors Description
- Electronic Control Board Identification
- Replace the Electronic Control Board
- Replace the User Interface
- TROUBLESHOOTING
- WIRING DIAGRAMS
- PARTS CATALOG
- Available Accessories

28 PB
Wi-Fi SET UP INSTRUCTIONS (CONT)
6. To start the setup process click the menu button on the Control Panel of your Wallmaster model. See gure 307.
NOTE: If the Display is not illuminated, you will need to need click the menu button to illuminate the Display and then click
it again to start the setup process.
7. Using the up and down arrows, navigate to the CnCT screen.
OPERATION
MENU RETURN
Step 8 (Begin the Setup Process)
MENU RETURN
Steps 7 (Get to the CnCT Screen)
8. Click the menu button (see gure307) , this will begin the setup process for your Friedrich Connect enabled device.
NOTE: When the setup process starts, the WI-FI symbol will begin to ash. This indicates the A/C unit is trying to connect
to your Wi-Fi network
NOTE: Once the setup process has been started, you will have ve minutes to complete the setup. If the setup can not be
completed in ve minutes the system will rest and you will need to restart the process.
9. After the Wi-Fi symbol starts blinking, click the “Next” button on your
mobile device.
NOTE: If the Wi-Fi setup is not completed on the rst attempt, you may
need to reset the Air Conditioning control unit. To accomplish this, turn the
unit off, and unplug the Air Conditioning unit for a minimum of 15 seconds.
Plug the unit back in and start the setup process over.
Step 9 (Click Next)