DISHWASHER use & care Introduction........................................................2 Operating Instructions...................................8 Important Safety information.....................3 Care and Cleaning.......................................... 11 Features...............................................................5 Troubleshooting.............................................20 Controls and Settings.....................................6 Limited Warranty..........................
INTRODUCTION Welcome to our family Thank you for bringing Frigidaire into your home! We see your purchase as the beginning of a long relationship together. This manual is your resource for the use and care of your product. Please read it before using your appliance. Keep it handy for quick reference. If something doesn’t seem right, the troubleshooting section will help you with common issues. FAQs, helpful tips and videos, cleaning products, and kitchen and home accessories are available at www.
IMPORTANT SAFETY INFORMATION WARNING • Store dishwasher detergent and rinse agents out of the reach of children. • If the dishwasher drains into a food disposer, make sure disposer is completely empty before running dishwasher. • Do not wash plastic items unless marked: “Dishwasher Safe” or equivalent. Check with manufacturer for recommendations, if not marked. Items that are not marked dishwasher safe may melt and create a potential fire hazard.
IMPORTANT SAFETY INFORMATION WARNING To reduce the risk of fire, electrical shock or injury when using your dishwasher, follow the previous basic precautions . WARNING Please read all instructions before using this appliance. Child Safety Destroy or recycle the carton, plastic bags, and any exterior wrapping material immediately after the dishwasher is unpacked. Children should NEVER use these items to play.
FEATURES Your dishwasher cleans by spraying a mixture of hot water and detergent through the spray arms against soiled surfaces. First, the dishwasher drains for a few seconds to remove soils dropped while loading, then fills with water covering the filter area. Water is then pumped through the spray arms. Soil particles go through and across the filter and down the drain as the water is pumped out. This series of steps are repeated as needed. The number of water fills varies with the cycle being used.
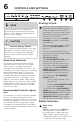
CONTROLS AND SETTINGS 1 NOTE 2 4 5 6 7 Starting a Cycle 1 Your dishwasher uses a DishSenseTM Technology to understand how much food is on the dishes and then adjusts the cycle accordingly. When the cycle and options have been selected, the LEDs over the cycle and options selected will illuminate. The status window will display the cycle time and then displays “Press START”. To start the cycle, press START/ CANCEL pad and close the door immediately.
CONTROLS AND SETTINGS This helps dishwasher detergent remove food grease and soil from dishes more effectively and aids in drying performance by adding additional rinse aid and increasing the water temperature. Sanitize Select SANITIZE option, by pressing SANITIZE pad to sanitize your dishes and glassware. When selected, the light illuminates and remains on after the cycle has completed. The water temperature in the final rinse rises to 155°F (68°C) and maintains that temperature for 9 minutes.
OPERATING INSTRUCTIONS Select your desired cycle and options, then press the DELAY TIME pad until the desired delay time displays in the status window. The LEDs of the selected cycle and options are illuminated. The status window displays the delay time and then displays ‘Press Start’. To start the delay countdown, press START/CANCEL pad and close door immediately. The status window displays ‘Close’ after the START/CANCEL pad is pressed.
OPERATING INSTRUCTIONS 9 Status Window The STATUS window, available on some models, indicates 1-24 ���������������� Number of delay start hours. CLOSE The last hour will count down in minutes. MINUTES ������ Number of minutes left in cycle (1-99). L1----L4 �������� Level of Rinse Aid dosage. User Instruction Code the following activity: Close will scroll across the status window indicating the door needs to be closed.
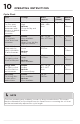
OPERATING INSTRUCTIONS Cycle Chart Cycle Settings Water (approx.) Heavy For pots, pans casseroles and dinnerware with dried-on or bakedon soils, and silverware Default High Options Scour, Air Dry and Sanitize 7.0 - 7.9 gal. 26.6 - 29.9 liters Normal For regularly soiled dishes and silverware. Default None Available Options Spray, Scour, Air Dry, High and Sanitize 2.9 - 7.3 gal. 11.0 - 27.
CARE AND CLEANING Dish Preparation Scrape away large pieces of food, bones, pits, toothpicks, etc. The continuously filtered wash fluid will remove remaining food particles. Burned-on foods should be loosened before loading. Empty liquids from glasses and cups. Foods such as mustard, mayonnaise, vinegar, lemon juice and tomato based products may cause discoloration of stainless steel and plastics if allowed to sit for a long period of time.
CARE AND CLEANING Fold-down Tines Upper Rack 12 place settings standard loading pattern Flex Wash The fold-down tines in the upper rack makes it easy to load those extra large and hard-to-fit items. The tines may be left up for normal use or folded down for more flexible loading. The Flex Wash system gives you the ability to wash the inside areas of baby bottles, narrow glassware and other items. To turn this feature on turn these clips to have them pointing upward (B).
CARE AND CLEANING down or toward the center. Tilt slightly for better drainage. Make sure tall items do not block spray arm rotation. Be sure pan handles do not protrude through the bottom of the rack and block the spray arm rotation. Fold-down Tines Bottom Rack The fold-down tines in the lower and upper rack make it easy to load those extra large and hard-to-fit items. The tines may be left up for normal use or folded down for more flexible loading.
CARE AND CLEANING Cup Shelf/Stemware Holders The Cupshelf holder can be folded down to be used to load two levels of cups, juice glasses, and other short items or fold down both and use for long items such as utensils and spatulas. Fold up to load tall glasses. Loading the Silverware Basket CAUTION Load sharp items (knives, skewers, etc.) pointing down. Failure to do so may result in injury. Features and appearance of racks and silverware basket may vary from your model.
CARE AND CLEANING Add an Item To add or remove items after wash cycle starts: • Unlatch door and wait a few seconds until wash action stops before opening. • Add the item and wait a few seconds to allow cold air to slowly expand inside dishwasher. • To resume cycle press the START/ CANCEL pad and close the door immediately. Filling the Detergent Dispenser The detergent dispenser has a main wash cup where you will add your detergent or detergent tab.
CARE AND CLEANING Dosage of detergent Place a single detergent tablet or packet into the detergent dispenser compartment. Detergent Usage Chart Water Hardness Soft Water (0-3 grains) Medium Hard Water (4-8 grains) Hard Water (9-12 grains) Amount of detergent (teaspoons) 4 teaspoons 6 teaspoons 8 teaspoons Dispenser cup level First Line Second Line Full NOTE For very hard water, detergent alone may not be enough.
CARE AND CLEANING Rinse Aid Rinse aid greatly improves drying, reduces water spots, filming. With it water “sheets” off dishes rather than forming water droplets that cling and leave spots. 17 NOTE Deselecting the AIR DRY option in combination with rinse aid will enhance drying performance. The energy required to not use the AIR DRY option costs pennies per cycle.
CARE AND CLEANING Outside Occasionally wipe with a mild nonabrasive detergent and water. Rinse and dry. Care of Drain Air Gap If a drain air gap was installed for your built-in dishwasher, check to make sure it is clean so the dishwasher will drain properly. A drain air gap is usually mounted on the counter top and can be inspected by removing the cover. This is not part of your dishwasher and is not covered by warranty.
CARE AND CLEANING Winterizing A dishwasher left in an unheated place should be protected from freezing. Have a qualified person do the following: To Disconnect Service: 1. Turn off electrical power to the dishwasher at the supply source by removing fuses or tripping circuit breaker. 2. Shut off water supply. 3. Place a pan under the inlet valve. Disconnect water line from the inlet valve and drain into pan. 4. Disconnect drain line from pump and drain water into pan. To Restore Service: 1.
TROUBLESHOOTING Before calling for service, review this list. It may save you both time and expense. This list includes common experiences that are not the result of defective workmanship or material in your dishwasher. Food Soils Left on Dishes • Choose another cycle for longer washing time. • Choose the Hi-Temp Wash option. • Check rack loading section for proper loading-avoid nesting items. • Home water pressure may be too low - should be 20 to 120 pounds per square inch (psi).
TROUBLESHOOTING Glassware/Flatware Spotted or Cloudy 21 Dishware Stained or Discolored • Tea and coffee can stain cups. Remove the stains by hand washing in a solution of 1/2 cup (120 ml) bleach and one quart (1L) of warm water. Rinse thoroughly. • Avoid overloading and improper loading. (See Preparing and Loading Dishes). Iron deposits in water can cause a yellow or brown film. A special filter installed in the water supply line will correct this problem. (See Removing Spots and Film).
TROUBLESHOOTING Detergent Left in Dispenser Cup • Detergent may be old. Discard and use fresh detergent. • Be sure the dish load doesn’t block spray from entering the detergent cup. • Check to see if cycle has been completed. • Make sure items do not prevent the detergent dispenser from opening. • There will be a “new” smell when first installed. This is normal. • Check to see if unit is draining properly. (See Dishwasher Does Not Drain Properly).
LIMITED WARRANTY 23 Your appliance is covered by a one year limited warranty. For one year from your original date of purchase, Electrolux will pay all costs for repairing or replacing any parts of this appliance that prove to be defective in materials or workmanship when such appliance is installed, used and maintained in accordance with the provided instructions. Exclusions This warranty does not cover the following: 1.
welcome home Our home is your home. Visit us if you need help with any of these things: owner support accessories service registration (See your registration card for more information.) Frigidaire.com 1-800-374-4432 Frigidaire.