READ AND SAVE THESE INSTRUCTIONS P/N 218954901 (0101)
Product Registration This Owner's Guide will instruct you on how to properly operate and care for your product. In addition, please read through the information contained in your literature pack to learn more about your new appliance. Record Your Model and Serial Numbers Record the Model No. and Serial No. of this refrigerator in the space provided below. These numbers are found on the serial plate located on the ceiling of the refrigerator compartment. Model No.
Important Safety Instructions Read all instructions before using this refrigerator. For Your Safety Do not store, or use gasoline or other flammable vapors and liquids in the vicinity of this or any other appliance. Read product labels for flammability and other warnings. Proper Disposal of Your Refrigerator/Freezer Risk of child entrapment. Child entrapment and suffocation are not problems of the past.
First Steps This Owner’s Guide provides specific operating instructions for your model. Use refrigerator only as instructed in this Owner’s Guide. Before starting refrigerator, follow these important first steps: Location Install refrigerator: • near a grounded electrical outlet. DO NOT use an extension cord or an adapter plug. • out of direct sunlight and away from range, dishwasher, or other heat sources, if possible. • on a floor that is level and strong enough to support a fully loaded refrigerator.
First Steps Connecting Ice Maker to Water Supply (continued) Do Not Install Ice Maker Tubing Where Temperature May Fall Below Freezing. Check to be sure your water connection will comply with local plumbing codes. Water quality determines your ice quality. It is best to connect the ice maker to water that is not softened. Chemicals from a malfunctioning softener can damage the ice maker. If the ice maker is connected to soft water, ensure that the softener is maintained and working properly.
Energy Saving Ideas • Locate the refrigerator in the coolest part of the room, out of direct sunlight and away from heating ducts or registers. Do not place the refrigerator next to heatproducing appliances such as a range, oven or dishwasher. If this is not possible, a section of cabinetry or an added layer of insulation between the two appliances will help the refrigerator operate more efficiently. • Level the refrigerator so the doors close tightly.
Fresh Food Storage Shelf Adjustment Refrigerator shelves are easily adjusted to suit individual needs. Before adjusting shelves, remove all food. The shipping clips which stabilize the shelves for shipping may be removed and discarded. To adjust the cantilever shelves (shelves supported at the rear of the refrigerator), lift the back of the shelf up and out. Replace shelf by inserting hooks at rear into slots. Lower and lock into position.
Automatic Ice and Water Dispenser The ice and water dispenser on the freezer door conveniently dispenses chilled water and ice cubes. To operate the dispenser, slide the knob to the selection of your choice and press a glass against the dispensing arm, as shown. Be sure to hold the glass as far up as possible to catch all cubes. To stop dispensing, pull glass away from dispensing arm. Release dispensing arm before the glass is full, but do not remove the glass until the ice has completely dispensed.
Automatic Ice and Water Dispenser (continued) Do not use the ice chute as a handle when removing or replacing the ice storage bin. Surfaces there may be sharp. WARNING DO NOT PUT FINGERS UP ICE CHUTE. SURFACES THERE MAY BE SHARP. Ice Dispenser Tips 1. Ice cubes stored too long may develop an odd flavor. Empty the container and return it to the proper position. The ice maker will then produce more ice. 2. Occasionally shake the container to keep ice separated. 3.
Care and Cleaning Keep your refrigerator and freezer clean to prevent odor build-up. Wipe up any spills immediately and clean both sections at least twice a year. Never use metallic scouring pads, brushes, abrasive cleaners or strong alkaline solutions on any surface. Do not wash any removable parts in a dishwasher. Always unplug the power cord from the wall outlet before cleaning. NOTE: Turning the control to OFF does not disconnect power to the controls, light bulb, or other electrical components.
Care and Cleaning Long vacations: • Remove all food and ice if you will be gone 1 month or more. • Turn controls to OFF and disconnect power. • Turn off automatic ice maker and turn water supply valve to the closed position. • Clean interior thoroughly. Leave both doors open to prevent odor and mold build-up. Block open if necessary. Moving: When moving refrigerator, follow these guidelines to prevent damage: • Remove all food and other items from both the refrigerator and freezer compartments.
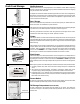
To Remove Freezer Door: 1. Remove the toe grille (see “Outside” in Care and Cleaning Section). 2. To disconnect water line, grip tube firmly in left hand and use tool (located in bag under toe grille) to push in on gray collar to release water connector (Figure 1). 3. Remove screw to detach lower hinge cover (Figure 2). 4. To disconnect wiring harness plug connector, place your thumbs on the flat sides of each connector piece. Bend both parts back and forth.
Avoid Service Checklist OCCURRENCE Before calling for service, review this list. It may save you both time and expense. This list includes common occurrences that are not the result of defective workmanship or materials in this appliance. SOLUTION RUNNING OF REFRIGERATOR Refrigerator compressor does not run. Freezer control is off. Set freezer control. See Setting the Controls. Refrigerator is in defrost cycle. This is normal for a fully automatic defrosting refrigerator.
OCCURRENCE SOLUTION WATER/MOISTURE/FROST INSIDE REFRIGERATOR Moisture collects on inside of refrigerator walls. Weather is hot and humid which increases rate of frost buildup and internal sweating. This is normal. Door is slightly open. See Occurrence section OPENING/CLOSING OF DOORS/DRAWERS. Door is opened too often or too long. Open the door less often. Water collects on bottom side of drawer cover. Vegetables contain and give off moisture.
OCCURRENCE ICE DISPENSER Ice dispenser is jammed. SOLUTION Ice cubes are jammed between the ice maker arm and back of the bin. Remove the ice cubes that are jamming the dispenser. Ice cubes are frozen together. Use the dispenser often so that cubes do not freeze together. WATER DISPENSER Dispenser will not dispense water. Household water line valve is not open. Open household water line valve. See Occurrence "Ice maker is not making any ice." Freezer door is not closed. Be sure freezer door is closed.
REFRIGERATOR WARRANTY Your refrigerator is protected by this warranty WARRANTY PERIOD THROUGH OUR AUTHORIZED SERVICERS, WE WILL: One year from original purchase date Pay all costs for repairing or replacing any parts of this appliance which prove to be defective in materials or workmanship. Excludes original and replacement Ice & Water filter cartridges (if equipped). Original and replacement cartridges are warranted for 30 days (parts only).
Service Information in Canada To avoid unnecessary cost and inconvenience, make a few simple checks before calling for service. Common occurrences and their solutions can be found in the Avoid Service Checklist. Be sure you have followed the instructions in this manual. If you are unable to locate the cause of a problem, call for service. Insist on factory service by an authorized ELECTROLUX PARTS AND SERVICE depot.
Notes 18
Notes 19