USE & CARE MANUAL THIS PORTABLE AIR CONDITIONER IS EQUIPPED WITH A NEW INDUSTRY STANDARD POWER SUPPLY CORD WITH A TEST-RESET FUNCTION READ AND SAVE THESE INSTRUCTIONS PORTABLE AIR CONDITIONER ELECTRONIC CONTROL P/N 220250d396 SZ000373(En)-YaoKong(p1-5) 1 2004.11.
ROOM AIR CONDITIONER WARRANTY Your product is protected by this warranty Your appliance is warranted by Electrolux. Electrolux has authorized Frigidaire Consumer Services and their authorized servicers to perform service under this warranty. Electrolux authorizes no one else to change or add to any of these obligations under this warranty. Any obligations for service and parts under this warranty must be performed by Frigidaire Consumer Services or an authorized Frigidaire servicer.
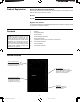
Product Registration Record Your Model and Serial Numbers Record in the space provided below the model and serial numbers. On all models, the serial plate is located on the outside of the cabinet. Model No. Serial No. Register Your Product The self-addressed PRODUCT REGISTRATION CARD should be filled in completely, signed and returned to the Frigidaire Company. Contents NOTE: This Owner’s Guide provides specific operating instructions for your model.
Important Safety Instructions Read all instructions before using this air conditioner. For Your Safety Do not store or use gasoline or other flammable vapors and liquids in the vicinity of this or any other appliance. Read product labels for flammability and other warnings. The power supply cord with this air conditioner contains a current detection device designed to reduce the risk of fire. Please refer to the section ‘Operation of Current Device’ for details.
To reduce the risk of fire, electric shock, or injury to persons, read the IMPORTANT SAFETY INSTRUCTIONS before operating this appliance. The power supply cord contains a current device that senses damage to the power cord. To test your power supply cord do the following: 1. Plug in the Air Conditioner. 2. The power supply cord will have TWO buttons on the plug head. Press the TEST button. You will notice a click as the RESET button pops out. 3. Press the RESET button.
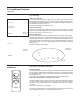
Air Conditioner Features CONTROL PANEL FAN SPEED SELECTION MODE SELECTION (NOTE: HEAT AVAILABLE ON SELECT MODELS) FAHRENHEIT / CELSIUS INDICATORS BUCKET FULL INDICATOR TEMP / TIMER DISPLAY POWER INDICATOR TEMPERATURE CHANGE BUTTONS REMOTE SIGNAL RECEIVER ON / OFF BUTTON TIMER BUTTONS Fig.3 REMOTE CONTROL MODE INDICATION FAN SELECTION TEMPERATURE CONTROL BUTTONS MODE SELECTOR TIMER BUTTONS FAN SPEED SELECTOR ON/OFF BUTTON RESET + LOCK PIN BUTTONS Fig.
Air Conditioner Features (continued) EXHAUSTING HOT AIR In the COOLING Mode the appliance must be placed close to a window or opening so that the warm exhaust air can be ducted outside. First position unit on a flat floor and make sure there's a minimum of 12" clearance around the unit, and is within the vicinity of a single circuit outlet.
Air Conditioner Features (continued) COOLING MODE: In this mode the exhaust adaptor hose MUST be used. 1. Press the MODE button until the “Cool” indicator lights. 2. Press the “ ” Temp buttons for desired setting. 3. Press the FAN button for desired fan speed. HEATING MODE: (on select models) In this mode you do not need to use the exhaust adaptor hose. 1. Press the MODE button until the “Heat” indicator lights. 2. Press the “ ” Temp buttons up or down for the desired heat setting. 3.
Air Conditioner Features (continued) In the Cool & Dry Modes, water will collect in the internal bucket and will need to be discharged. DRAINAGE: Water Pump Drainage: Remove the rubber cap from the spigot next to the power cord. Attach the rubber tubing supplied to the drainage spigot. Locate the open end either through the rubber grommet in the window slider kit so it can discharge out through the window, or in a suitable discharge drain. (Fig. 10) The pump will engage once the bucket is full.
Air Conditioner Features (continued) ADDITIONAL THINGS YOU SHOULD KNOW Now that you have mastered the operating procedure, here are more features in your control that you should become familiar with. • • • CARE & CLEANING The “Cool” circuit has an automatic 3 minute time delayed start if the unit is turned off and on quickly. This prevents overheating of the compressor and possible circuit breaker tripping. The fan will continue to run during this time.
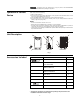
Avoid Service Checklist Before calling for service, review this list. It may save you time and expense. This list includes common occurrences that are not the result of defective workmanship or materials in this appliance. OCCURRENCE SOLUTION Air conditioner will not operate. Wall plug disconnected. Push plug firmly into wall outlet. Plug Current Device Tripped. Press the RESET button. House fuse blown or circuit breaker tripped. Replace fuse with time delay type or reset circuit breaker.