All about the Use & Care of your Refrigerator TA B L E O F C O N T E N T S Automatic Ice & Water Dispenser..........................13 Features at a Glance...............................................4 Changing the Filter...............................................15 Installation............................................................5 Normal Operating Sounds and Sights.....................16 Door Removal Instructions......................................7 Care and Cleaning................
Important Safety Instructions WARNING Please read all instructions before using this refrigerator. For your Safety • DO NOT store or use gasoline, or other flammable liquids in the vicinity of this or any other appliance. Read product labels for warnings regarding flammability and other hazards. • DO NOT operate the refrigerator in the presence of explosive fumes. • Avoid contact with any moving parts of automatic ice maker. • Remove all staples from the carton.
Important Safety Instructions Child Safety Destroy or recycle the carton, plastic bags, and any exterior wrapping material immediately after the refrigerator is unpacked. Children should never use these items to play. Cartons covered with rugs, bedspreads, plastic sheets or stretch wrap may become airtight chambers, and can quickly cause suffocation. Proper Disposal of your Refrigerator or Freezer Risk of child entrapment Child entrapment and suffocation are not problems of the past.
Features At A Glance Features may vary according to model ® SpillSafe Adjustable Shelf ® SpillSafe Adjustable Shelf 4
Installation This Use & Care Guide provides general operating instructions for your model. Use the refrigerator only as instructed in this Use & Care Guide. Before starting the refrigerator, follow these important first steps. Location • Choose a place that is near a grounded electrical outlet. Do Not use an extension cord or an adapter plug. • If possible, place the refrigerator out of direct sunlight and away from the range, dishwasher or other heat sources.
Installation Door Opening NOTE The refrigerator doors are designed to shut by themselves within a 20 degree opening. Your refrigerator should be positioned to allow easy access to a counter or table when removing food. For best use of drawers and freezer baskets, the refrigerator should be in a position where both the refrigerator and freezer doors can be fully opened.
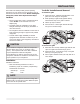
Door Removal Instructions Getting through narrow spaces If your refrigerator will not fit through an entrance area, you can reduce its size by removing the doors. Check first by measuring the entrance.
Door Removal Instructions To remove the freezer top hinge cover: 1 Remove the two screws from each cover over the top door hinges. 3 Detach the water tube from the connector located below the freezer door. The connector releases when you press its outer sleeve inward. 2 Lift hinge cover straight up and off. To remove the freezer door: Adjustable Hinge (some models) 1 Detach the multi-wire cable connector located above the top hinge. Grasp both sides of the connector firmly and pull apart.
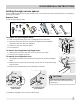
Connecting the Water Supply WARNING To avoid electric shock, which can cause death or severe personal injury, disconnect the refrigerator from electrical power before connecting a water supply line to the refrigerator. CAUTION To Avoid Property Damage: • Copper or Stainless Steel braided tubing is recommended for the water supply line. Water supply tubing made of ¼ inch plastic is not recommended to be used.
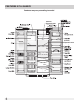
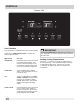
Controls Iceman Lite User Interface Your refrigerator is equipped with a user interface display. Touch an icon (Water/Cube/Crush) to activate the desired dispenser mode. IMPORTANT Pressing the power off icon does not turn off power to your refrigerator. You must unplug the power cord from the wall outlet. light on-off On / Off Setting Cooling Temperatures control lock Press and hold for three (3) seconds to activate and deactivate.
Controls LCD User Interface Your refrigerator is equipped with a user interface display. It is only necessary to touch the glass. There is no need to press with force. Touch an icon (Water/Cube/Crush) to activate the desired dispenser mode. light on-off On / Off control lock Press and hold for three (3) seconds to activate and deactivate. The Lock icon will be displayed in the LCD window. This restricts undesired changes to the refrigerator’s settings and prevents use of the ice and water dispenser.
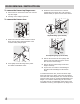
Storage Features CAUTION To avoid personal injury or property damage, handle tempered glass shelves carefully. Shelves may break suddenly if nicked, scratched, or exposed to sudden temperature change. See “Glass Shelves” in Care & Cleaning Chart. fresh produce. The fresh drawers feature humidity control which allows you to adjust the humidity within the drawer. This can extend the life of fresh vegetables that keep best in high humidity.
Automatic Ice & Water Dispenser Priming the Water Supply System Your refrigerator’s water supply system includes several tubing lines, an advanced water filter, a distribution valve bank, and a reserve tank to ensure ample supply to the ice and water dispenser at all times. This system needs to be completely filled with water when first connected to an external supply line. CAUTION For proper dispenser operation, recommended water supply pressure should fall between 30 psi and 100 psi.
Automatic Ice & Water Dispenser (Continued) Ice Maker/Dispenser Tips • Ice cubes stored too long may develop an odd flavor. Empty the ice container as explained below. • Occasionally shake the ice container to keep ice separated. • If your refrigerator is not connected to a water supply or the water supply is turned off, turn off the ice maker by pressing the On/Off switch. • If you need a large quantity of ice at one time, it is best to get cubes directly from the ice container.
CHANGING THE FILTER Locating the Filters Your refrigerator is equipped with water filtering system. The water filter system filters all dispensed drinking water, as well as the water used to produce ice. Water Filter The water filter is located at the top right side of the fresh food compartment. Replacing the Water Filter In general, you should change the water filter every six months to ensure the highest possible water quality.
Normal Operating Sounds and sights Understanding the Sounds you may Hear Your new, high-efficiency refrigerator may introduce unfamiliar sounds. These sounds normally indicate your refrigerator is operating correctly. Some surfaces on floors, walls, and kitchen cabinets may make these sounds more noticeable. Following is a list of major components in your refrigerator and the sounds they can cause: A Evaporator Refrigerant through the evaporator may create a boiling or gurgling sound.
Care & Cleaning Protecting your investment Keeping your refrigerator clean maintains appearance and prevents odor build-up. Wipe up any spills immediately and clean the freezer and fresh food compartments at least twice a year. When cleaning, take the following precautions: • Never use CHLORIDE or cleaners with bleach to clean stainless steel. • Do not wash any removable parts in a dishwasher. • Always unplug the electrical power cord from the wall outlet before cleaning. • Remove adhesive labels by hand.
Before You Call 1-800-944-9044 (United States) Visit our web site at www.frigidaire.com. 1-800-265-8352 (Canada) PROBLEM CAUSE CORRECTION AUTOMATIC ICE MAKER Ice maker is not making any ice. • Ice maker wire signal arm is in the “up” or OFF position. Ice maker power switch is Off. Ice maker has small cube caught in mechanism. Saddle valve on cold water pipe is clogged or restricted by foreign material. • • Ice maker is producing less ice than you expect.
Before You Call (continued) PROBLEM CAUSE CORRECTION RUNNING OF REFRIGERATOR Compressor does not run. • • • • • Refrigerator runs too much or too long. • • • • Set freezer control. • Plug at electrical outlet is disconnected. House fuse blown or tripped circuit breaker. Power outage. • This is normal for a fully automatic defrost refrigerator. The defrost cycle occurs periodically, lasting about 30 minutes. Ensure plug is tightly pushed into outlet. • • Room or outside weather is • hot.
major appliance warranty Your appliance is covered by a one year limited warranty. For one year from your original date of purchase, Electrolux will pay all costs for repairing or replacing any parts of this appliance that prove to be defective in materials or workmanship when such appliance is installed, used and maintained in accordance with the provided instructions. Exclusions This warranty does not cover the following: 1.