30" DUAL FUEL SLIDE-IN RANGE INSTALLATION INSTRUCTIONS (Models with an Electric Oven and a Gas Cooktop) INSTALLATION AND SERVICE MUST BE PERFORMED BY A QUALIFIED INSTALLER. IMPORTANT: SAVE FOR LOCAL ELECTRICAL INSPECTOR'S USE. READ AND SAVE THESE INSTRUCTIONS FOR FUTURE REFERENCE. If the information in this manual is not followed exactly, a fire or explosion may result causing property damage, personal injury or death.
30" DUAL FUEL SLIDE-IN RANGE INSTALLATION INSTRUCTIONS (Models with an Electric Oven and a Gas Cooktop) NOTE: 1. Do not pinch the power supply cord or the flexible gas conduit between the range and the wall. 2. Do not seal the range to the side cabinets. 3. 24" (61 cm) minimum clearance between the cooktop and the bottom of the cabinet when the bottom of wood or metal cabinet is protected by not less than ¼" (0.64 cm) flame retardant millboard covered with not less than No. 28 MSG sheet metal, 0.015"(0.
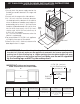
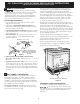
0" DUAL FUEL SLIDE-IN RANGE INSTALLATION INSTRUCTIONS (Models with an Electric Oven and a Gas Cooktop) To avoid breakage: Do NOT handle or manipulate the unit by the cooktop. 1 2 3 4 5 6 8 7 The counter-top around the cut-out should be flat and leveled (see hatched area on illustration 1). Before installing the unit, measure the heights of the two (2) cabinet sides (H1-4), front and back (see illustration 1) from the floor to the top of the counter. 1 ½" Max. Level the range using the Shave (3.
30" DUAL FUEL SLIDE-IN RANGE INSTALLATION INSTRUCTIONS (Models with an Electric Oven and a Gas Cooktop) Standard for Mobile Home Construction and Safety, title 24, HUD (part 280)] or when such standard is not applicable, the Standard for Manufactured Home Installation 1982 (Manufactured Home Sites, Communities and Setups), ANSI Z225.1/NFPA 501Alatest edition, or with local codes in United States and with CAN/CSA-Z240 MH in Canada.
30" DUAL FUEL SLIDE-IN RANGE INSTALLATION INSTRUCTIONS (Models with an Electric Oven and a Gas Cooktop) 1. Factory Connected Power Supply Cord (Canada only) Electrical Shock Hazard This range is equipped with a factory-connected power cord (see Figure 1). Cord must be connected to a grounded 120/240 volt or 120/208 volt range outlet. If no outlet is available, have one installed by a qualified electrician. • Electrical ground is required on this appliance.
30" DUAL FUEL SLIDE-IN RANGE INSTALLATION INSTRUCTIONS (Models with an Electric Oven and a Gas Cooktop) 4. Electrical Connection to the Range Four Conductor Wire Connection to Range Where local codes does NOT permit connection of the frame grounding conductor to the neutral wire of the copper power supply cord (see Figure 4): 1.
30" DUAL FUEL SLIDE-IN RANGE INSTALLATION INSTRUCTIONS (Models with an Electric Oven and a Gas Cooktop) Direct Electrical Connection to the Circuit Breaker, Fuse Box or Junction Box Where local codes DO NOT permit connecting the appliance-grounding conductor to the neutral (white) wire, or if connecting to 4-wire electrical system (see Figure 6): 1. Be sure that no power is supplied on the cable from residence. 2. Remove the grounding strap from the terminal block and from the appliance frame. 3.
30" DUAL FUEL SLIDE-IN RANGE INSTALLATION INSTRUCTIONS (Models with an Electric Oven and a Gas Cooktop) 4. Cabinet Construction The inlet pressure to the regulator must be at least 1" (.25 kPa) greater than the regulator manifold pressure setting. The regulator is set for 4"(10,16 cm) water column (1.0 kPa) Natural gas manifold pressure; the inlet pressure must be at least 5"(12.60 cm) water column (1.25 kPa) Natural gas. For LP/Propane gas, the regulator must be set for 10"(25,4 cm) water column (2.
30" DUAL FUEL SLIDE-IN RANGE INSTALLATION INSTRUCTIONS (Models with an Electric Oven and a Gas Cooktop) Manual Shutoff Valve On Off Flare Union Nipple GAS FLOW Flexible Connector Once regulator is in place, open the shutoff valve in the gas supply line. Wait a few minutes for gas to move through the gas line. Pressure Regulator Flare Union Leak testing of the appliance shall be conducted according to the manufacturer's instructions. Nipple Check for leaks.
30" DUAL FUEL SLIDE-IN RANGE INSTALLATION INSTRUCTIONS (Models with an Electric Oven and a Gas Cooktop) 7. Moving the Appliance for Servicing and Cleaning Turn off the range line fuse or circuit breakers at the main power source, and turn off the manual gas shut-off valve. Make sure the range is cold. Remove the service drawer (warmer drawer on some models) and open the oven door. Lift the range at the front and slide it out of the cut-out opening without creating undue strain on the flexible gas conduit.
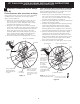
30" DUAL FUEL SLIDE-IN RANGE INSTALLATION INSTRUCTIONS (Models with an Electric Oven and a Gas Cooktop) 9. Leveling the Range - 4. Adjust the "LOW" Setting of Surface Burner Valves (see Figure 13) a. Push in and turn each control to LITE until burner ignites. b. Quickly turn knob to LOWEST POSITION. c. If burner goes out, readjust valve as follows: Reset control to OFF. Remove the surface burner control knob, insert a thin-bladed screw driver into the hollow valve stem and engage the slotted screw inside.
30" DUAL FUEL SLIDE-IN RANGE INSTALLATION INSTRUCTIONS (Models with an Electric Oven and a Gas Cooktop) When All Hookups are Complete 6. Operation of Oven Elements The oven is equipped with an electronic oven control. Each of the functions has been factory checked before shipping. However, it is suggested that you verify the operation of the electronic oven controls once more. Refer to the Electronic Oven Control Guide for operation.
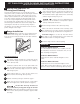
30" DUAL FUEL SLIDE-IN RANGE INSTALLATION INSTRUCTIONS (Models with an Electric Oven and a Gas Cooktop) 1. Unfold paper template and place it flat on the floor with the back and side edges positioned exactly where the back and sides of range will be located when installed. (Use the diagram below to locate brackets if template is not available (Figure 15)). 2. Mark on the floor the location of the 4 mounting holes shown on the template. For easier installation, 3/16" (0.
INSTRUCCIONES DE INSTALACIÓN PARA LA ESTUFA DE FUEL DUAL DE 30" (Para Modelos con un Horno Eléctrico y una Estufa a Gas) LA INSTALACIÓN Y EL SERVICIO DEBEN SER EFECTUADOS POR UN INSTALADOR CALIFICADO. IMPORTANTE: GUARDE ESTAS INSTRUCCIONES PARA USO DEL INSPECTOR LOCAL DE ELECTRICIDAD. LEA Y GUARDE ESTAS INSTRUCCIONES PARA REFERENCIA FUTURA.
INSTRUCCIONES DE INSTALACIÓN PARA LA ESTUFA DE FUEL DUAL DE 30" (Para Modelos con un Horno Eléctrico y una Estufa a Gas) NOTAS: 1. No pellizque el cordón eléctrico o el conducto flexible de gas entre la estufa y la pared. 2. No selle la estufa a los armarios de lado. 3. Un espacio mínimo de 24" (61 cm) entre la superficie de la estufa y el fondo del armario cuando el fondo del armario de madera o metal está protegido por no menos de 1/4" (0.
INSTRUCCIONES DE INSTALACIÓN PARA LA ESTUFA DE FUEL DUAL DE 30" (Para Modelos con un Horno Eléctrico y una Estufa a Gas) Para evitar fractura de la unidad: NO manipule la unidad sosteniendo la cubierta de vidrio. 1 La cubierta alrededor del espacio donde usted instalara su unidad debe de estar plana y nivelada (Vea el área sombreada en la figura 1).
INSTRUCCIONES DE INSTALACIÓN PARA LA ESTUFA DE FUEL DUAL DE 30" (Para Modelos con un Horno Eléctrico y una Estufa a Gas) Notas importantes para el Instalador 1. Lea todas las instrucciones contenidas en este manual antes de instalar la estufa. 2. Saque todo el material usado en el embalaje del compartimiento del horno antes de conectar el suministro eléctrico o de gas a la estufa. 3. Observe todos los códigos y reglamentos pertinentes. 4. Deje estas instrucciones con el comprador. 5.
INSTRUCCIONES DE INSTALACIÓN PARA LA ESTUFA DE FUEL DUAL DE 30" (Para Modelos con un Horno Eléctrico y una Estufa a Gas) 1. Cordón de fuente de energía conectado de fabrica (Canadá solamente) Peligro de choque eléctrico • La conexión a tierra es requerida para este electrodoméstico. • No conecte al suministro eléctrico hasta que el electrodoméstico este conectado a tierra de manera permanente. • Desconecte el suministro eléctrico hacia la caja de empalmes antes de hacer la conexión eléctrica.
INSTRUCCIONES DE INSTALACIÓN PARA LA ESTUFA DE FUEL DUAL DE 30" (Para Modelos con un Horno Eléctrico y una Estufa a Gas) Conexión del cable de cuatro conductores a la cocina. 4. Conexión eléctrica a la cocina (Estados Unidos) 1. Retire los 3 tornillos de la parte baja de la cubierta del cable trasero, luego levante la cubierta hacia arriba para tener acceso (cubierta de acceso) al bloque de conexión del borne terminal (vea figura 2). 2.
INSTRUCCIONES DE INSTALACIÓN PARA LA ESTUFA DE FUEL DUAL DE 30" (Para Modelos con un Horno Eléctrico y una Estufa a Gas) Conexión eléctrica directa al cortacircuito, a la caja de fusibles o la caja de empalmes Donde los códigos locales NO permitan conectar el conductor de puesta a tierra del electrodoméstico al neutral (blanco), o si está conectado con un sistema a 4 alambres (vea figura 6): 1. Desconecte el suministro eléctrico. 2.
INSTRUCCIONES DE INSTALACIÓN PARA LA ESTUFA DE FUEL DUAL DE 30" (Para Modelos con un Horno Eléctrico y una Estufa a Gas) 4. Construcción del armario 5. Instalación de la alimentación de gas Para eliminar el riesgo de quemaduras o de fuego tratando de alcanzar algo por encima de las zonas calientes, evite de colocar artículos sobre la cocina. Si cree necesitar este espacio, el riesgo puede disminuir si instala un sombrerete que proteja horizontalmente un mínimo de 5" (12.7cm) sobre la base del armario.
INSTRUCCIONES DE INSTALACIÓN PARA LA ESTUFA DE FUEL DUAL DE 30" (Para Modelos con un Horno Eléctrico y una Estufa a Gas) Valvula de cierre Unión manual FLUJO DEL GAS Una vez que regulador está en su lugar, abra la válvula en la línea del suministro de gas. Espere algunos minutos para que el gas pueda moverse a través de la línea de gas. Regulador Unión de presión Para verificar si hay fugas en el electrodoméstico se debe de seguir las instrucciones del fabricante.
INSTRUCCIONES DE INSTALACIÓN PARA LA ESTUFA DE FUEL DUAL DE 30" (Para Modelos con un Horno Eléctrico y una Estufa a Gas) 7. La mudanza del aparato para reparaciones o limpieza Apague la corriente eléctrica a la estufa a la fuente de poder principal, y apague la válvula de cierre manual de gas. Asegúrese de que la estufa esté fresca. Quite el cajón de servicio (el cajón calentador en algunos modelos) y abre la puerta del horno.
INSTRUCCIONES DE INSTALACIÓN PARA LA ESTUFA DE FUEL DUAL DE 30" (Para Modelos con un Horno Eléctrico y una Estufa a Gas) 9. Nivelación de la estufa 1. Empuje y gire un botón control del quemador superior hasta la posición LITE (encender). Se podría oír el encendedor haciendo chispas. 2. El quemador se deberá encender en cuatro (4) segundos para un funcionamiento normal, después de que el aire haya sido purgado de la tubería de suministro de gas. Controle visualmente que el quemador se haya encendido. 3.
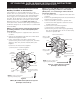
INSTRUCCIONES DE INSTALACIÓN PARA LA ESTUFA DE FUEL DUAL DE 30" (Para Modelos con un Horno Eléctrico y una Estufa a Gas) Después de Terminar la Instalación e. El tamaño de la flama de la porción posterior del quemador puente puede aumentarse o disminuirse dándole vuelta al tornillo A. Utilice el tornillo B para ajustar el tamaño de la llama de la porción central del quemador puente. Dé vuelta en sentido opuesto de las manecillas del reloj para aumentar el tamaño de la llama.
INSTRUCCIONES DE INSTALACIÓN PARA LA ESTUFA DE FUEL DUAL DE 30" (Para Modelos con un Horno Eléctrico y una Estufa a Gas) 11. Instrucciones de instalación de la fijación anti-inclinación 1. Desdoble la plantilla de papel y colóquela plana en el piso con los bordes laterales y el trasero colocados exactamente donde la parte trasera y los lados de la estufa serán colocados cuando sea instalada. (Use el diagrama siguiente para ubicar los soportes si no se dispone de la plantilla). 2.
INSTRUCTIONS D'INSTALLATION POUR CUISINIÈRE SUR PIEDS DE 30" À ALIMENTATION MIXTE (Modèles avec four électrique et plaque de cuisson à gaz) UN INSTALLATEUR QUALIFIÉ DOIT EFFECTUER L’INSTALLATION ET LE SERVICE IMPORTANT: CONSERVEZ CES INSTRUCTIONS POUR LES INSPECTEURS LOCAUX. LISEZ CES INSTRUCTIONS ET CONSERVEZ‑LES POUR RÉFÉRENCES ULTÉRIEURES.
INSTRUCTIONS D'INSTALLATION POUR CUISINIÈRE SUR PIEDS DE 30" À ALIMENTATION MIXTE (Modèles avec four électrique et plaque de cuisson à gaz) NOTE: 1. Ne coincez pas le cordon d'alimentation ou le conduit de gaz entre le mur et l'appareil. 2. Ne scellez pas l'appareil aux armoires latérales. 3.
INSTRUCTIONS D'INSTALLATION POUR CUISINIÈRE SUR PIEDS DE 30" À ALIMENTATION MIXTE (Modèles avec four électrique et plaque de cuisson à gaz) Pour éviter les bris: NE manipulez PAS l'appareil par la table de cuisson. 1 2 3 Le comptoir autour de l'ouverture de découpage doit être plat et à niveau (voir les parties hachurées à la figure 1). Avant d'installer l'appareil, mesurez la hauteur des deux (2) côtés du comptoir (H1-4), avant et arrière (voir figure 1) du plancher jusqu'au dessus du comptoir.
INSTRUCTIONS D'INSTALLATION POUR CUISINIÈRE SUR PIEDS DE 30" À ALIMENTATION MIXTE (Modèles avec four électrique et plaque de cuisson à gaz) • Assurez‑vous que la tapisserie à proximité de la cuisinière peut résister à la chaleur générée par la cuisinière. • Avant d’installer la cuisinière à un endroit recouvert de linoléum ou de tout autre couvre‑plancher synthétique, assurez‑vous que celui‑ci peut résister à un minimum de 90°F (32.
INSTRUCTIONS D'INSTALLATION POUR CUISINIÈRE SUR PIEDS DE 30" À ALIMENTATION MIXTE (Modèles avec four électrique et plaque de cuisson à gaz) 1. Modèles avec cordon d'alimentation branché en usine (Canada seulement) Risque de choc électrique • La mise à la terre de cet appareil est obligatoire. • Ne branchez pas l'appareil au circuit électrique avant qu'il soit mis à la terre correctement, en permanence. • Interrompez le courant dans la boîte de jonction avant d'effectuer la connexion électrique.
INSTRUCTIONS D'INSTALLATION POUR CUISINIÈRE SUR PIEDS DE 30" À ALIMENTATION MIXTE (Modèles avec four électrique et plaque de cuisson à gaz) 3. Connexions électriques à la Pour une connexion à un câble d'alimentation à quatre conducteurs (maisons mobiles) (États-Unis) cuisinière (U.S.A.
INSTRUCTIONS D'INSTALLATION POUR CUISINIÈRE SUR PIEDS DE 30" À ALIMENTATION MIXTE (Modèles avec four électrique et plaque de cuisson à gaz) Connexions électriques au système électrique de la résidence Aux endroits où les codes locaux l'interdisent, ou si vous raccordez à un système électrique à quatre conducteurs, ne raccordez pas le conducteur de mise à la terre du châssis au fil neutre (blanc) de la boîte de jonction (voir figure 6): 1. Débranchez l'alimentation électrique. 2.
INSTRUCTIONS D'INSTALLATION POUR CUISINIÈRE SUR PIEDS DE 30" À ALIMENTATION MIXTE (Modèles avec four électrique et plaque de cuisson à gaz) 4. Construction de l’armoire 4.1 5. Alimentation en gaz – Installation Cet appareil a été conçu en usine pour fonctionner au gaz naturel avec une pression d’admission de 4"(10,16 cm) de colonne d’eau (1.0 kpa). Un régulateur de pression convertible est branché avec la rampe à gaz de la cuisinière, et doit rester connecté en série avec le tuyau d’alimentation.
INSTRUCTIONS D'INSTALLATION POUR CUISINIÈRE SUR PIEDS DE 30" À ALIMENTATION MIXTE (Modèles avec four électrique et plaque de cuisson à gaz) Robinet Adaptateur Adapteur d’arrêt de raccord manuel évasé DÉBIT DU GAZ Ouvrez le robinet de la ligne d’alimentation en gaz. Attendez quelques minutes pour permettre au gas de circuler à travers la canalisation.
INSTRUCTIONS D'INSTALLATION POUR CUISINIÈRE SUR PIEDS DE 30" À ALIMENTATION MIXTE (Modèles avec four électrique et plaque de cuisson à gaz) 7. Déplacement de l'appareil en vue d'en faire le service ou pour faire du nettoyage Installez le support anti-bascule maintenant avant de placer l'appareil à sa 6 position finale. Suivez les instructions à la dernière page ou sur le gabarit fourni avec le support antibascule de l'appareil.
INSTRUCTIONS D'INSTALLATION POUR CUISINIÈRE SUR PIEDS DE 30" À ALIMENTATION MIXTE (Modèles avec four électrique et plaque de cuisson à gaz) 9. Mise à niveau de la cuisinière 1. Appuyez sur le bouton de commande d’un brûleur de surface et tournez‑le à la position «LITE». Vous entendrez les étincelles de l’allumeur électrique qui allume le brûleur. b. Le brûleur de surface doit s’allumer lorsque le gaz est disponible au brûleur supérieur.
INSTRUCTIONS D'INSTALLATION POUR CUISINIÈRE SUR PIEDS DE 30" À ALIMENTATION MIXTE (Modèles avec four électrique et plaque de cuisson à gaz) Lorsque tous les raccords sont terminés d. Enlevez le bouton de commande et réglez le robinet comme indiqué à l’étape e. e. La dimension de la flamme de la portion arrière du brûleur «Pont» peut être augmentée ou diminuée en tournant la vis A. Utilisez la vis B pour ajuster la dimension de la flamme de la portion centrale du brûleur «Pont».
INSTRUCTIONS D'INSTALLATION POUR CUISINIÈRE SUR PIEDS DE 30" À ALIMENTATION MIXTE (Modèles avec four électrique et plaque de cuisson à gaz) 1. Dépliez le gabarit de papier et placez‑le à plat sur le plancher, l’endos et les extrémités des côtés exactement à l’endroit où l’arrière et les côtés de la cuisinière seront placés lors de l’installation (utilisez le diagramme ci‑dessous pour localiser les supports anti‑bascules si le gabarit de papier n’est pas disponible). 2.
INSTRUCTIONS D'INSTALLATION POUR CUISINIÈRE SUR PIEDS DE 30" À ALIMENTATION MIXTE WIRING DIAGRAM - Diagrama de cables- SCHÉMA DE CÂBLAGE (Modèles avec four électrique et plaque de cuisson à gaz) 40