Welcome & Congratulations Congratulations on your purchase of a new range! At Electrolux Home Products, we are very proud of our product and are completely committed to providing you with the best service possible. Your satisfaction is our number one priority. We know you’ll enjoy your new range and Thank You for choosing our product. We hope you consider us for future purchases.
Important Safety Instructions Read all instructions before using this appliance. Save these instructions for future reference. This manual contains important safety symbols and instructions. Please pay attention to these symbols and follow all instructions given. This symbol will help alert you to situations that may cause serious bodily harm, death or property damage. This symbol will help alert you to situations that may cause bodily injury or property damage.
Important Safety Instructions IMPORTANT INSTRUCTIONS FOR USING YOUR COOKTOP IMPORTANT INSTRUCTIONS FOR USING YOUR OVEN • Know which knob controls each surface heating unit. Place a pan of food on the unit before turning it on, and turn the unit off before removing the pan. • Use Care When Opening Oven Door or Warmer Drawer (if equipped)—Stand to the side of the range when opening the door of a hot oven. Let hot air or steam escape before you remove or replace food in the oven.
Before Setting Oven Controls 6
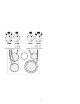
Setting Surface Controls The Electronic Surface Element Control (ESEC) The Electronic Surface Element Control (“ESEC”) feature includes 4 digital display windows. The ESEC feature provides a numeric digital setting for 4 of the radiant surface element positions on the cooktop. These settings work the same way as normal knob setting indicators work except the settings are displayed in digital windows (Figs. 1 thru 4).
Setting Surface Controls ESEC Hot Element Indicator Message (HE) After using any of the single, dual or Bridge radiant element positions the cooktop will become very hot. Even after turning the control knob to OFF, the cooktop will remain hot for some time. The ESEC control monitors the temperature of the cooktop and displays the message “HE” (hot element) warning when the cooktop is still too hot to touch (See Fig.1).
Setting Surface Controls The Dual Radiant Elements (all models) The cooktop is equipped with one or more dual radiant surface elements. Symbols on the control panel (See Fig. 4) are used to indicate which coil of the dual radiant element will heat. The symbol shown in Fig. 1 indicates that only the inner coil will heat. The symbol shown in Fig. 4 indicates that both inner and outer coils will heat . You may switch from either coil setting at any time during cooking. To Operate the Dual Element(s): 1.
Setting Surface Controls To Operate the Bridge Element (some models): Fig. 1 Fig. 2 Fig. 5 Fig. 3 Fig. 4 1. Place correctly sized cookware on the Bridge surface element. 2. Push in and turn the control knob counterclockwise (See Figs. 1 & 2) to heat the portion of the Bridge element for normal shaped cookware or clockwise (See Figs. 3 & 4) for larger or rectangular shaped cookware. 3. Use the ESEC digital display window for the desired setting.
Setting Surface Controls Operating the Warming Zone (some models) The purpose of the Warming Zone is to keep hot cooked foods at serving temperature. Use the Warming Zone to keep cooked foods hot such as; vegetables, gravies, casseroles, soups, stews, breads, pastries and oven-safe dinner plates. Always start with hot food. It is not recommended to heat cold food on the Warming Zone. All food placed on the Warming Zone should be covered with a lid or aluminum foil to maintain quality.
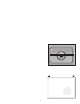
Surface Cooking Using proper cookware The size and type of cookware used will influence the setting needed for best cooking results. Cookware should have flat bottoms that make good contact with the entire surface heating element (See Fig. 2). Check for flatness by rotating a ruler across the bottom of the cookware (See Fig. 1). Be sure to follow the recommendations for using proper cookware as illustrated.
Setting the Clock The CLOCK pad is used to set the clock. The clock may be set for 12 or 24 hour time of day operation. The clock has been preset at the factory for the 12 hour operation. When the range is first plugged in, or when the power supply to the range has been interrupted, the timer in the display will flash with power failure "PF" (See Fig. 1). To set the clock (example below for 1:30): 1. Press . "CLO" will appear in the display (Fig. 2). 2. Press pads to set the time of day to 1:30 (Fig.
Setting Oven Controls Setting Continuous Bake or 12 Hour Energy Saving The TIMER ON/OFF and CLEAN pads control the Continuous Bake or 12 Hour Energy Saving features. The oven control has a factory preset built-in 12 Hour Energy Saving feature that will shut off the oven if the oven control is left on for more than 11 hours and 59 minutes. The oven can be programmed to override this feature for Continuous Baking.
Setting Oven Lockout Feature The pad controls the Oven Lockout feature. The Oven Lockout feature automatically locks the oven door, prevents the Warming Drawer and most oven controls from being turned ON. It does not disable the clock, Kitchen Timer or the interior oven light. for 3 seconds Fig. 1 for 3 seconds Fig.
Setting Silent Control Operation The START TIME and 18
To set the Bake Temperature to 350°F: 1. Arrange interior oven racks and place food in oven. 2. Press , "- - - °" will appear in the display (Fig. 1). Fig. 1 3. Press Fig. 2 Fig. 3 Fig. 4 Fig. 5 Fig.
Setting Oven Controls Setting Timed Bake The BAKE and BAKE TIME pads control the Timed Bake feature. The automatic timer of the Timed Bake feature will turn the oven OFF after cooking for the desired amount of time you selected. INSTRUCTIONS To program the oven to begin baking immediately and to shut off automatically: (example below to bake at 350°F for 50 minutes): 1. Be sure the clock is set for the correct time of day. 2. Arrange interior oven rack(s) and place the food in the oven. 3.
Setting Delayed Timed Bake The BAKE , BAKE TIME and START TIME pads control the Delayed Timed Bake feature. The automatic timer of the Delayed Timed Bake will turn the oven ON and OFF at the time you select in advance. 1. Be sure that the clock is set with the correct time of day. 2. Arrange interior oven rack(s) and place the food in the oven. 3. Press 4. Press . "- - -°" will appear in the display (Fig. 1). (Fig. 2). "BAKE" will flash and "350°" will appear in the display. Fig. 2 5. Press .
Setting Oven Controls Setting Broil The pad controls the Broil feature. When broiling, heat radiates downward from the oven broiler for even coverage. The Broil feature is preset to start broiling at 550°F however, the Broil feature temperature may be set at any temperature between 400°F and 550°F. For optimum browning results when broiling, preheat the broil element for 3-4 minutes. Should an oven fire occur, leave the oven door closed and turn the oven OFF.
Setting Oven Controls To set the oven for Convection Bake and temperature to 350°F: 1. Arrange interior oven racks and place food in oven (See Fig. 1). 2. Press . "CONV BAKE" will flash and "- - -°" will appear in the display (Fig. 2). 3. Press . "CONV BAKE" and "350°" will appear in the display (See Fig. 3). 4. Press . "CONV BAKE" and the oven temperture adjustment will appear in the display (for this example it is 325°F). A beep will sound once the adjusted oven temperature is reached.
Setting Oven Controls Setting Convection Roast The CONV ROAST pad is designed to give optimum cooking performance for this feature. The Convection Roast pad combines a cook cycle with the convection fan and element to roast meats and poultry. Preheating is not necessary for meats and poultry. Heated air circulates around the food from all sides, sealing in juices and flavors. Foods are crispy brown on the outside while staying moist on the inside.
Setting Oven Controls To set the Convection Convert Feature The CONV CONVERT pad is used to automatically convert a standard baking recipe for convection baking. When set properly, this feature is designed to display the actual converted (reduced) temperature in display. Convection Convert may ONLY be used with a Bake, Timed Bake or a Delayed Timed Bake setting.
Using the Favorite Settings Feature The FAVORITE SETTING pad is used to record and recall your favorite recipe settings. This feature may store and recall from 1 to 3 different settings. The Favorite Setting feature may be used with Bake or a Timed Bake. This feature will not work with any other function including a Delayed Timed Bake setting. To Program the Oven to record a recipe setting and begin baking (sample shown is for bake at 350°F): 1. Place the food in the oven. 2. Press .
Setting the Sabbath Feature (for use on the Jewish Sabbath & Holidays) The BAKE TIME and used with the START TIME pads are used to set the Sabbath feature. The Sabbath feature can only be pad. The oven temperature may be set higher or lower after setting the Sabbath feature (the oven temperature adjustment feature should be used only during Jewish Holidays), however the display will not visibly change and no audible tones will be provided when a change occurs.
Setting Oven Controls Setting the Sabbath Feature (cont’d) It is recommended that any oven temperature change with the Sabbath feature activated be followed with 2 presses of the START pad. This will insure the oven remains ON even if the attempt to set the oven temperature was lower or higher than the oven control can accept. If the oven temperature is set incorrectly, the oven temperature will default to 170°F or 550°F. Try to set the desired oven temperature again.
Bake-n-Warm™ Double Oven Dual Features of the Bake-n-Warm™ Double Oven The Bake-n-Warm™ Double Oven is designed to provide two unique food preparation features. The features provide a Mini Oven and a Warmer Drawer using the same lower oven cavity, drawer and control. The Mini Oven feature is ideal for cooking foods such as pizza, casseroles, baked potatoes and frozen convenience foods. The purpose of the Warmer Drawer feature is to keep hot cooked foods at serving temperature. Always start with hot food.
Bake-n-Warm™ Double Oven Bake-n-Warm™ Double Oven Light Operation (some models): The Bake-n-Warm™ Double Oven light operates with the upper oven light and automatically turns ON when the upper oven door is opened. If equipped, the Bake-n-Warm™ Double Oven light may also be manually operated by pressing the pad. To Remove the Bake-nWarm™ Double Oven Drawer & Replace the Oven Light: 1. Before drawer removal, be sure to turn OFF the Bake-n-Warm™ Double Oven and let the drawer area cool completely. 2.
Self-Cleaning During the Self-Cleaning cycle, the outside of the range can become very hot to the touch. DO NOT leave small children unattended near the appliance. The health of some birds is extremely sensitive to the fumes given off during the Self-Cleaning cycle of any range. Move birds to another wellventilated room. DO NOT line the oven walls, racks, bottom or any other part of the range with aluminum foil.
The SPEED CLEAN , CLEAN & MAXX CLEAN Fig. 1 Fig. 2 Fig. 3 Fig. 4 Fig. 5 Fig.
Self-Cleaning INSTRUCTIONS PRESS DISPLAY When the Self-Clean cycle is done: 1. The time of day,"DOOR LOCKED" and "CLEAN" icon will remain in the display. 2. Once the oven has cooled down for approximately 1 HOUR, and the "DOOR LOCKED" icon is no longer displayed, the oven door can then be opened. Stopping or Interrupting a Self-Cleaning cycle: If it becomes necessary to stop or interrupt a Self-Cleaning cycle due to excessive smoke or fire in the oven: 1. Press . 2.
The temperature in the oven has been pre-set at the factory. When first using the oven, be sure to follow recipe times and temperatures. If you think the oven is too hot or too cool, the temperature in the oven can be adjusted. Before adjusting, test a recipe by using a temperature setting that is higher or lower than the recommended temperature. The baking results should help you to decide how much of an adjustment is needed.
General Care & Cleaning (Cleaning Table) Surfaces How to Clean Glass, Painted Plastic Body Parts & Control Knobs For general cleaning, use a soft cloth, clean with mild dish detergent & water or a 50/50 solution of vinegar & water. Follow by rinsing the area with clean water; dry & polish with a soft cloth. Glass cleaners may be used if sprayed on a soft cloth 1st. DO NOT spray liquids directly on the control pad and display areas.
General Care & Cleaning Cooktop Cleaning & Maintenance Consistent and proper cleaning is essential to maintaining your ceramic glass cooktop. Prior to using your cooktop for the first time, apply the recommended cooktop cleaning creme to the ceramic surface (visit www.frigidaire.com for replacment cleaner). Buff with a non-abrasive cloth or no-scratch cleaning pad. This will make cleaning easier when soiled from cooking.
Do not use the following on the ceramic glass cooktop: • Do not use abrasive cleaners and scouring pads, such as metal and some nylon pads. They may scratch the cooktop, making it more difficult to clean. • Do not use harsh cleaners, such as chlorine bleach, ammonia or oven cleaners, as they may etch or discolor the cooktop. • Do not use dirty sponges, cloths or paper towels, as they can leave soil or lint on the cooktop which can burn and cause discoloration.
Before You Call Solutions to Common Problems Before you call for service, review the following list. It may save you time & expense. The list includes common occurrences (shown in bold) that are not the result of defective workmanship or materials in this appliance. The possible corrections to these problems are provided with the problem listed: Oven smokes excessively during broiling - (1) Control(s) not set properly. Follow Broil instructions under Setting Oven Range is not level - (1) Poor installation.
Major Appliance Warranty Information Your appliance is covered by a one year limited warranty. For one year from your original date of purchase, Electrolux will pay all costs for repairing or replacing any parts of this appliance that prove to be defective in materials or workmanship when such appliance is installed, used and maintained in accordance with the provided instructions. Exclusions This warranty does not cover the following: 1.